request

HTTP协议:

1. 请求消息:客户端发送给服务器端的数据
    * 数据格式:
        1. 请求行
        2. 请求头
        3. 请求空行
        4. 请求体
2. 响应消息:服务器端发送给客户端的数据
    * 数据格式:
        1. 响应行
            1. 组成:协议/版本 响应状态码 状态码描述
            2. 响应状态码:服务器告诉客户端浏览器本次请求和响应的一个状态。
                1. 状态码都是3位数字 
                2. 分类:
                    1. 1xx:服务器就收客户端消息,但没有接受完成,等待一段时间后,发送1xx多状态码
                    2. 2xx:成功。代表:200
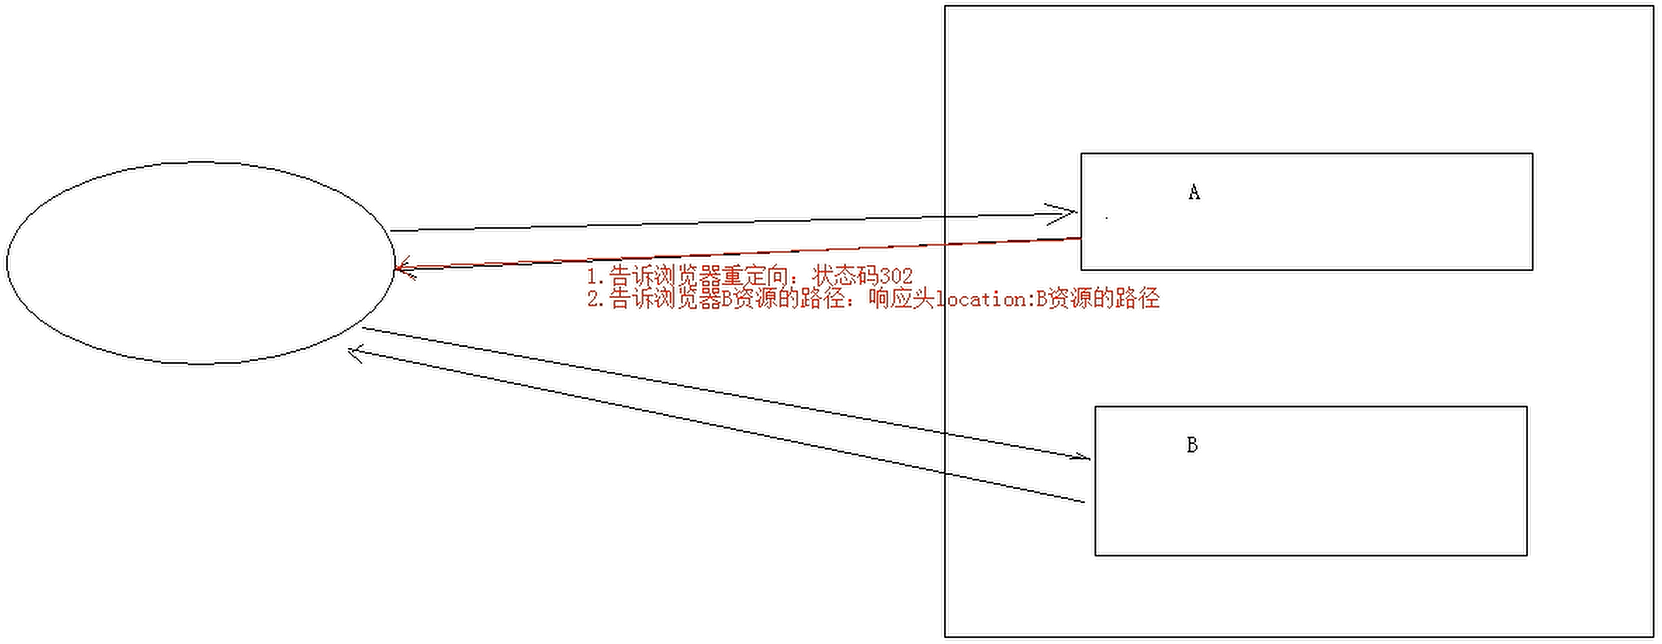
                    3. 3xx:重定向。代表:302(重定向),304(访问缓存)
                    4. 4xx:客户端错误。
                        * 代表:
                            * 404(请求路径没有对应的资源) 
                            * 405:请求方式没有对应的doXxx方法
                    5. 5xx:服务器端错误。代表:500(服务器内部出现异常)
        2. 响应头:
            1. 格式:头名称: 值
            2. 常见的响应头:
                1. Content-Type:服务器告诉客户端本次响应体数据格式以及编码格式
                2. Content-disposition:服务器告诉客户端以什么格式打开响应体数据
                    * 值:
                        * in-line:默认值,在当前页面内打开
                        * attachment;filename=xxx:以附件形式打开响应体。文件下载
        3. 响应空行
        4. 响应体:传输的数据


    * 响应字符串格式
        HTTP/1.1 200 OK
        Content-Type: text/html;charset=UTF-8
        Content-Length: 101
        Date: Wed, 06 Jun 2018 07:08:42 GMT

        <html>
          <head>
            <title>$Title$</title>
          </head>
          <body>
          hello , response
          </body>
        </html>

Response对象

一、功能:设置响应消息

1. 设置响应行

        1. 格式:HTTP/1.1 200 ok
        2. 设置状态码:setStatus(int sc) 

2. 设置响应头:

1
setHeader(String name, String value)

3. 设置响应体:

        * 使用步骤:
            1. 获取输出流
                * 字符输出流:PrintWriter getWriter()

                * 字节输出流:ServletOutputStream getOutputStream()

            2. 使用输出流,将数据输出到客户端浏览器

二、案例:

1. 完成重定向

重定向:资源跳转的方式

image-20200731154135769
代码实现:

1
2
3
4
5
6
7
8
//1. 设置状态码为302
response.setStatus(302);
//2.设置响应头location
response.setHeader("location","/day15/responseDemo2");


//简单的重定向方法
response.sendRedirect("/day15/responseDemo2");

重定向的特点:redirect

            1. 地址栏发生变化
            2. 重定向可以访问其他站点(服务器)的资源
            3. 重定向是两次请求。不能使用request对象来共享数据

转发的特点:forward

            1. 转发地址栏路径不变
            2. 转发只能访问当前服务器下的资源
            3. 转发是一次请求,可以使用request对象来共享数据

上面这两个遇到面试题就可能被问到:forward 和 redirect 区别

路径写法:

        1. 路径分类
                1. 相对路径:通过相对路径不可以确定唯一资源
                    * 如:./index.html
                    * 不以/开头,以.开头路径

                    * 规则:找到当前资源和目标资源之间的相对位置关系
                        * ./:当前目录
                        * ../:后退一级目录
                2. 绝对路径:通过绝对路径可以确定唯一资源
                    * 如:http://localhost/day15/responseDemo2        /day15/responseDemo2
                    * 以/开头的路径

                    * 规则:判断定义的路径是给谁用的?判断请求将来从哪儿发出
                        * 给客户端浏览器使用:(重定向是给浏览器用)
                            需要加虚拟目录(项目的访问路径)
                            * 建议虚拟目录动态获取:request.getContextPath()
                            * <a> , <form> 重定向...
                        * 给服务器使用:(请求转发是给服务器端使用的)
                            不需要加虚拟目录
                            * 转发路径


2. 服务器输出字符数据到浏览器

        * 步骤:
            1. 获取字符输出流
            2. 输出数据

        * 注意:
            * 乱码问题:
                1. PrintWriter pw = response.getWriter();获取的流的默认编码是ISO-8859-1
                2. 设置该流的默认编码
                3. 告诉浏览器响应体使用的编码

                //简单的形式,设置编码,是在获取流之前设置
1
response.setContentType("text/html;charset=utf-8");
1
2
3
4
5
6
7
8
9
10
11
12
13
14
15
16
17
18
19
20
@WebServlet("/responseDemo4")
public class ResponseDemo4 extends HttpServlet {
@Override
protected void doPost(HttpServletRequest req, HttpServletResponse resp) throws ServletException, IOException {
// 获取流对象之前,设置流的默认编码,ISO-8859-1 设置为GBK
// resp.setCharacterEncoding("utf-8");
// 告诉浏览器,服务器发送的消息数据的编码。建议浏览器使用该编码解码
//resp.setHeader("content-type","text/html;charset=utf-8"); // 这一行不但设置了浏览器的编码而且也设置了流的编码,

// 简单形式,设置编码
resp.setContentType("text/html;charset=utf-8");
// 1. 获取字符输出流
PrintWriter pw = resp.getWriter();
// 2. 输出数据
//pw.write("<h1>Hello response</h1>");
pw.write("<h1>你好啊 response</h1>");

}
...
}

3. 服务器输出字节数据到浏览器

        * 步骤:
            1. 获取字节输出流
            2. 输出数据
1
2
3
4
5
6
7
8
9
@Override
protected void doPost(HttpServletRequest req, HttpServletResponse resp) throws ServletException, IOException {
resp.setContentType("text/html;charset=utf-8");
// 获取字节输出流
ServletOutputStream sos = resp.getOutputStream();
// 输出数据
sos.write("霓虹呀".getBytes("utf-8"));

}

4. 验证码

        1. 本质:图片
        2. 目的:防止恶意表单注册
1
2
3
4
5
6
7
8
9
10
11
12
13
14
15
16
17
18
19
20
21
22
23
24
25
26
27
28
29
30
31
32
33
34
35
36
37
38
39
40
41
42
43
44
45
46
47
48
49
50
51
52
53
54
55
56
57
58
59
package cn.zenner.web.servlet;

import javax.imageio.ImageIO;
import javax.servlet.ServletException;
import javax.servlet.annotation.WebServlet;
import javax.servlet.http.HttpServlet;
import javax.servlet.http.HttpServletRequest;
import javax.servlet.http.HttpServletResponse;
import java.awt.*;
import java.awt.image.BufferedImage;
import java.io.IOException;
import java.util.Random;

@WebServlet("/checkCodeServlet")
public class CheckCodeServlet extends HttpServlet {
@Override
protected void doPost(HttpServletRequest req, HttpServletResponse resp) throws ServletException, IOException {
int width = 200;
int height = 100;

// 1. 创建一个对象能在内存画图(验证码图片对象)
BufferedImage Image = new BufferedImage(width,height,BufferedImage.TYPE_INT_RGB);
// 2. 美化图片
// 2.1 填充背景色
Graphics g = Image.getGraphics();
g.setColor(Color.pink);
g.fill3DRect(0, 0, width, height, true);
// 2.2 画边框
g.setColor(Color.BLUE);
g.drawRect(0, 0, width-1, height-1);
// 2.3 写验证码
String str = "ABCDEFGHIGKLMNOPQRSTUVWXYabcdefghigklmnopqrstuvwxyz0123456789";
// 生成随机角标
Random ran = new Random();
for (int i = 0; i < 4; i++) {
int j = ran.nextInt(str.length());
char c = str.charAt(j);
g.drawString(c+"", width/5*(i+1), height/2);
}
// 2.4 画干扰线
g.setColor(Color.GREEN);
// 2.4.1 随机生成坐标点
for (int i = 0; i < 10; i++) {
int x1 = ran.nextInt(width);
int x2 = ran.nextInt(width);
int y1 = ran.nextInt(height);
int y2 = ran.nextInt(height);
g.drawLine(x1,y1,x2,y2);
}

// 3. 将图片输出到页面展示
ImageIO.write(Image,"jpg", resp.getOutputStream());
}

@Override
protected void doGet(HttpServletRequest req, HttpServletResponse resp) throws ServletException, IOException {
this.doPost(req,resp);
}
}
1
2
3
4
5
6
7
8
9
10
11
12
13
14
15
16
17
18
19
20
21
22
23
24
25
26
27
28
29
30
31
32
33
34
35
<!DOCTYPE html>
<html lang="en">
<head>
<meta charset="UTF-8">
<title>Title</title>
<script>
/*
分析:
点击超链接或者图片,需要换一张验证码图片
1.给超链接和图片绑定单击事件

2. 重新设置图片的src属性值
*/
window.onload = function () {
var img = document.getElementById("checkCode");
img.onclick = function () {
// 加时间戳
var date = new Date().getTime();
img.src = "/day15/checkCodeServlet?"+date;
}
var a = document.getElementById("check");

}
function b() {
var img = document.getElementById("checkCode");
var date = new Date().getTime();
img.src = "/day15/checkCodeServlet?"+date;
}
</script>
</head>
<body>
<img id="checkCode" src="/day15/checkCodeServlet" alt="" />
<a id="change" href="#" onclick="b()">看不清换一张?</a>
</body>
</html>

ServletContext对象:

1. 概念

    代表整个web应用,可以和程序的容器(服务器)来通信

2. 获取:

    1. 通过request对象获取
        request.getServletContext();
    2. 通过HttpServlet获取
        this.getServletContext();

3. 功能:

(1) 获取MIME类型:

        * MIME类型:在互联网通信过程中定义的一种文件数据类型
            * 格式: 大类型/小类型   text/html        image/jpeg

        * 获取:String getMimeType(String file)  

(2) 域对象:共享数据

        1. setAttribute(String name,Object value)
        2. getAttribute(String name)
        3. removeAttribute(String name)

        * ServletContext对象范围:所有用户所有请求的数据

(3) 获取文件的真实(服务器)路径

1
2
3
4
5
6
7
8
9
1. 方法:String getRealPath(String path)  
String b = context.getRealPath("/b.txt");//web目录下资源访问
System.out.println(b);

String c = context.getRealPath("/WEB-INF/c.txt");//WEB-INF目录下的资源访问
System.out.println(c);

String a = context.getRealPath("/WEB-INF/classes/a.txt");//src目录下的资源访问
System.out.println(a);

案例:

* 文件下载需求:
    1. 页面显示超链接
    2. 点击超链接后弹出下载提示框
    3. 完成图片文件下载


* 分析:
    1. 超链接指向的资源如果能够被浏览器解析,则在浏览器中展示,如果不能解析,则弹出下载提示框。不满足需求
    2. 任何资源都必须弹出下载提示框
    3. 使用响应头设置资源的打开方式:
        * content-disposition:attachment;filename=xxx


* 步骤:
    1. 定义页面,编辑超链接href属性,指向Servlet,传递资源名称filename
    2. 定义Servlet
        1. 获取文件名称
        2. 使用字节输入流加载文件进内存
        3. 指定response的响应头: content-disposition:attachment;filename=xxx
        4. 将数据写出到response输出流
1
2
3
4
5
6
7
8
9
10
11
12
13
14
15
16
17
18
19
20
21
22
23
24
25
26
27
28
29
30
31
32
33
34
35
36
37
38
39
40
41
42
43
package cn.zenner.web.download;

import javax.servlet.ServletContext;
import javax.servlet.ServletException;
import javax.servlet.ServletOutputStream;
import javax.servlet.annotation.WebServlet;
import javax.servlet.http.HttpServlet;
import javax.servlet.http.HttpServletRequest;
import javax.servlet.http.HttpServletResponse;
import java.io.*;

@WebServlet("/downloadServlet")
public class DownloadServlet extends HttpServlet {
@Override
protected void doPost(HttpServletRequest req, HttpServletResponse resp) throws ServletException, IOException {
// 1. 获取请求参数,文件名称
String filename = req.getParameter("filename");
// 2. 使用字节输入流加载文件进内存
// 2.1 找到文件服务器路径
ServletContext servletContext = this.getServletContext();
String realPath = servletContext.getRealPath("/img/"+filename);
// 2.2 使用字节输入流关联
FileInputStream fis = new FileInputStream(realPath);
// 3. 设置response响应头
// 3.1 设置响应头类型:content-type
String mimeType = servletContext.getMimeType(filename);
resp.setHeader("content-type","mimeType");
// 3.2 设置响应头打开方式: content-disposition
resp.setHeader("content-disposition","attachment;filename="+filename);
// 3. 将输入流的数据写出到输出流中
ServletOutputStream sos = resp.getOutputStream();
byte[] buff = new byte[1024*8];
int len = 0;
while((len = fis.read(buff)) != -1){
sos.write(buff,0,len);
}
}

@Override
protected void doGet(HttpServletRequest req, HttpServletResponse resp) throws ServletException, IOException {
this.doPost(req, resp);
}
}
* 问题:
    * 中文文件问题
        * 解决思路:
            1. 获取客户端使用的浏览器版本信息
            2. 根据不同的版本信息,设置filename的编码方式不同