文件操作
在java语言里有对于文件操作系统操作的支持,这个支持就在java.io.File类中进行了定义,也就是说整个的Java.io包里面File类是唯一一个与文件本身操作(创建,删除,重命名)有关的类,如果要想进行File类的操作,要必须提供完成的路径,而后才可以调用相应的方法进行处理:
1. File类的基本使用
打开JDK文档可以发现,File类是Comparable接口的子类,所以File类的对象是可以进行排序处理的;在对File类处理的时候需要为其设置访问路径,那么对于路径的配置主要通过File类的构造方法来处理
构造方法:设置要操作完整路径;
1
public File(String pathname)
构造方法:设置父路径与子目录
1
public File(String parent, String child)
现在要想进行文件的基本操作可以使用如下的方法:
-
1
public boolean createNewFile() throws IOException
判断文件是否存在
1
public boolean exists()
删除文件
1
public boolean delete()
范例:使用File类创建一个文件()
2
3
4
5
6
7
8
9
10
11
12
13
import java.io.IOException;
public class JavaApiDemo {
public static void main(String[] args) throws IOException {
File file = new File("./zenner.txt");
if (file.exists()) {
file.delete();
}else {
System.out.println(file.createNewFile());
}
}
}
通过代码发现,File类本身就是文件本身的处理;
2. File类操作深入
现在已实现了文件的基础操作,但是对于这个操作里也存在一些问题;下面用之前的代码进行优化处理:
在实际的软件项目开发和运行的过程之中,往往都会在windows中进行项目开发,而在项目部署的时候基于Linux或Unix系统来进行项目的发布以保证生产环节的安全性;
在不同的操作系统中有不同的路径分割符:Windows分隔符“\”、Linux分隔符“/”;
所以在最初进行开发时就必须考虑到不同系统的路径分隔符的问题;
File类中提供了一个常量:
1
public static final String separator
范例:正常的路径编写
随着系统的适应性的不断加强,对于当前的路径操作,win风和Linux风也都可以随意使用了;
在使用File类进行文件处理的时候需要注意的是:程序 → JVM → 操作系统函数 → 文件处理;所以对同一文件进行反复的删除或创建时有可能会出现延迟的问题,所以这个时候最好的方案是别重名;
在进行文件创建的时候有一个重要前提:文件的父路径必须首先存在;
如何获取父路径
1
2public String getParent() // 返回父路径的字符串
public File getParentFile() // 返回父路径的File类对象如果父路径不存在,需要创建路径:
1
2public boolean mkdir() // 创建单级目录
public boolean mkdirs() // 创建多级目录
范例:文件创建的标准形式
2
3
4
5
6
7
8
9
10
11
12
13
14
15
16
import java.io.IOException;
public class JavaApiDemo {
public static void main(String[] args) throws IOException {
File file = new File("."+File.separator+"zenner.txt");
if (!file.getParentFile().exists()) { // 判断父路径不存在
file.getParentFile().mkdirs(); // 不存在要创建
}
if (file.exists()) { // 文件是否存在
file.delete();
}else {
System.out.println(file.createNewFile());
}
}
}
这种父目录是否存在的判断很多情况下只需要使用一次,但是如果将其留在代码中就可能造成时间复杂度的提升;如果想要提升性能,就先保证目录已经创建。
3. 获取文件信息
通过File类获取文件本身的一些信息
是否可执行
1
public boolean canExecute()
是否可读
1
public boolean canRead()
是否可写
1
public boolean canWrite()
获取文件大小,返回字节长度
1
public long length()
最有一次修改日期时间
1
public long lastModified()
1
2
3
4
5
6
7
8
9
10
11
12
13
14
15
16
17import java.io.File;
import java.io.IOException;
import java.text.SimpleDateFormat;
public class JavaApiDemo {
public static void main(String[] args) throws IOException {
File file = new File("."+File.separator+"Ohwo"+File.separator+"zenner.txt");
System.out.println(file.getParent());
if (!file.getParentFile().exists()) { // 父路径不存在
file.getParentFile().mkdirs();
}
if (!file.exists()) {
file.createNewFile();
}
System.out.println("最后修改时间: "+ new SimpleDateFormat("yyyy-MM-dd HH:mm:ss").format(file.lastModified()));
}
}
判断是否是目录
1
ublic boolean isDirectory()
判断是否是文件
1
public boolean isFile()
列出所有文件
1
public File[] listFiles()
1
2
3
4
5
6
7
8
9
10
11
12
13
14
15
16
17
18
19
20
21
22
23
24
25
26
27
28
29
30
31import java.io.File;
import java.io.IOException;
import java.text.SimpleDateFormat;
public class JavaApiDemo {
public static void main(String[] args) throws IOException {
File file = new File("d:"+File.separator);
if (file.isDirectory()) {
File result [] = file.listFiles();
for (File f:result) {
System.out.println(f);
}
}
}
}
/*
d:\$RECYCLE.BIN
d:\audio
d:\BaiduNetdiskDownload
d:\Download
d:\file
d:\pagefile.sys
d:\Program Files (x86)
d:\software
d:\System Volume Information
d:\technology
d:\Temp
d:\video
d:\迅雷下载
*/
4. 综合案例:列出目录结构
任意设置的一个目录路径,然后把这个目录中所有的文件列出,包括子目录中的
- 递归输出目录下的所有文件,并且按层次输出文件目录
1 | import java.io.File; |
5. 综合案例:文件批量改名
输入目录名称,并把该目录下所有文件名后缀改为txt
对于这类操作必须设置一些假设的约定,能够重命名的文件都是由后缀的;如果没有后缀要为其追加路径,如果由后缀的路径,则必须以最后一个”.”进行截取;
改名为,参数是一个File类的实例化对象,这个file的名字就是改名为的名字
1
public boolean renameTo(File dest)
范例:
2
3
4
5
6
7
8
9
10
11
12
13
14
15
16
17
18
19
20
21
22
23
24
25
26
27
28
29
30
31
32
import java.io.IOException;
public class JavaApiDemo {
public static void main(String[] args) throws IOException {
File file = new File("D:\\technology\\java\\三,高级编程\\note\\java高级编程(下)\\task");
long start = System.currentTimeMillis();
renameDir(file);
long end = System.currentTimeMillis();
System.out.println("本次操作花费的时间: "+(end - start));
}
private static void renameDir(File file) {
if (file.isDirectory()) {
File results [] = file.listFiles();
if (results!=null) {
for (File f:results) {
renameDir(f);
}
}
}else {
if (file.isFile()) {
String filename = file.getName();
if (filename.contains(".")) {
filename = file.getName().substring(0,file.getName().lastIndexOf("."));
}
filename = filename + ".txt";
file.renameTo(new File(file.getParent(),filename)); // 改名的关键步骤
}
}
}
}
字节流与字符流
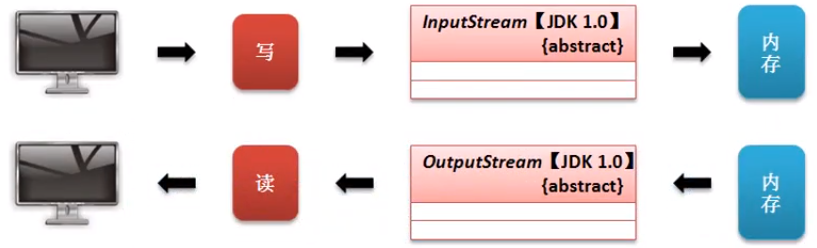
File类只能处理文件本身不能操作文件内容;而开发之中IO的核心意义在于:输入与输出操作;对程序而言,输入与输出可能来自不同的环境。
1. 流的基本概念
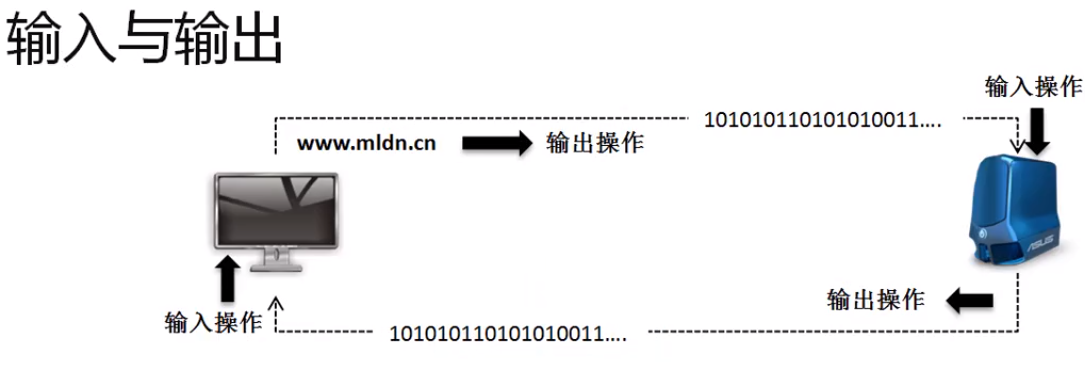
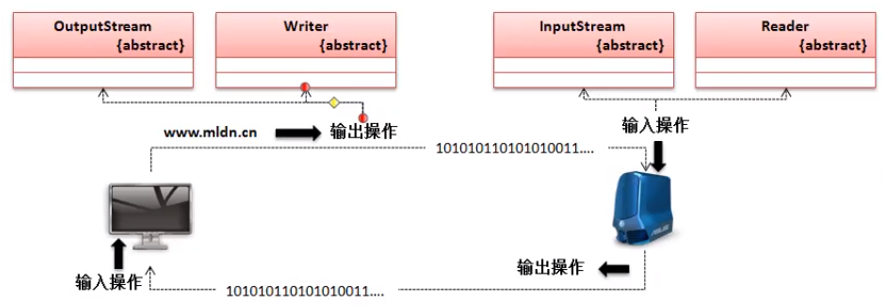
对于服务器或者客户端而言实质上传递的就是一种数据流的处理形式,而所谓的数据流指的就是比特数据;而对于这种流的处理形式java.io包里面提供由两种类的支持
- 字节处理流:
OutputStream(输出字节流)、InputStream(输入字节流); - 字符处理流:
Writer(输出字符流)、Reader(输入字符流);
所有的流操作都应该采用如下的统一的步骤进行,下面以文件处理的流程为例:
- 如果要进行的是文件的读写操作,则一定要通过File类找到一个文件路径;
- 通过字节流或字符流的子类为父类对象进行实例化
- 利用字节流或字符流中的方法实现数据的输入与输出;
- 流的操作属于资源操作,资源操作必须进行关闭;
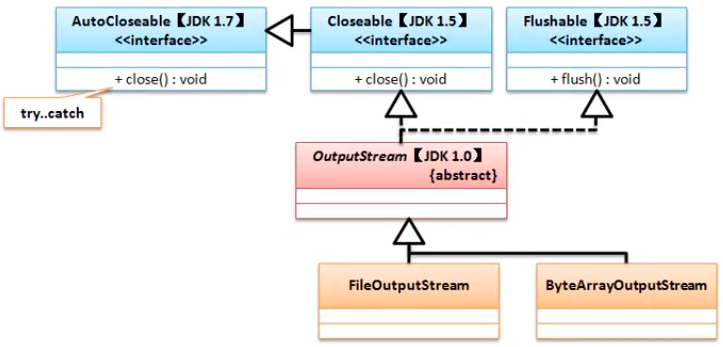
2. OutputStream字节输出流
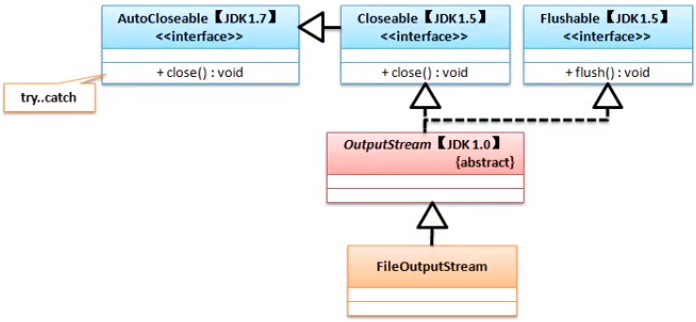
字节的数据是以byte类型为主实现的操作,在进行字节内容输出的时候可以使用 OutputStream 类来完成,
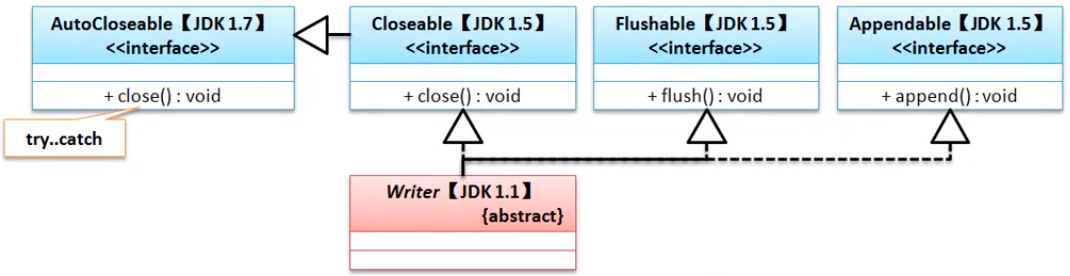
1 | public abstract class OutputStream extends Object implements Closeable, Flushable |
这个类实现了两个接口,于是基本的对应关系如下:

Closeable接口:1
2
3public interface Closeable extends AutoCloseable{
public void close() throws IOException;
}Flushable接口:
1
2
3public interface Flushable{
public void flush() throws IOException;
}
OutputStream类里定义的是一个公共的输出操作标准,这个标准里定义了三个内容输出的方法:
| No | 方法名称 | 类型 | 描述 |
|---|---|---|---|
| 1 | public abstract void write(int b) throws IOException |
普通 | 输出单个字节数据 |
| 2 | public void write(byte[] b) throws IOException |
普通 | 输出一组字节数据 |
| 3 | public void write(byte[] b, int off, int len) |
普通 | 输出部分字节数据 |
(第二种方法用的最多)OutputStream类毕竟是一个抽象类,而这个抽象类按传统认识应该通过子类的实例的向上转型完成抽象类的实例化。如果说要进行文件处理操作,则可以使用FileOutputStream子类
因为最终还是要发生向上转型的处理关系,所以此时对于FileOutputStream子类核心关注点就可以放在构造方法上了;
[覆盖文件】构造方法:
1
public FileOutputStream(File file) throws FileNotFoundException
【可追加文件】构造方法
1
public FileOutputStream(File file, boolean append) throws FileNotFoundException
范例:使用Output类实现内容的输出
2
3
4
5
6
7
8
9
10
11
12
13
14
15
16
17
import java.io.FileOutputStream;
import java.io.IOException;
import java.io.OutputStream;
public class JavaApiDemo {
public static void main(String[] args) throws IOException {
File file = new File("D:\\hello\\a.txt"); // 1. 指定操作路径
if (!file.getParentFile().exists()) {
file.getParentFile().mkdirs();
}
OutputStream output = new FileOutputStream(file); // 2. 通过子类实例化
String str = "abcdefg";
output.write(str.getBytes()); // 3. 将字符串变为字节数组并输出
output.close(); // 4. 关闭输出;
}
}
本程序采用了最为标准的形式实现了输出的操作处理,只是创建了程序的父目录没有创建文件,所以可以看出输出操作可以自动创建文件;
另外,由于OutPutStream类也是AutoCloseable 的接口子类,所以close方法也可以简化使用
范例:自动关闭处理
2
3
4
5
6
7
8
9
10
11
12
13
14
15
16
17
18
19
import java.io.FileOutputStream;
import java.io.IOException;
import java.io.OutputStream;
public class JavaApiDemo {
public static void main(String[] args) throws IOException {
File file = new File("D:\\hello\\a.txt");
if (!file.getParentFile().exists()) {
file.getParentFile().mkdirs();
}
try(OutputStream output = new FileOutputStream(file,true)){ // 追加文件
String str = "abcdefg\r\n"; // 标准换行
output.write(str.getBytes());
}catch(IOException e){
e.printStackTrace();
}
}
}
这里的\r\n是标准换行
3. InputStream字节输入流
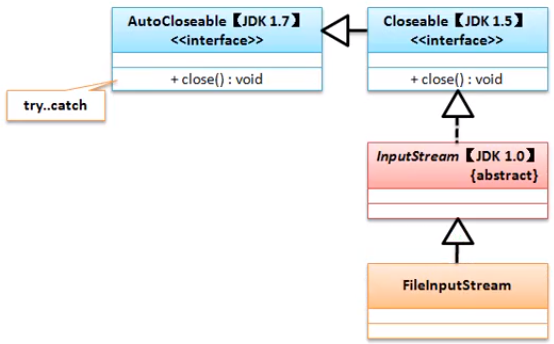
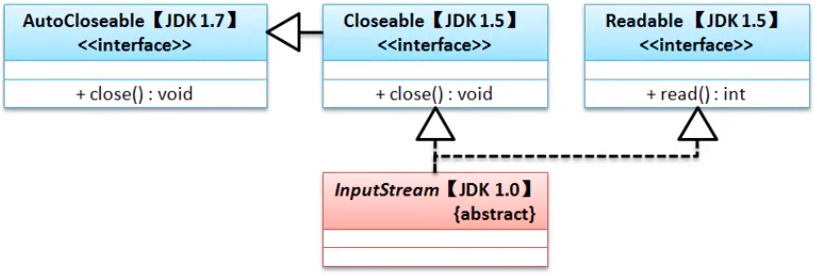
InputStream类主要实现的就是字节数据读取;
1 | public abstract class InputStream extends Object implements Closeable |
在InputStream类里面有这么几个核心方法:
| No | 方法名称 | 类型 | 描述 |
|---|---|---|---|
| 1 | public abstract int read() throws IOException |
普通 | 读取单个字节数据 |
| 2 | public abstract int read() throws IOException |
普通 | 读取一组字节数据 |
| 3 | public int read(byte[] b,int off, int len) |
普通 | 读取一组字节数据的部分内容 |
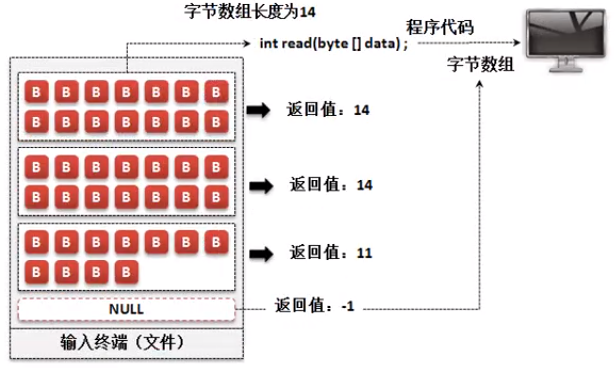
- 第一种读方法读单个字节数据,读到文件底部会返回-1:

- 第二个方法读取一组字节数据,读取的是读取的个数,如果数据读取到底则返回-1:
InputStream类是一个抽象类,这时应该依靠它的子类来实例化对象,如果要从文件读取一定使用FileInputStream子类;
对子类而言,我们只关心父类对象实例化,构造方法:
构造方法
1
public FileInputStream(File file) throws FileNotFoundException
范例: 读取数据
2
3
4
5
6
7
8
9
10
11
12
13
14
15
16
17
18
19
20
21
22
23
import java.io.FileInputStream;
import java.io.FileOutputStream;
import java.io.IOException;
import java.io.InputStream;
import java.io.OutputStream;
public class JavaApiDemo {
public static void main(String[] args) throws IOException {
File file = new File("D:\\hello\\a.txt");
InputStream input = new FileInputStream(file);
byte data [] = new byte[1024];
int Length = input.read(data);
input.close();
System.out.println("【"+new String(data,0,Length)+"】 "+Length);
}
}
/*
【abcdefg
abcdefg
abcdefg
】 27
*/
data的输出需要注意不能全部输出1024个字节;应当按照读进来的个数来读取相应的;
对于字节输入流里最为麻烦的问题在于:使用read()方法读取的时候以字节数组为主进行接收;
JDK 1.9 ,InputStream类里推出了一个新的方法:
1 | public byte[] readAllBytes() throws IOException |
范例:新方法
2
3
4
5
6
7
8
9
10
11
12
13
14
15
16
17
18
19
20
21
22
import java.io.FileInputStream;
import java.io.FileOutputStream;
import java.io.IOException;
import java.io.InputStream;
import java.io.OutputStream;
public class JavaApiDemo {
public static void main(String[] args) throws IOException {
File file = new File("D:\\hello\\a.txt");
InputStream input = new FileInputStream(file);
byte data [] = input.readAllBytes();
input.close();
System.out.println("【"+new String(data)+"】 ");
}
}
/*
【abcdefg
abcdefg
abcdefg
】
*/
如果现在想要读的内容很大很大,这个方法可能会搞死程序;
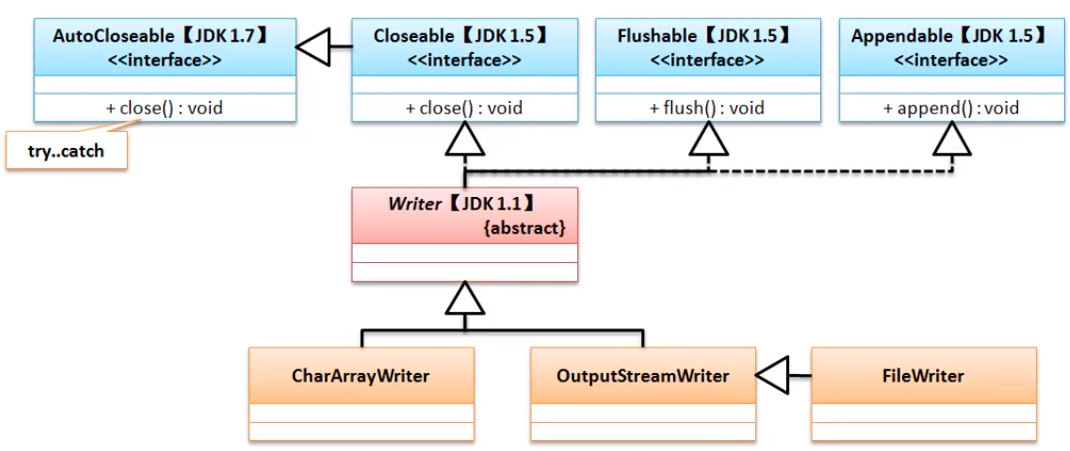
4. Writer字符输出流
很多情况下用字符串输出是比较方便的。所以推出了Writer,这个类的定义如下:
1 | public abstract class Writer extends Object implements Appendable, Closeable, Flushable |
重点看两个Writer类里的输出操作方法:
输出字符数组
1
public void write(char[] cbuf) throws IOException
输出字符串
1
public void write(String str) throws IOException
范例:使用Writer输出
2
3
4
5
6
7
8
9
10
11
12
13
14
15
16
17
18
19
20
21
import java.io.FileWriter;
import java.io.IOException;
import java.io.Writer;
public class JavaApiDemo {
public static void main(String[] args) throws IOException {
File file = new File("D:\\hello\\a.txt");
if (!file.getParentFile().exists()) {
file.getParentFile().mkdirs();
}
Writer out = new FileWriter(file,true); // true打开追加开关
String str = "www.zenner.com\r\n";
out.write(str);
out.append("What dose the fox say?"); // 也可以用append
out.close();
}
}
使用Writer的最大优势在于可以直接利用字符串完成。
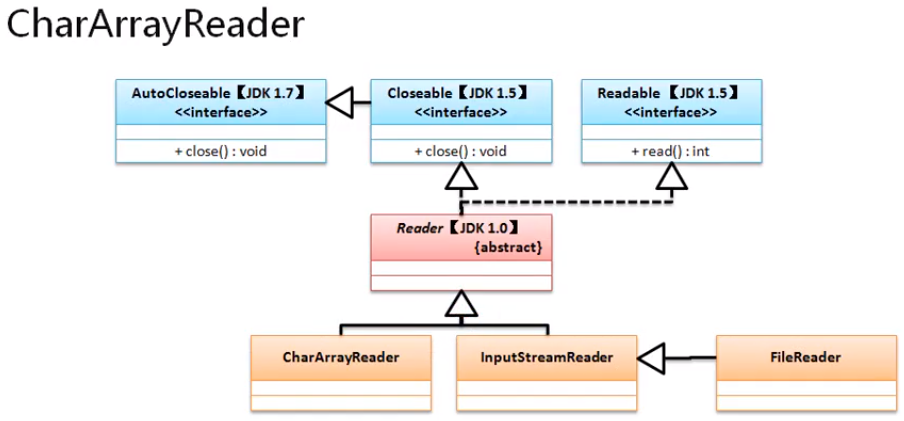
5. Reader字符输入流
Reader是实现字符输入流的一种类型,本身属于一个抽象类,这个类定义如下:
1 | public abstract class Reader extends Object implements Readable, Closeable |
Reader类里面并没有像Writer类一样提供有整个字符串的输入处理操作,只能通过字符数组来实现我们的接收:
接收数据
1
public int read(char[] cbuf) throws IOException
范例:实现数据读取
2
3
4
5
6
7
8
9
10
11
12
13
14
15
16
17
18
19
20
21
22
23
24
25
import java.io.FileNotFoundException;
import java.io.FileReader;
import java.io.IOException;
import java.io.Reader;
public class JavaApiDemo {
public static void main(String[] args) throws IOException {
File file = new File("D:\\hello\\a.txt");
if (file.exists()) {
Reader in = new FileReader(file);
char data[] = new char[1024];
int len = in.read(data);
in.close();
System.out.println("读取内容: "+ new String(data,0,len));
}
}
}
/*
读取内容: www.zenner.com
What dose the fox say?
*/
字符流读取的时候只能够按照数组的形式来实现处理:
6. 字节流与字符流的区别
他们的区别重点从输出处理操作来分析;在OutputStream 和 Writer 输出的最后发现都使用了 close() 方法进行了关闭处理。
OutPutStream在未使用close方法关闭后文件内容依然输出了在文件里;
而Writer不使用close方法关闭,内容将无法进行输出,因为Writer使用到了缓冲区;当使用了close的方法的时候实际上会有强制刷新缓冲区的情况,这时会将内容进行输出,没有关闭就不能进行关闭操作;所以此时如果在不关闭的情况下想要实现全部内容的输出可以使用flush()方法强制清空;
范例:使用writer并强制清空
2
3
4
5
6
7
8
9
10
11
12
13
14
15
16
17
18
19
import java.io.FileWriter;
import java.io.IOException;
import java.io.Writer;
public class JavaApiDemo {
public static void main(String[] args) throws IOException {
File file = new File("D:\\hello\\a.txt");
if (!file.getParentFile().exists()) {
file.getParentFile().mkdirs();
}
Writer out = new FileWriter(file,true); // true打开追加开关
String str = "www.zenner.com\r\n";
out.write(str);
out.append("What dose the fox say?"); // 也可以用append
out.flush(); // 强制刷新
}
}
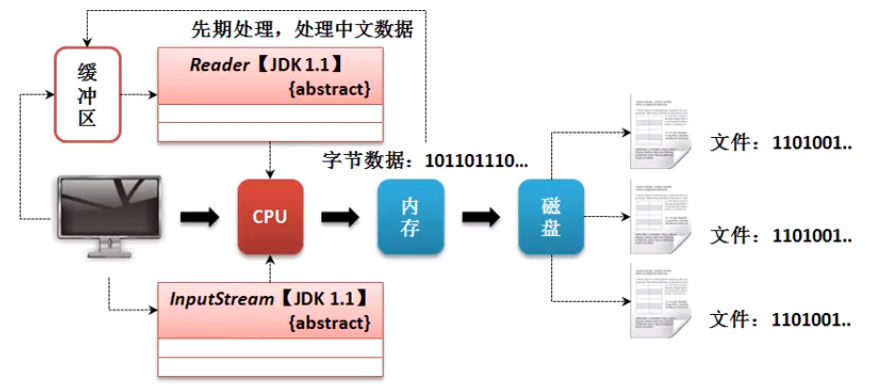
字节流进行处理时不会使用缓冲区,而字符流会使用到缓冲区;另外使用字符流的缓冲区更加适合中文数据的处理。开发中涉及到中文信息的输出都会用到字符流;
7. 转换流
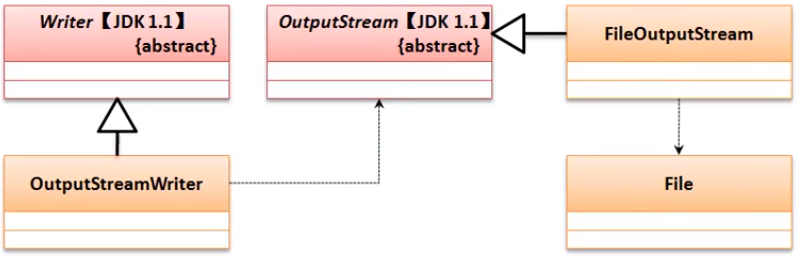
所谓转换是指实现字节流和字符流的功能转换;例如:进行输出的时候OutputStream需要将内容变为字节数组后才可以输出,而writer可以直接输出字符串,所以就需要一种不同流之间的转换操作。
在java.io里提供了两个类:InputStreamReader,OutputStreamWriter;
OutputStreamWriter- 定义
1
public class OutputStreamWriter extends Writer
- 构造方法:
1
public OutputStreamWriter(OutputStream out)
InputStreamReader- 定义
1
public class InputStreamReader extends Reader
- 构造方法:
1
public InputStreamReader(InputStream in)
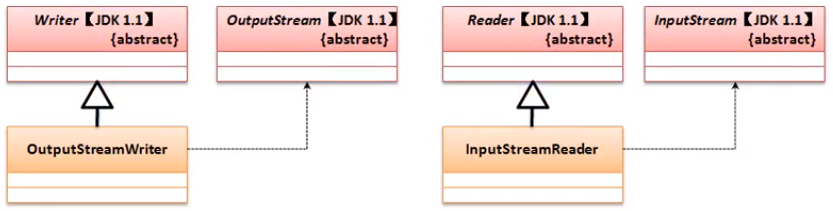
通过类的继承结构可以发现,所谓的转换处理就是将接收到的字节流对象通过向上转型变为字符流对象;
范例:观察转换
2
3
4
5
6
7
8
9
10
11
12
13
14
15
16
17
18
19
20
import java.io.FileOutputStream;
import java.io.FileWriter;
import java.io.IOException;
import java.io.OutputStream;
import java.io.OutputStreamWriter;
import java.io.Writer;
public class JavaApiDemo {
public static void main(String[] args) throws IOException {
File file = new File("D:\\hello\\a.txt");
if (!file.getParentFile().exists()) {
file.getParentFile().mkdirs();
}
OutputStream output = new FileOutputStream(file);
Writer out = new OutputStreamWriter(output); // 字节流变为字符流
out.write("www.zenner.com");
out.close();
}
}
讲解转换流的主要目的是进行结构的分析处理;
在InputStream类有他的直接子类FileInputStream,OutputStream有他的直接子类FileOutputStream,而观察FileWriter和FileReader时可以看到的:
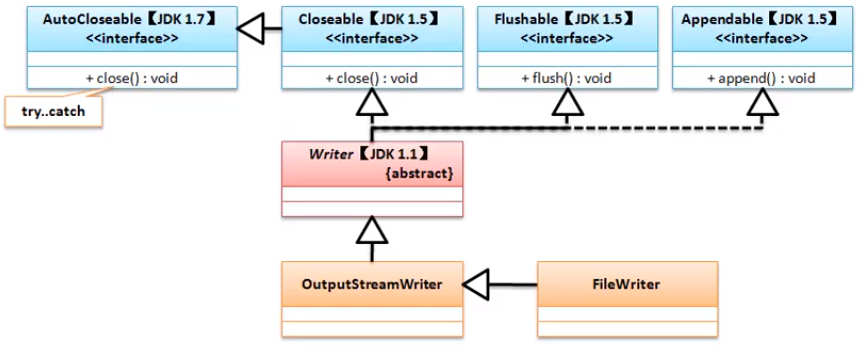
FileWriter- 定义
1
public class FileWriter extends OutputStreamWriter
- 构造方法:
1
public OutputStreamWriter(OutputStream out)
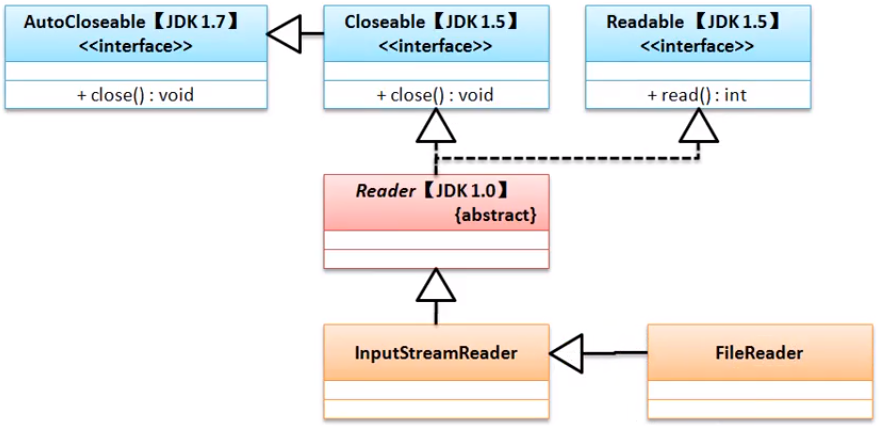
FileReader- 定义
1
public class FileReader extends InputStreamReader
- 构造方法:
1
public InputStreamReader(InputStream in)
8. 综合实战:文件拷贝
模拟拷贝命令:通过初始化参数输入拷贝的源文件路径与拷贝的目标路径实现文件的拷贝处理;
需求分析:
- 需要实现文件的拷贝,首先文件就可以是各种文件所以肯定使用字节流;
- 拷贝时应考虑到大文件的拷贝问题;
实现方案:
方案一:使用
InputStream将全部要拷贝的内容直接读取到程序里面,而后一次性输出到目标文件
- 缺点:如果拷贝的文件很大,基本程序就死了
方案二:采用部分拷贝,读取一部分,输出一部分;
采用第二种方案核心的方法:
InputStream: `
OutputStream:
范例:实现文件拷贝处理
2
3
4
5
6
7
8
9
10
11
12
13
14
15
16
17
18
19
20
21
22
23
24
25
26
27
28
29
30
31
32
33
34
35
36
37
38
39
40
41
42
43
44
45
46
47
48
49
50
51
52
53
54
55
56
57
58
59
60
61
62
63
64
65
66
67
68
69
70
71
72
73
74
75
76
import java.io.FileInputStream;
import java.io.FileNotFoundException;
import java.io.FileOutputStream;
import java.io.IOException;
import java.io.InputStream;
import java.io.OutputStream;
class FileUtil{ // 文件操作工具类
private File srcFile;
private File desFile;
public FileUtil(String src,String des) {
this(new File(src),new File(des));
}
public FileUtil(File srcFile, File desFile) {
super();
this.srcFile = srcFile;
this.desFile = desFile;
}
public boolean copy() throws IOException,FileNotFoundException { // 文件拷贝处理
try {
if (!this.srcFile.exists()) { // 源文件必须存在!!
throw new FileNotFoundException("拷贝源文件不存在");
}
}catch (FileNotFoundException e) {
e.printStackTrace();
}
if (!this.desFile.getParentFile().exists()) {
this.desFile.getParentFile().mkdirs();
}
byte data [] = new byte[1024];
InputStream input = null;
OutputStream output = null;
try {
input = new FileInputStream(this.srcFile);
output = new FileOutputStream(this.desFile);
int len = 0;
do {
len = input.read(data); //
if (len != -1) {
output.write(data,0,len);
}
} while (len != -1);
return true;
} catch (IOException e) {
throw e;
}finally {
if (input!= null) {
input.close();
}
if (output != null) {
output.close();
}
}
}
}
public class JavaApiDemo {
public static void main(String[] args) throws IOException {
if (args.length != 2) {
System.out.println("命令执行错误,执行结构:java JavaApiDemo srcFilePath desFilePath");
System.exit(1);
}
long start = System.currentTimeMillis();
FileUtil fu = new FileUtil(args[0],args[1]);
System.out.println(fu.copy() ? "文件拷贝成功":"文件拷贝失败");
long end = System.currentTimeMillis();
System.out.println("拷贝完成的时间: " + (end-start));
}
}
/*
文件拷贝成功
拷贝完成的时间: 11
*/
2
3
4
5
6
7
8
9
10
11
12
13
14
15
16
17
18
19
20
21
22
23
24
25
26
27
28
29
30
31
32
33
34
35
36
37
38
39
40
41
42
43
44
45
46
47
48
49
50
51
52
53
54
55
56
57
58
59
60
61
62
63
64
65
66
67
68
69
70
71
72
73
74
75
76
77
78
79
80
81
82
import java.io.FileInputStream;
import java.io.FileNotFoundException;
import java.io.FileOutputStream;
import java.io.IOException;
import java.io.InputStream;
import java.io.OutputStream;
class FileUtil{ // 文件操作工具类
private File srcFile;
private File desFile;
public FileUtil(String src,String des) {
this(new File(src),new File(des));
}
public FileUtil(File srcFile, File desFile) {
super();
this.srcFile = srcFile;
this.desFile = desFile;
}
public boolean copy() throws IOException,FileNotFoundException { // 文件拷贝处理
try {
if (!this.srcFile.exists()) { // 源文件必须存在!!
throw new FileNotFoundException("拷贝源文件不存在");
}
}catch (FileNotFoundException e) {
e.printStackTrace();
}
if (!this.desFile.getParentFile().exists()) {
this.desFile.getParentFile().mkdirs();
}
byte data [] = new byte[1024];
InputStream input = null;
OutputStream output = null;
try {
input = new FileInputStream(this.srcFile);
output = new FileOutputStream(this.desFile);
int len = 0;
// 1. 读取数据到数组之中,随后返回读取的个数
// do {
// len = input.read(data); //
// if (len != -1) {
// output.write(data,0,len);
// }
// } while (len != -1);
// 2. 判断个数是否是-1,如果不是则进行读写
while ((len = input.read(data)) != -1) {
output.write(data,0, len);
}
return true;
} catch (IOException e) {
throw e;
}finally {
if (input!= null) {
input.close();
}
if (output != null) {
output.close();
}
}
}
}
public class JavaApiDemo {
public static void main(String[] args) throws IOException {
if (args.length != 2) {
System.out.println("命令执行错误,执行结构:java JavaApiDemo srcFilePath desFilePath");
System.exit(1);
}
long start = System.currentTimeMillis();
FileUtil fu = new FileUtil(args[0],args[1]);
System.out.println(fu.copy() ? "文件拷贝成功":"文件拷贝失败");
long end = System.currentTimeMillis();
System.out.println("拷贝完成的时间: " + (end-start));
}
}
/*
文件拷贝成功
拷贝完成的时间: 11
*/
以上的实现是拷贝文件的最原始的实现,而从JDK1.9开始InputStream和Reader类中都追加有数据转存的处理操作方法:
InputStream1
public long transferTo(OutputStream out) throws IOException
Reader1
public long transferTo(Writer out) throws IOException
范例:使用转存的方式处理
2
3
4
5
6
7
8
9
10
11
12
13
14
15
16
17
18
19
20
21
22
23
24
25
26
27
28
29
30
31
32
33
34
35
36
37
38
39
40
41
42
43
44
45
46
47
48
49
50
51
52
53
54
55
56
57
58
59
60
61
62
63
64
65
import java.io.FileInputStream;
import java.io.FileNotFoundException;
import java.io.FileOutputStream;
import java.io.IOException;
import java.io.InputStream;
import java.io.OutputStream;
class FileUtil{ // 文件操作工具类
private File srcFile;
private File desFile;
public FileUtil(String src,String des) {
this(new File(src),new File(des));
}
public FileUtil(File srcFile, File desFile) {
super();
this.srcFile = srcFile;
this.desFile = desFile;
}
public boolean copy() throws IOException,FileNotFoundException { // 文件拷贝处理
try {
if (!this.srcFile.exists()) { // 源文件必须存在!!
throw new FileNotFoundException("拷贝源文件不存在");
}
}catch (FileNotFoundException e) {
e.printStackTrace();
}
if (!this.desFile.getParentFile().exists()) {
this.desFile.getParentFile().mkdirs();
}
InputStream input = null;
OutputStream output = null;
try {
input = new FileInputStream(this.srcFile);
output = new FileOutputStream(this.desFile);
input.transferTo(output);
return true;
} catch (IOException e) {
throw e;
}finally {
if (input!= null) {
input.close();
}
if (output != null) {
output.close();
}
}
}
}
public class JavaApiDemo {
public static void main(String[] args) throws IOException {
if (args.length != 2) {
System.out.println("命令执行错误,执行结构:java JavaApiDemo srcFilePath desFilePath");
System.exit(1);
}
long start = System.currentTimeMillis();
FileUtil fu = new FileUtil(args[0],args[1]);
System.out.println(fu.copy() ? "文件拷贝成功":"文件拷贝失败");
long end = System.currentTimeMillis();
System.out.println("拷贝完成的时间: " + (end-start));
}
}
此时要注意程序运行环境的版本问题;此时进一步扩展,要实现文件目录的拷贝。拷贝了文件目录还需要拷贝所有的子目录中的文件。
范例:文件夹拷贝操作
2
3
4
5
6
7
8
9
10
11
12
13
14
15
16
17
18
19
20
21
22
23
24
25
26
27
28
29
30
31
32
33
34
35
36
37
38
39
40
41
42
43
44
45
46
47
48
49
50
51
52
53
54
55
56
57
58
59
60
61
62
63
64
65
66
67
68
69
70
71
72
73
74
75
76
77
78
79
80
81
82
83
84
85
86
87
88
89
90
91
92
93
94
95
import java.io.FileInputStream;
import java.io.FileNotFoundException;
import java.io.FileOutputStream;
import java.io.IOException;
import java.io.InputStream;
import java.io.OutputStream;
class FileUtil{ // 文件操作工具类
private File srcFile;
private File desFile;
public FileUtil(String src,String des) {
this(new File(src),new File(des));
}
public FileUtil(File srcFile, File desFile) {
super();
this.srcFile = srcFile;
this.desFile = desFile;
}
public boolean copy() throws Exception { // 文件拷贝处理
return this.copyFileImpl(this.srcFile, this.desFile);
}
private boolean copyFileImpl(File srcFile,File desFile) throws Exception{
try {
if (!srcFile.exists()) { // 源文件必须存在!!
throw new FileNotFoundException("拷贝源文件不存在");
}
}catch (FileNotFoundException e) {
e.printStackTrace();
}
if (!desFile.getParentFile().exists()) {
desFile.getParentFile().mkdirs();
}
InputStream input = null;
OutputStream output = null;
try {
input = new FileInputStream(srcFile);
output = new FileOutputStream(desFile);
input.transferTo(output);
return true;
} catch (IOException e) {
throw e;
}finally {
if (input!= null) {
input.close();
}
if (output != null) {
output.close();
}
}
}
public boolean copyDir() throws Exception{
try {
this.copyImpl(this.srcFile);
return true;
} catch (Exception e) {
return false;
}
}
private void copyImpl(File file) throws Exception {
if (file.isDirectory()) {
File results [] = file.listFiles();
if (results!=null) {
for (File f:results) {
copyImpl(f);
}
}
}else {
String newFilePath = file.getPath().replace(this.srcFile.getPath()+File.separator,"");
File newFile = new File(this.desFile,newFilePath);
System.out.println(newFile);
this.copyFileImpl(file, newFile);
}
}
}
public class JavaApiDemo {
public static void main(String[] args) throws Exception {
if (args.length != 2) {
System.out.println("命令执行错误,执行结构:java JavaApiDemo srcFilePath desFilePath");
System.exit(1);
}
long start = System.currentTimeMillis();
FileUtil fu = new FileUtil(args[0],args[1]);
if (!new File(args[0]).isDirectory()) {
System.out.println(fu.copy() ? "文件拷贝成功":"文件拷贝失败");
}else {
System.out.println(fu.copyDir() ? "文件夹拷贝成功":"文件夹拷贝失败");
}
ong end = System.currentTimeMillis();
System.out.println("拷贝完成的时间: " + (end-start));
}
}
IO深入操作
1. 字符编码
实际开发中常用的编码有以下几种:
- GBK/GB2312:国标;GB2312只描述简体中文,而GBK包含有简体中文与繁体中文;
- ISO8859-1:国际通用编码,可以用其描述所有的字母信息,如果是象形文字则需要进行编码处理;
- UNICODE编码:采用十六进制的方式存储,可以描述所有的文字信息;
- UTF 编码:象形文字部分使用十六进制编码,而普通的字母采用的是IOS8859-1编码,优势在于可以快速地传输,节约带宽,也就是开发之中的首选编码,主要使用“UTF-8”
如果想知道当前系统中支持的编码规则,则可以采用如下代码列出全部的本机属性:
范例:列出本机属性
2
3
4
5
6
7
8
9
10
public static void main(String[] args) throws Exception {
System.getProperties().list(System.out);
}
}
/*
获取的部分信息
file.encoding=UTF-8
file.separator=\
*/范例:程序编码与系统编码
2
3
4
5
6
7
8
9
10
11
12
13
14
15
16
import java.io.FileOutputStream;
import java.io.OutputStream;
public class JavaApiDemo {
public static void main(String[] args) throws Exception {
OutputStream output = new FileOutputStream("D:"+File.separator+"a.txt");
output.write("中华人民共和国万岁!".getBytes());
output.close();
}
}
/*
程序编码与系统编码一致都是UTF-8,即使写入了字节流,系统仍可以正确编码
而其他的编码就可能在文件中出现乱码;
当然也是不一定都会出现那乱码
*/
项目中出现乱码问题就是编码和解码标准不统一,而解决方法就是采用UTF-8
2. 内存操作流
之前都是文件操作流,文件操作流的特点就是读取文件,写入文件,以文件为终端

假设需要IO操作又不希望产生文件,就可以以内存为终端进行处理;这个时候的流程
在java里提供有两类的内存操作流:
- 字节内存操作流:
ByteArrayOutputStream、ByteArrayInputStream; - 字符内存操作流:
CharArrayWriter、CharArrayReader
/io/image-20200705113450324.png)
下面以 ByteArrayOutputStream 和 ByteArrayInputStream 类为主进行内存的使用分析,先分析他们各自的构造方法:
ByteArrayInputStream:1
public ByteArrayInputStream(byte[] buf)
ByteArrayOutputStream1
public ByteArrayOutputStream()
在 ByteArrayOutputStream 类里面有一个重要的方法,这个方法可以获取全部保存在内存流中的数据信息,该方法为:
获取数据:
1
public byte[] toByteArray()
使用字符串的形式来获取数据:
1
public String toString()
范例:利用内存流实现一个小写字母转大写字母的操作
2
3
4
5
6
7
8
9
10
11
12
13
14
15
16
17
18
19
import java.io.ByteArrayOutputStream;
import java.io.InputStream;
import java.io.OutputStream;
public class JavaApiDemo {
public static void main(String[] args) throws Exception {
String str = "www.zenner.com";
InputStream input = new ByteArrayInputStream(str.getBytes()); // 将数据保存在内存流
OutputStream output = new ByteArrayOutputStream();
int data = 0;
while((data = input.read())!= -1) { // 每次读取一个字节
output.write(Character.toUpperCase((char)data)); // 保存数据
}
System.out.println(output);
input.close();
output.close();
}
}
如果不希望只是以字符串的形式返回,因为存放的还可能是二进制数据,那么就可以用子类的扩展功能获取全部字节数据
范例:
2
3
4
5
6
7
8
9
10
11
12
13
14
15
16
17
18
19
20
21
22
import java.io.ByteArrayOutputStream;
import java.io.InputStream;
import java.io.OutputStream;
public class JavaApiDemo {
public static void main(String[] args) throws Exception {
String str = "www.zenner.com";
InputStream input = new ByteArrayInputStream(str.getBytes()); // 将数据保存在内存流
// 必须使用子类来调用子类自己的扩展方法
ByteArrayOutputStream output = new ByteArrayOutputStream();
int data = 0;
while((data = input.read())!= -1) { // 每次读取一个字节
output.write(Character.toUpperCase((char)data)); // 保存数据
}
byte result [] = output.toByteArray();
System.out.println(new String(result));
input.close();
output.close();
}
}
3. 管道流
管道流之遥的功能是实现两个线程之间的IO处理操作;
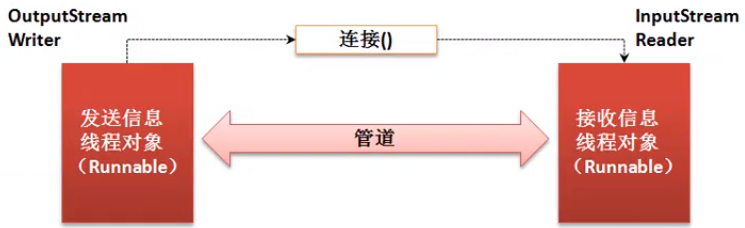
同样也有两类:
字节管道流:
PipedOutputStream、PipedInputStream;连接操作
1
public void connect(PipedInputStream snk) throws IOException
字符管道流:
PipedReader、PipedWriter;连接处理:
1
public void connect(PipedReader snk) throws IOException
范例:实现管道操作
2
3
4
5
6
7
8
9
10
11
12
13
14
15
16
17
18
19
20
21
22
23
24
25
26
27
28
29
30
31
32
33
34
35
36
37
38
39
40
41
42
43
44
45
46
47
48
49
50
51
52
53
54
55
56
57
58
59
60
61
62
63
64
65
66
67
68
69
70
71
import java.io.PipedInputStream;
import java.io.PipedOutputStream;
class SendThread implements Runnable{
private PipedOutputStream output;
public SendThread() {
super();
this.output = new PipedOutputStream();
}
public void run() {
// TODO Auto-generated method stub
try {
this.output.write(("【"+Thread.currentThread().getName()+"信息发送】www.zenner.com").getBytes());
} catch (IOException e) {
// TODO Auto-generated catch block
e.printStackTrace();
}
try {
this.output.close();
} catch (IOException e) {
// TODO Auto-generated catch block
e.printStackTrace();
}
}
public PipedOutputStream getOutput() {
return output;
}
}
class ReceiveThread implements Runnable{
private PipedInputStream input;
public ReceiveThread() {
super();
this.input = new PipedInputStream();
}
public void run() {
byte data[] = new byte[1024];
try {
int len = this.input.read(data);
System.out.println("{"+Thread.currentThread().getName()+"接收消息}"+new String(data,0,len));
} catch (IOException e) {
// TODO Auto-generated catch block
e.printStackTrace();
}
try {
this.input.close();
} catch (IOException e) {
// TODO Auto-generated catch block
e.printStackTrace();
}
}
public PipedInputStream getInput() {
return input;
}
}
public class JavaApiDemo {
public static void main(String[] args) throws Exception {
SendThread send = new SendThread();
ReceiveThread receive = new ReceiveThread();
send.getOutput().connect(receive.getInput());
new Thread(send,"消息发送线程").start() ;
new Thread(receive,"消息接收线程").start() ;
}
}
输入与输出支持
1. 打印流
要进行数据输出一般都用outputStream类;这个类的数据输出操作功能有限:
1 | public void write(byte[] b) throws IOException |
所有的输出都要转为字节字节后才能输出;而项目里的输出都是其他类型所以还要再转换为字节的形式来处理,这样比较麻烦;所以为了开发者会开发一些功能类来简化这个过程;不过这些包装起来的输出操作如何进行,核心使用的就是OutputStream;
范例:自己弄这样一个打印流;打印流的设计思想
2
3
4
5
6
7
8
9
10
11
12
13
14
15
16
17
18
19
20
21
22
23
24
25
26
27
28
29
30
31
32
33
34
35
36
37
38
39
40
41
42
43
44
import java.io.FileOutputStream;
import java.io.IOException;
import java.io.OutputStream;
class PrintUtil implements AutoCloseable{ // 实现一些常用数据的输出
private OutputStream output;
public PrintUtil(OutputStream output) { // 由外部来决定输出的位置
super();
this.output = output;
}
public void print(String str) {
try {
this.output.write(str.getBytes());
}catch(IOException e){
e.printStackTrace();
}
}
public void println(String str) {
this.print(str+ "\n");
}
public void close() throws Exception {
this.output.close();
}
public void println(long i) {
this.println(String.valueOf(i));
}
public void print(long i) {
this.print(String.valueOf(i));
}
}
public class JavaApiDemo {
public static void main(String[] args) throws Exception {
File file = new File("d:"+File.separator + "zenner.txt");
PrintUtil pu = new PrintUtil(new FileOutputStream(file)); // 通过传递类的类型使得各种类型的输出都能由这个类来输出
pu.println("姓名啊哈哈哈");
pu.print("年龄:");
pu.println(78);
pu.close();
}
}
打印流的设计思想的本质在于提高已有类的功能;例如:OutputStream类是唯一可以实现输出的操作功能类,所以应该以其为核心根本,但是这个类输出的操作功能有限,所以不方便进行输出各个数据类型,所以为他做出一层包装,此时用到的设计思想就是“装饰设计模式”;
java.io包中有两种打印流:printStream、printWriter;
printStream- 继承关系:
1
public class PrintStream extends FilterOutputStream implements Appendable, Closeable
- 构造方法
1
public PrintStream(OutputStream out)
printWriter- 继承关系
1
2public class PrintWriter
extends Writer- 构造方法:
1
2public PrintWriter(OutputStream out)
public PrintWriter(Writer out)/java高级编程(下)/image-20200707090637650.png)
下面使用PrintWriter来实现数据的输出操作:
范例:
2
3
4
5
6
7
8
9
10
11
12
13
14
15
import java.io.FileOutputStream;
import java.io.PrintWriter;
public class JavaApiDemo {
public static void main(String[] args) throws Exception {
File file = new File("d:"+File.separator + "zenner.txt");
PrintWriter pu = new PrintWriter(new FileOutputStream(file)); // 通过传递类的类型使得各种类型的输出都能由这个类来输出
pu.println("姓名啊哈哈哈");
pu.print("年龄:");
pu.println(78);
pu.close();
}
}
JDK 1.5开始Printwriter类里面追加有格式化输出的操作支持:
1 | public PrintWriter printf(String format, Object... args) |
范例:格式化输出
2
3
4
5
6
7
8
9
10
11
12
13
14
15
16
17
import java.io.FileOutputStream;
import java.io.PrintWriter;
public class JavaApiDemo {
public static void main(String[] args) throws Exception {
File file = new File("d:"+File.separator + "zenner.txt");
PrintWriter pu = new PrintWriter(new FileOutputStream(file)); // 通过传递类的类型使得各种类型的输出都能由这个类来输出
String name = "小兵吱吱";
int age = 78;
double salary = 4324.42;
pu.printf("姓名:%s、年龄:%d、收入:%9.2f", name,age,salary);
pu.close();
}
}
/*
姓名:小兵吱吱、年龄:78、收入: 4324.42
*/
这个类输出起来比OutputStream类要简单;以后输出的时候就是用打印流;
2. System类对IO的支持
System是一个系统类;系统类里有三个和输出输出相关的常量:
标准输出:显示器输出
1
public static final PrintStream out
错误输出
1
public static final PrintStream err
标准输入:
1
public static final InputStream in
范例:
2
3
4
5
6
7
8
9
10
public static void main(String[] args) throws Exception {
try {
Integer.parseInt("s");
} catch (Exception e) {
System.out.println(e);
System.err.println(e);
}
}
}
java.lang.NumberFormatException: For input string: “s”
ava.lang.NumberFormatException: For input string: “s”
System.out和System.err都是同一类型的;
最早这么设置是因为out是希望用户看到信息;err是不希望用户看到的;
范例:实现键盘输入
2
3
4
5
6
7
8
9
10
11
12
13
14
15
16
public class JavaApiDemo {
public static void main(String[] args) throws Exception {
InputStream input = System.in;
System.out.println("请输出信息:");
byte [] data = new byte[1024];
int len = input.read(data);
System.out.println("输入内容为:" + new String(data,0,len));
}
}
/*
请输出信息:
fdsafdsafdsa
输入内容为:fdsafdsafdsa
*/
这样的键盘输入处理是有缺陷的;如果长度不足只能接收部分数据;在接收的时候可能接受中文造成编码不当;
3. BufferReader缓冲输入流
BufferReader提供的是一个缓冲字符输入流的概念;可以很好的解决输入流数据的读取问题;
1 | public BufferedReader(Reader in, int sz) |
该类有一个重要的方法:
读取一行数据
1
public String readLine() throws IOException
用这个类实现键盘输入数据的标准化定义
/java高级编程(下)/image-20200707094310296.png)
范例:实现键盘数据输入
2
3
4
5
6
7
8
9
10
11
12
13
14
import java.io.InputStream;
import java.io.InputStreamReader;
public class JavaApiDemo {
public static void main(String[] args) throws Exception {
BufferedReader input = new BufferedReader(new InputStreamReader(System.in));
System.out.println("请输入信息: ");
String msg = input.readLine();
System.out.println("输入内容为: "+msg);
}
}
/java高级编程(下)/image-20200707095136134.png)
这个类是之前最好的,后面 JDK 1.5以后有一个更好的类;
4. Scanner扫描流
java.util.Scanner是为了解决输入流的访问问题;可以理解为BufferedReader的替代功能类,在Scanner类里有如下的几种操作方法:
构造方法:
1
2public Scanner(InputStream source)
public Scanner(File source) throws FileNotFoundException继承关系:
1
2
3
public final class Scanner
extends Object
implements Iterator<String>, Closeable是否有数据:
1
public boolean hasNext()
取出数据
1
public String next()
设置分隔符:
1
public Scanner useDelimiter(String pattern)
范例:使用
Scanner实现键盘数据输入
2
3
4
5
6
7
8
9
10
11
12
public static void main(String[] args) throws Exception {
Scanner sc = new Scanner(System.in);
System.out.println("请输入年龄: ");
if (sc.hasNextInt()) { // 是否有整数输入
int age = sc.nextInt();
System.out.println("您的年龄: " + age);
} else {
System.out.println("输入正确格式");
}
}
}范例:持续输入
2
3
4
5
6
7
8
9
10
public static void main(String[] args) throws Exception {
Scanner sc = new Scanner(System.in);
System.out.println("请输入年龄: ");
while(sc.hasNextInt()) { // 是否有整数输入
int age = sc.nextInt();
System.out.println("您的年龄: " + age);
}
}
}
Scanner实现键盘输入是比较简单的;
范例:
2
3
4
5
6
7
8
9
10
public static void main(String[] args) throws Exception {
Scanner sc = new Scanner(System.in);
System.out.println("请输入: ");
if(sc.hasNext()) { // 是否有整数输入
System.out.println("您的年龄: " + sc.next());
}
sc.close();
}
}
还有一个特点是可以直接利用正则济宁验证判断;
范例:验证一个人的生日(yyyy-MM-dd)
2
3
4
5
6
7
8
9
10
11
12
13
14
import java.util.Scanner;
public class JavaApiDemo {
public static void main(String[] args) throws Exception {
Scanner sc = new Scanner(System.in);
System.out.println("请输入您的生日: ");
// 验证一个人的生日(yyyy-MM-dd)
if(sc.hasNext("\\d{4}-\\d{1,2}-\\d{2}")) { // 是否有整数输入
System.out.println("您的年龄: " + new SimpleDateFormat("yyyy-MM-dd").parse(sc.next("\\d{4}-\\d{1,2}-\\d{2}")));
}
sc.close();
}
}范例:用Scanner读文件(我读我自己)
2
3
4
5
6
7
8
9
10
11
12
13
14
import java.io.File;
import java.util.Scanner;
public class JavaApiDemo {
public static void main(String[] args) throws Exception {
// System.out.println(new File("").getAbsolutePath());
Scanner sc = new Scanner(new File("./src/cn/jubingyi/Demo/JavaApiDemo.java"));
sc.useDelimiter("\n");
while (sc.hasNext()) {
System.out.println(sc.next());
}
sc.close();
}
}
如果程序需要输出数据一定使用打印流,输入数据使用Scanner(BufferedReader)
对象序列化
几乎只要是java开发就一定存在序列化的概念,而正是因为序列化的概念逐步发展,慢慢也有了更多的序列化标准;
1. 对象序列化的基本概念
所谓的对象序列化只是将内存中保存的对象以二进制数据流的形式进行处理,可以实现对象的保存或者网络传输;(什么你要把对象发送到远程服务器上?)
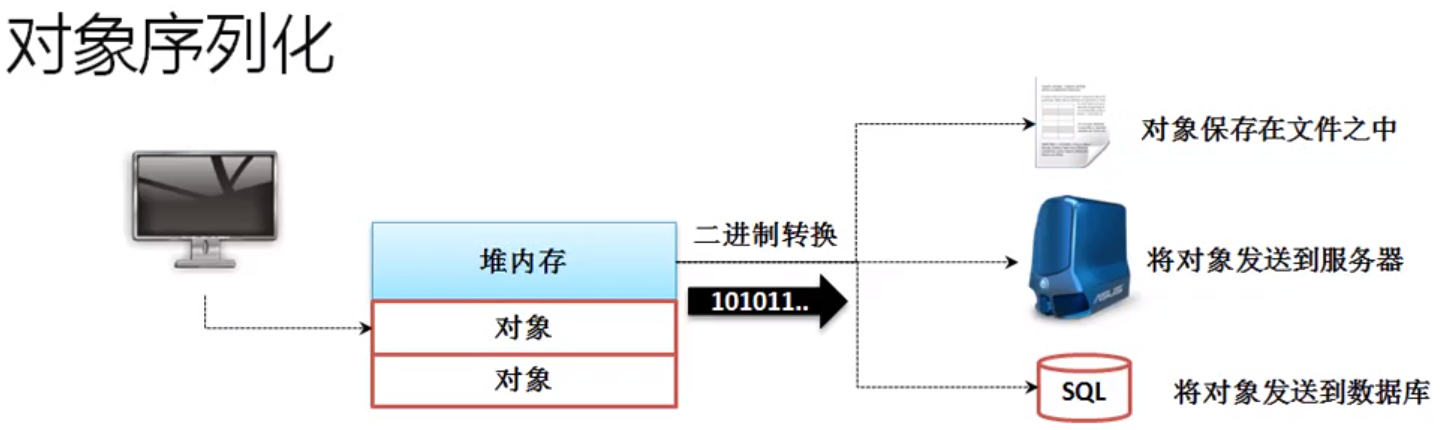
然后并不是所有的对象都可以被序列化,在java里有一个强制性的要求:如果要序列化的对象,那么序列化的类一定要实现 java.io.Serializable 父接口,作为序列化的标记。 但是这个方法没有任何的方法,因为它描述的是一种类的能力;
范例:定义一个可以被序列化的类
2
3
4
5
6
7
8
9
10
11
12
13
14
15
16
17
18
19
class Person implements Serializable{ // 可以被序列化
/**
*
*/
private static final long serialVersionUID = 1L;
private String name;
private int age;
public Person(String name, int age) {
super();
this.name = name;
this.age = age;
}
public String toString() {
return "Person [name=" + name + ", age=" + age + "]";
}
}
此时Person类产生的每一个对象都可以实现二进制的数据传输,属于可以被序列化的程序类;
2. 序列化与反序列化
有了序列化的支持类之后如果想要实现序列化与反序列化的操作则就可以利用以下的两个类完成
| 类名称 | 序列化:objectOutputStream |
反序列化:objectInputStream |
|---|---|---|
| 类定义 | public class ObjectOutputStream extends OutputStream implements ObjectOutput, ObjectStreamConstants |
public class ObjectInputStream extends InputStream implements ObjectInput, ObjectStreamConstants |
| 构造方法 | public ObjectOutputStream(OutputStream out)throws IOException |
public ObjectInputStream(InputStream in) throws IOException |
| 操作方法 | public final void writeObject(Object obj) throws IOException |
public final Object readObject() throws IOException, ClassNotFoundException |
范例:实现序列化与反序列化
2
3
4
5
6
7
8
9
10
11
12
13
14
15
16
17
18
19
20
21
22
23
24
25
26
27
28
29
30
31
32
33
34
35
36
37
38
39
40
41
42
43
44
45
46
47
48
49
50
51
52
53
54
import java.io.File;
import java.io.FileInputStream;
import java.io.FileNotFoundException;
import java.io.FileOutputStream;
import java.io.IOException;
import java.io.ObjectInputStream;
import java.io.ObjectOutputStream;
import java.io.Serializable;
public class JavaApiDemo {
private final static File SAVE_FILE = new File("./fileOperation/zenner.person");
public static void main(String[] args) throws Exception {
if (!SAVE_FILE.getParentFile().exists()) {
SAVE_FILE.getParentFile().mkdirs();
}
saveobject(new Person("笑喷涕",78));
System.out.println(loadObject());
}
public static void saveobject(Object obj) throws FileNotFoundException, IOException {
ObjectOutputStream oos = new ObjectOutputStream(new FileOutputStream(SAVE_FILE));
oos.writeObject(obj); // 序列化
oos.close();
}
public static Object loadObject() throws Exception {
ObjectInputStream ois = new ObjectInputStream(new FileInputStream(SAVE_FILE));
Object obj = ois.readObject(); // 反序列化
ois.close();
return obj;
}
}
("serial")
class Person implements Serializable{ // 可以被序列化
/**
*
*/
private String name;
private int age;
public Person(String name, int age) {
super();
this.name = name;
this.age = age;
}
public String toString() {
return "Person [name=" + name + ", age=" + age + "]";
}
}
/*
Person [name=笑喷涕, age=78]
*/
在java中的对象序列化与反序列化必须使用内部提供的对象操作流,因为里面牵扯到二进制数据的格式,这是不能够自定义处理,如果想要实现一组对象的序列化,则可以使用对象数组完成;
在很多的实际项目开发之中,开发者就很少能够见到这两个类,因为有许多容器的帮助开发者自动实现;
3. transient关键字
默认情况下执行了对象序列化的时候会将类中的全部属性的内容进行全部序列化,但很多情况下,并不需要进行序列化的处理,这时就可以在属性定义上使用transient关键字来完成;
在进行序列化处理的时候name属性的内容是不会被保存下来的,也就是说,读取的数据name将是其对应数据的默认值“null”。
1 | import java.io.File; |
如果假设类之中有一些是需要计算保存的属性内容往往是不需要被序列化的,这时就可以使用 transient关键字,在实际开发之中大部分需要被序列化的类往往都是简单java类,所以这一个关键字出现的频率并不高。
javaIO编程案例
1. 数字大小比较
编写程序,输入3个整数,并求出3个整数的最大值和最小值:
想要进行数字输入处理,那么应该保证输入错误的时候可以重新输入;那么为了达到重用的设计,我们应该准备一个单独的输入数据类。
- 定义一个输入工具类(Scanner实现)
2
3
4
5
6
7
8
9
10
11
12
13
14
15
16
17
18
19
20
import java.util.Scanner;
public class InputUtil {
public static int getInt(String prompt) {
int num = 0;
boolean flag = true;
while (flag) {
System.out.println(prompt);
("resource")
Scanner input = new Scanner(System.in); // 这里用的是 Scanner
if (input.hasNext("\\d+")) {
num = Integer.parseInt(input.next("\\d+"));
flag = false;
}else {
System.out.println("输入的内容不是数字!");
}
}
return num;
}
}
- 用BufferedReader来实现
2
3
4
5
6
7
8
9
10
11
12
13
14
15
16
17
18
19
20
21
22
23
24
25
26
27
28
29
30
31
32
import java.io.BufferedReader;
import java.io.IOException;
import java.io.InputStreamReader;
import java.util.Scanner;
public class InputUtil {
public static int getInt(String prompt) {
BufferedReader buf = new BufferedReader(new InputStreamReader(System.in));
int num = 0;
boolean flag = true;
while (flag) {
System.out.println(prompt);
String str = null ;
try {
str = buf.readLine();
if (str.matches("\\d+")) {
num = Integer.parseInt(str);
flag = false;
}else {
System.out.println("输入的内容不是数字!");
}
} catch (IOException e) {
// TODO Auto-generated catch block
System.out.println("输入的内容不是数字!");
}
}
return num;
}
}
- 定义数据的输入处理
2
3
4
5
6
7
8
9
public interface INumberService {
/**
* 输入数据并且返回输入数据的最大值与最小值
* @param count 表示输入数据的个数
* @return 整数数组,包含两项,第一个是最大值,第二个是最小值
*/
public int [] stat(int count);
}
- 实现接口的子类
2
3
4
5
6
7
8
9
10
11
12
13
14
15
16
17
18
19
20
21
22
23
24
25
import cn.jubingyi.Demo.service.INumberService;
import cn.jubingyi.Demo.util.InputUtil;
public class NumberServiceImpl implements INumberService {
public int[] stat(int count) {
int result [] = new int[2];
int data [] = new int[count];
for (int x = 0 ; x < data.length ; x ++) { // 信息循环输入
data[x] = InputUtil.getInt("请输入第“" + (x + 1) + "”个数字");
}
result[0] = data[0];
result[1] = data[1];
for (int x = 0 ; x < data.length ; x ++) {
if (data[x] > result[0]) {
result[0] = data[x];
}
if (data[x] < result[1]) {
result[1] = data[x];
}
}
return result;
}
}
- 定义工厂类获取接口对象
2
3
4
5
6
7
8
9
10
11
import cn.jubingyi.Demo.service.INumberService;
import cn.jubingyi.Demo.service.impl.NumberServiceImpl;
public class Factory {
private Factory() {}
public static INumberService getInstance() {
return new NumberServiceImpl();
}
}
- 编写测试类
2
3
4
5
6
7
8
9
10
11
12
13
import cn.jubingyi.Demo.factory.Factory;
import cn.jubingyi.Demo.service.INumberService;
public class IOcaseDemo {
public static void main(String[] args) {
INumberService numberService = Factory.getInstance();
int result [] = numberService.stat(5);
System.out.println("最大值: " + result[0] + "、最小值: " + result[1]);
}
}
2.文件保存处理
从键盘输入文件的内容和要保存的文件名称,然后根据输入的名称创建文件,并将内容保存到文件中。
在这里可以看出文件路径在文件启动之前就应该启动好。
1 | public class IOcaseDemo { |
- 定义一个文件操作的服务接口:
2
3
4
5
6
7
8
public interface IFileService {
/**
* 定义文件的保存处理方法
* @return 保存成功返回true,否则返回false
*/
public boolean save();
}
- 在
InputUtil类里面追加有输入字符串的处理方法
2
3
4
5
6
7
8
9
10
11
12
13
14
15
16
17
18
19
20
21
22
23
24
25
26
27
28
import java.io.BufferedReader;
import java.io.IOException;
import java.io.InputStreamReader;
import java.util.Scanner;
public class InputUtil {
private InputUtil() {}
public static String getString(String prompt) {
String str = null;
boolean flag = true;
while (flag) {
Scanner input = new Scanner(System.in);
System.out.println(prompt);
if (input.hasNext()) {
str = input.next().trim();
if (!"".equals(str)) { // 不是空字符串
flag = false;
}else {
System.out.println("输入的内容不允许为空!");
}
} else {
System.out.println("输入的内容不允许为空!");
}
}
return str;
}
}
- 实现文件名字与内容输入的实现类
2
3
4
5
6
7
8
9
10
11
12
13
14
15
16
17
18
19
20
21
22
23
24
25
26
27
28
29
30
31
32
33
34
35
import java.io.File;
import java.io.FileNotFoundException;
import java.io.FileOutputStream;
import java.io.PrintWriter;
import cn.jubingyi.Demo.service.IFileService;
import cn.jubingyi.Demo.util.InputUtil;
public class FileServiceImpl implements IFileService {
private String name;
private String content;
public FileServiceImpl() {
this.name = InputUtil.getString("请输入保存文件名称");
this.content = InputUtil.getString("请输入保存文件的内容");
}
public boolean save() {
File file = new File(IFileService.SAVE_DIR + this.name);
PrintWriter out = null;
try {
out = new PrintWriter(new FileOutputStream(file));
out.print(this.content);
}catch (FileNotFoundException e) {
return false;
} finally {
if (out != null) {
out.close();
}
}
return true;
}
}
- 工厂类
2
3
4
5
6
7
8
9
10
11
12
13
import cn.jubingyi.Demo.service.IFileService;
import cn.jubingyi.Demo.service.INumberService;
import cn.jubingyi.Demo.service.impl.FileServiceImpl;
import cn.jubingyi.Demo.service.impl.NumberServiceImpl;
public class Factory {
private Factory() {}
public static IFileService getInstance() {
return new FileServiceImpl();
}
}范例:测试类里有一个static使得其启动时就会提前执行;
2
3
4
5
6
7
8
9
10
11
12
13
14
15
16
17
18
19
20
import java.io.File;
import cn.jubingyi.Demo.factory.Factory;
import cn.jubingyi.Demo.service.IFileService;
import cn.jubingyi.Demo.service.INumberService;
public class IOcaseDemo {
static {
File file = new File(IFileService.SAVE_DIR);
if (!file.exists()) {
file.mkdirs();
}
}
public static void main(String[] args) {
IFileService fileService = Factory.getInstance();
fileService.save();
}
}
3. 字符串逆序显示
从键盘传入的多个字符串到程序中,并将它们按逆序输出在屏幕上。
程序之中应该考虑到如下的几种设计:
- 既然字符串的内容可以随时修改,最好建立一个StringBuffer做保存;
- 在进行数据处理的时候应由用户来决定是否继续输入
- 定义字符串的操作标准
2
3
4
5
6
public interface IStringService {
public void append(String str) ;
public String[] reverse();
}
- 实现子类里就使用
StringBuffer
2
3
4
5
6
7
8
9
10
11
12
13
14
15
16
17
18
19
20
21
22
23
24
25
26
27
import cn.jubingyi.Demo.service.IStringService;
public class StringServiceImpl implements IStringService {
private StringBuffer data = new StringBuffer();
public void append(String str) {
this.data.append(str).append("|");
}
public String[] reverse() {
String result [] = this.data.toString().split("\\|");
int center = result.length/2;
int head = 0;
int tail = result.length-1;
for(int x = 0 ; x < center ; x ++) {
String temp = result[head] ;
result[head] = result[tail] ;
result[tail] = temp ;
head ++;
tail --;
}
return result;
}
}
- 定义工厂类
2
3
4
5
6
7
8
9
10
11
import cn.jubingyi.Demo.service.IStringService;
import cn.jubingyi.Demo.service.impl.StringServiceImpl;
public class Factory {
private Factory() {}
public static IStringService getInstance() {
return new StringServiceImpl();
}
}
- 定义一个Menu处理类,采用交互式的界面完成处理
2
3
4
5
6
7
8
9
10
11
12
13
14
15
16
17
18
19
20
21
22
23
24
25
26
27
28
29
30
31
32
33
34
35
36
37
38
39
40
41
42
43
44
45
46
import java.util.Arrays;
import cn.jubingyi.Demo.factory.Factory;
import cn.jubingyi.Demo.service.IStringService;
import cn.jubingyi.Demo.util.InputUtil;
public class Menu {
private IStringService stringservice;
public Menu() {
this.stringservice = Factory.getInstance();
this.choose();
}
private void choose() {
this.show();
String choose = InputUtil.getString("请进行选择:");
switch(choose) { // 接受输入数据
case "1" :{
String str = InputUtil.getString("请输入字符串数据:");
this.stringservice.append(str);
choose();
}case "2" :{ // 逆序显示数据
String str = InputUtil.getString("数据反转:");
String result [] = this.stringservice.reverse();
System.out.println(Arrays.toString(result));
choose();
}case "0":{
System.out.println("Bye");
System.exit(1);
}default:{
System.out.println("未接受到选项\n\n\n");
choose();
}
}
}
public void show() {
System.out.println("*******************************");
System.out.println("【1】追加字符串数据");
System.out.println("【2】逆序显示所有字符串数据");
System.out.println("【0】结束程序进行");
System.out.println("\n\n\n");
}
}
- 主函数
2
3
4
5
6
7
8
9
import cn.jubingyi.Demo.Menu.Menu;
public class IOcaseDemo {
public static void main(String[] args) {
new Menu();
}
}
交互式整个比较容易
4. 数据排序处理
从键盘输入以下数据:“TOM:89|JERRY:90|TONY:95”,数据格式为“姓名:成绩|姓名:成绩|姓名:成绩”
- 对于排序要用Comparable接口完成,同时利用Arrays类来处理,这里面唯一不同的地方就在于此时的数据显示要用键盘输入
- 建立Student程序类,并且进行排序规则的配置;
2
3
4
5
6
7
8
9
10
11
12
13
14
15
16
17
18
19
20
21
22
23
24
public class Student implements Comparable<Student> {
private String name;
private double score;
public Student(String name,double score) {
this.name = name ;
this.score = score ;
}
public String toString() {
return "Student [name=" + name + ", score=" + score + "]";
}
public int compareTo(Student o) {
if (this.score > o.score) {
return -1;
} else if (this.score < o.score) {
return 1;
} else {
return 0;
}
}
}
- 建立数据的输入处理操作,因为牵扯到拆分问题:
2
3
4
5
6
import cn.jubingyi.Demo.vo.Student;
public interface IStudentService {
public Student [] getData(); // 获取排序后的数据
}
- 建立IStudentService子类
2
3
4
5
6
7
8
9
10
11
12
13
14
15
16
17
18
19
20
21
22
23
24
25
26
27
28
29
30
31
import java.util.Arrays;
import cn.jubingyi.Demo.service.IStudentService;
import cn.jubingyi.Demo.vo.Student;
public class StudentService implements IStudentService {
private String content;
private Student [] students;
public StudentService(String content) {
super();
this.content = content;
this.handle();
}
private void handle() { // 进行字符串数据的处理操作
String result [] = this.content.split("\\|");
this.students = new Student[result.length];
for (int x = 0 ; x < this.students.length ; x ++) {
String temp [] = result[x].split(":");
this.students[x] = new Student(temp[0],Double.parseDouble(temp[1]));
}
}
public Student[] getData() {
Arrays.sort(this.students);
return this.students;
}
}
- 定义Factory工厂类
2
3
4
5
6
7
8
9
10
import cn.jubingyi.Demo.service.impl.StudentServiceImpl;
import cn.jubingyi.Demo.util.InputUtil;
public class Factory {
private Factory() {}
public static IStringService getInstance() {
return (IStringService) new StudentServiceImpl(InputUtil.getString("请输入数据信息: "));
}
}5.编写测试类
2
3
4
5
6
7
8
9
10
11
import java.util.Arrays;
import cn.jubingyi.Demo.factory.Factory;
public class IOcaseDemo {
public static void main(String[] args) {
System.out.println(Arrays.toString(Factory.getInstance().getData()));
}
}
5. 数据排序处理深入
把全部输入信息保存在文件中,还可以添加信息,并可以显示全部信息
要进行内容保存,首先要确认好所有输入数据的保存位置,所有的数据之间如果要想沿用之前的设计结构,则数据文件里的保存应做到格式统一;
添加的时候还应考虑到有时添加的是“单独的内容”、“一组内容”;暂不考虑数据过大;
fds
fds
fds
| 类名称 | 序列化:objectOutputStream |
反序列化:objectInputStream |
|---|---|---|
| 类定义 | public class ObjectOutputStream extends OutputStream implements ObjectOutput, ObjectStreamConstants |
public class ObjectInputStream extends InputStream implements ObjectInput, ObjectStreamConstants |
| 构造方法 | public ObjectOutputStream(OutputStream out)throws IOException |
public ObjectInputStream(InputStream in) throws IOException |
| No | 方法名称 | 类型 | 描述 |
|---|---|---|---|
| 1 | |||
| 2 | |||
| 3 | |||
| 4 |