[TOC]
eclipse
启动后会选择工作目录
如果把一些视图关闭了可以从 windows+show View:
 t
t
里打开 “project Explorer”,”outline”,”console”,”problems”;
- 建立项目:命名为Myproject
项目创建完成后会产生两个目录:
src : 保存所有的原代码目录
bin : 保存所有的生成的 *.class 目录;
这个视图会和原来不一样,可以在右上角切换;
- 字体大小通过Ctrl + ++放大字体,通过 windows+preference也可以调整
范例:编写程序
- 输入main,然后ALt+”/“可补充完成
- 系统输出:sysout,ALT+/
代码生成功能可以生成一些类方法:
范例生成类方法:
- 光标放在这里:
- 状态栏【source】
- 里面可选 生成 setter,getter;有参构造,无参构造;
快捷键:
- Alt+/:代码编写提示
- Ctr + 1:代码纠正;
- CTRL + SHIFT + O :开发包的自动导入
- CTRL + / :注释代码
- CTRL + SHIFT + / :注释多行
- CTRL + SHIFT + F :格式化代码
- CTRL + SHIFT + L : 快捷键列表;
- 文档注释:
/**+回车
项目导入导出:
- 导出:【file】+【export】;
- 导入:【项目】右键+【properties】+【java build path】+【library】+【classpath】+【Add External JARs】
带参数的项目运行
3. debug操作
范例
类方法代码
1 | package cn.jubingyi.util; |
测试代码
1 | package cn.jubingyi.Demo; |
随后就可以以debug模式进行操作,
调试的几种形式:
- 单步跳入【F5】:进入到代码之中观察,进入到内部;
- 单步跳过【F6】:不进入到代码中观察,只观察代码表面
- 单步返回【F7】:后面的代码不再调试,返回到进入处
- 恢复执行【F8】:程序直接正常执行完毕
4. Junit测试工具
junit是一种用例测试工具;
测试用例
1 | package cn.jubingyi.util; |
- 选中要测试的例,继续选择新建;
- java-junit
- junit属于第三方程序包,需要额外的配置;
- 导入包后再import还报错了,删除项目自带的那个module什么文件;
- Junit测试有两个返回结果:
- GREEN BAR:测试通过
- RED BAR:测试失败;
java新特性
1.可变参数
设计一个方法,用于计算任意个数的整数的相加结果;
最开始用数组实现
现在可以用的方法定义形式是这样的:
1 | // 方法模板 |
参数上的 …就明确描述了数组得的结构;
1 | public class TestDeme { |
注意:传递多个参数,可变参数写在最后
2. foreach 循环(增加for)
原始数组:
1 | for (int x = 0; x < data.length; x++) { |
新特性:
1 | // 模板 |
增强型的for循环:
1 | public static void main(String[] args) { |
避免角标问题,避免越界问题;
3.静态导入
定义一个类
1 | public class MyMath { |
最开始肯定是先导入MyMath类,然后再用MyMath类来使用类中的static方法
范例:
1 | package cn.jubingyi.Demo; |
静态导入的方法:
1 | import cn.jubingyi.util.MyMath.*; |
泛型
可以解决程序的参数转换问题
1. 泛型问题引出
假设定义一个描述坐标的类Point; 类中有两个属性x,y;
- 参数可能有如下的选择:
- x = 10 、y = 20
- x = 10.1, y = 20.2
- x = 东经70° y = 北纬20°
首先要解决的就是Point类属性x,y类型问题,那么此时需要保存的有int,double,String类型;再Java里只有一种类型Object可以保存所有的类型;
- int 自动装箱 Integer,在自动转型到Object
- double 自动装箱 Double,Double自动向上到Object
- String 向上转型Object;
范例:定义Point类
1 | class Point{ |
范例:设置整形数据
1 | public static void main(String[] args) { |
范例设置字符串:
1 | public static void main(String[] args) { |
但设置就可以随意设置,但接收时总要确定的类型来接收;
2. 泛型基本定义
泛型就是类在定义时候不会设置类中的属性或方法中的参数的具体类型,在类使用的时候才进行定义
如果想要进行这种泛型的操作,就必须进行一个类型标记的声明
范例:Point类
1 | // 在Point类定义的时候完全不知道属性的类型,完全由使用者来决定 |
3. 通配符(重点)
增加了泛型解决了不同类型的定义问题,但又有了统一参数的问题
范例
1 | class Message <T>{ |
现在的问题是在于使用时类型使用的不是String那么其他的就不能使用fun函数了;也就是说还得写其他的重载方法;但写了所谓的重载方法也是错的:因为方法在程序看来都是Message<T>类型的,而不是你想要的,Message<String>,Message<Integer>之类的;
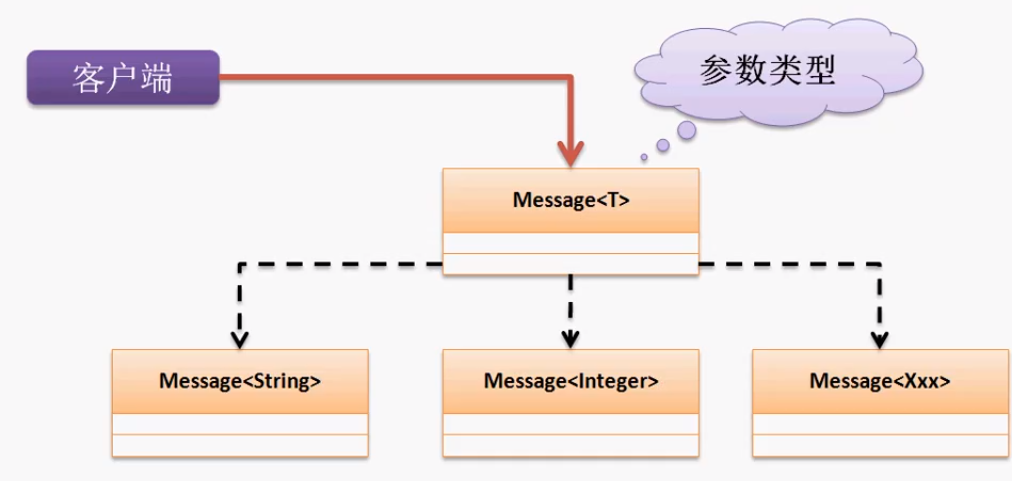
我们想要的就是可以接受所有的类型,又不想让用户随意修改我们使用的类型;
这里使用“?”来处理 :能接收一切,但不能修改
1 | public class TestDeme { |
而在“?”的基础上产生了两个子通配符
? extends 类: 设置泛型上限:- 例如
? extends Number,只能设置Number 或其子类,Integer,Double之类的
- 例如
- ? super 类: 设置泛型下限:
- 例如
? super String,表示只能够设置String或其父类:Object;
- 例如
范例:泛型上限
1 | package cn.jubingyi.Demo; |
泛型:泛型下限
1 | package cn.jubingyi.Demo; |
4. 泛型接口
范例:泛型接口
- 第一种类实现接口也泛型
2
3
4
5
6
7
8
9
10
11
12
13
14
public void print(T t);
}
class MessageImpl<T> implements IMessage<T>{
public void print(T t) {
System.out.println(t);
}
}
public class TestDeme {
public static void main(String[] args) {
IMessage<String> msg = new MessageImpl<String>();
msg.print("Hello world!!");
}
}
- 第二种:在子类实现接口的时候明确给出具体类型;
2
3
4
5
6
7
8
9
10
11
12
13
14
15
16
public void print(T t);
}
class MessageImpl implements IMessage<String>{ // 明确了类型是String
public void print(String t) {
// TODO Auto-generated method stub
System.out.println(t);
}
}
public class TestDeme {
public static void main(String[] args) {
IMessage<String> msg = new MessageImpl();
msg.print("Hello world!!");
}
}
5. 泛型方法
在类或接口里的方法就是泛型方法,但这些方法不一定非要在类或接口里
范例:定义泛型方法
2
3
4
5
6
7
8
9
10
11
12
public static void main(String[] args) {
Integer [] data = fun(1,2,3,4,5);
for (int temp:data) {
System.out.println(temp);
}
}
// <T>描述的是泛型标记的声明
public static <T> T[] fun(T ... args) {
return args;
}
}
枚举
枚举功能比较玩出现,所以一定程度上来说,可以不会;
1. 多例与枚举
多例设计模式:构造方法私有化,而后类内部需要提供有若干个实例化对象,后面通过static方法返回
范例:定义一个描述颜色基色的多例设计类
2
3
4
5
6
7
8
9
10
11
12
13
14
15
16
17
18
19
20
21
22
23
24
25
26
27
28
29
30
31
private static final Color RED = new Color("RED");
private static final Color GREEN = new Color("GREEN");
private static final Color BLUE = new Color("BLUE");
private String title;
private Color(String title) {
this.title = title;
}
public static Color getInstance(int ch) {
switch (ch) {
case 0:
return RED;
case 1:
return GREEN;
case 2:
return BLUE;
default:
return null;
}
}
public String toString() {
return this.title;
}
}
public class TestDeme {
public static void main(String[] args) {
System.out.println(Color.getInstance(2));
}
}限制本类实例化个数
所谓枚举就是一种高级的多例设计模式
范例
2
3
4
5
6
7
8
RED,GREEN,BLUE
}
public class TestDeme {
public static void main(String[] args) {
System.out.println(Color.RED);
}
}
2. Enum类
enum是对一种类型的包装:使用enum定义的枚举类本质上就相当于一个class定义的类继承了java.lang.Enum父类;
在Enum类里面有以下的方法:
构造方法:
1
protected Enum(String name, int ordinal)
当定义枚举类中对象的时候会自动设置序号和名字;
取得枚举名字:
1
public final String name()
取得枚举序号
1
public final int ordinal()
范例:
2
3
4
5
6
7
8
9
RED,GREEN,BLUE
}
public class TestDeme {
public static void main(String[] args) {
System.out.println(Color.RED.name()+" : "+Color.RED.ordinal());
}
}
//RED : 0
在枚举操作里还有一个方法可以取得所有的枚举数据:values()返回的是一个枚举的对象数组
范例:取得所有的枚举数据
2
3
4
5
6
7
8
9
10
11
12
13
14
15
RED, GREEN, BLUE
}
public class TestDeme {
public static void main(String[] args) {
for (Color temp : Color.values()) {
System.out.println(temp.name() + " : " + temp.ordinal());
}
}
}
/*
RED : 0
GREEN : 1
BLUE : 2
*/
面试题:请解释enum和Enum的区别
- enum是一个关键字,用enum定义的枚举类本质上就相当于一个类继承了Enum这个抽象类;
3. 枚举中定义其他结构
多例设计是在一个类中产生的,所以在这个类中就可以定义更多的属性和方法。
而枚举依靠以上额概念只能够说产生了若干个对象,但并不能扩充方法定义更多的结构。
所以设计枚举:定义属性,方法,或者实现接口
范例:在枚举中定义更多的结构
2
3
4
5
6
7
8
9
10
11
12
13
14
15
16
17
18
19
20
21
22
RED("红色"), GREEN("绿色"), BLUE("蓝色"); //定义有其他内容,枚举对象定义在第一行;
private String title;
private Color(String title) {
this.title = title;
}
public String toString() {
return this.title;
}
}
public class TestDeme {
public static void main(String[] args) {
for (Color temp : Color.values()) {
System.out.println(temp);
}
}
}
/*
红色
绿色
蓝色
*/
枚举还可以实现接口
范例:
2
3
4
5
6
7
8
9
10
11
12
13
14
15
16
17
18
19
20
21
22
23
24
25
26
27
28
public String getColor();
}
enum Color implements IColor{ // 实现了接口!!!
RED("红色"), GREEN("绿色"), BLUE("蓝色"); //定义有其他内容,枚举对象定义在第一行;
private String title;
private Color(String title) { // 构造方法不能用public
this.title = title;
}
public String toString() {
return this.title;
}
public String getColor() {
// TODO Auto-generated method stub
return this.title;
}
}
public class TestDeme {
public static void main(String[] args) {
IColor ic = Color.RED;
System.out.println(ic.getColor());
}
}
/*
红色
*/
4. 枚举应用
实现一个表示性别的对象
范例:
2
3
4
5
6
7
8
9
10
11
12
13
14
15
16
17
18
19
20
21
22
23
24
25
26
27
28
29
30
31
32
private String name;
private int age;
private Sex sex;
public People(String name, int age, Sex sex) {
super();
this.name = name;
this.age = age;
this.sex = sex;
}
public String toString() {
return "Person [name=" + name + ", age=" + age + ", sex=" + sex + "]";
}
}
enum Sex{
MALE("男"),FEMALE("女");
private String title;
private Sex(String title) {
this.title = title;
}
public String toString() {
return this.title;
}
}
public class TestDeme {
public static void main(String[] args) {
People per = new People("张三",20,Sex.MALE);
System.out.println(per);
}
}
枚举还支持switch判断
范例:
2
3
4
5
6
7
8
9
10
11
12
13
14
15
16
17
18
19
20
21
22
MALE("男"),FEMALE("女");
private String title;
private Sex(String title) {
this.title = title;
}
public String toString() {
return this.title;
}
}
public class TestDeme {
public static void main(String[] args) {
switch (Sex.MALE) {
case MALE:
System.out.println("是男人");
break;
case FEMALE:
System.out.println("是女人");
break;
}
}
}
Annotation
代码开发逻辑
- 项目开发:把所有地址信息写在程序里
如果地址换了,则需要修改程序,
- 使用一个配置文件,程序运行时要通过文件读取相关的配置操作
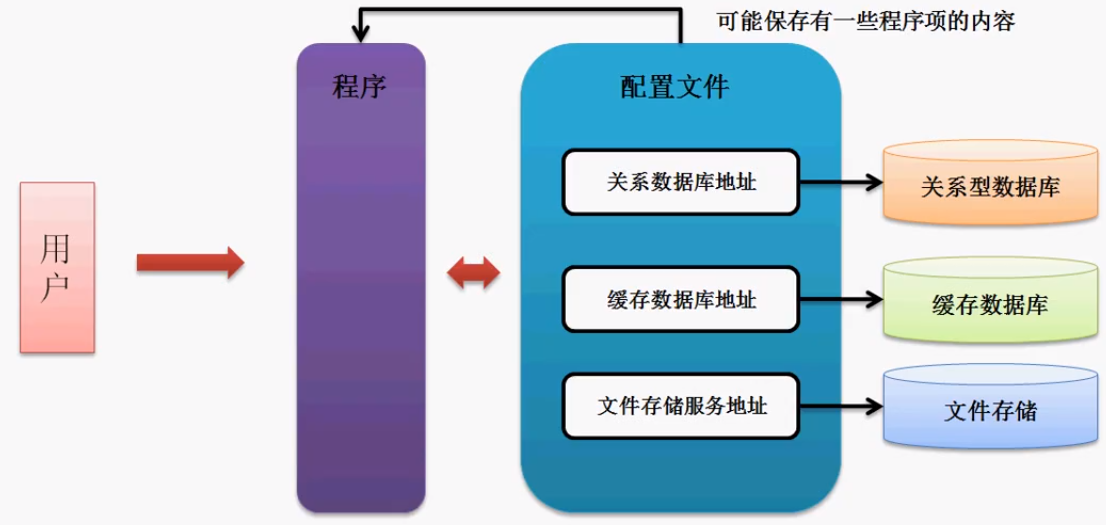
如果此时要更改一些配置,只需要更改配置文件即可(可以不修改源代码)
当使用配置文件后,
代码维护方便了,但开发还不是很方便;配置文件很难去修改,并且会造成一个项目的配置文件非常多;
JDK提供了一种做法把配置写进代码里,但用注解来控制;这样可以减少配置文件;
主要关注三个JDK内置的注解:@override,@Deprecated,@SuppressWarnnings
1. 准确覆写 @override
覆写:子类定义了与父类方法名称相同、参数类型及个数、返回值类型相同的方法的时候叫做覆写;被覆写方法不能拥有比父类更为严格的访问控制权限
范例:观察问题
2
3
4
5
6
7
8
9
10
11
12
class Person{
// 写了一个类里的toString写错成:tostring;导致没有报错;
public String tostring() {
return "是个人";
}
}
public class TestDeme {
public static void main(String[] args) {
System.out.println(new Person());
}
}
现在为了保证覆写方法严格,可以使用一个注解(@override)来检测是否覆写成功
2
3
4
5
6
public String tostring() {
return "是个人";
}
}报错:The method tostring() of type Person must override or implement a supertype method
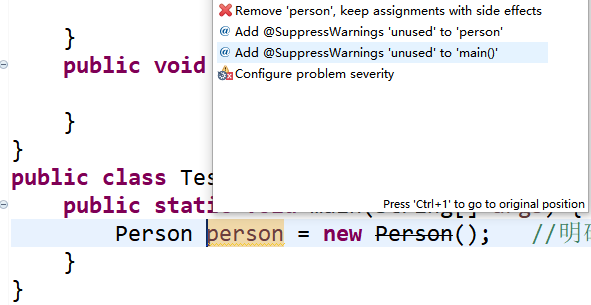
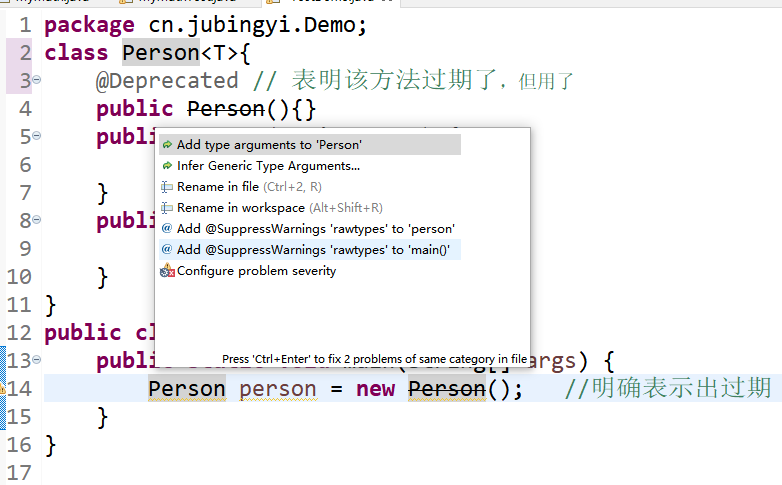
2. 过期声明 @Deprecated
如果一个程序类废止了,不能直接删除,加一个过期注解;
范例:
观察过期操作
2
3
4
5
6
7
8
9
10
11
12
13
14
15
// 表明该方法过期了,但用了也没事;
public Person(){}
public Person(String name) {
}
public void fun() {
}
}
public class TestDeme {
public static void main(String[] args) {
Person person = new Person(); //明确表示出过期
}
}

仅仅警告不建议在使用;
3. 压制警告 @SuppressWarnnings
调用某些操作会出现警告信息。警告不代表有错误;但用压制警告可以不再提示警告
这里可以给主方法main加l也可以给person加;
1 | public class TestDeme { |
接口定义加强
分析实际问题:
接口使用问题
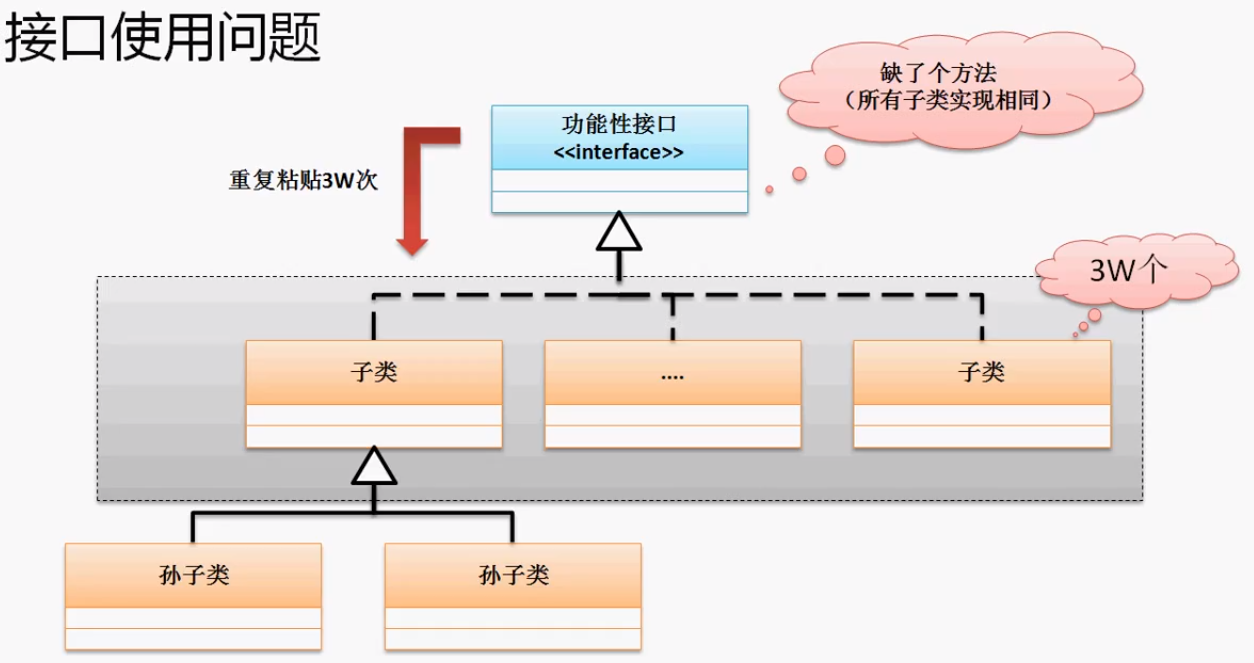
造成此种情况就在于接口只是个方法的声明,而没有具体方法实现;
- 使用default来定义普通方法,通过对象调用
- 使用static来定义静态方法,通过接口名来使用
范例:定义普通方法
2
3
4
5
6
7
8
9
10
11
12
13
14
15
16
17
18
19
20
21
22
public default void fun() { // 追加了普通方法体
System.out.println("Hello world!!");
}
public void print();
}
class Message implements IMessage{
public void print() {
// TODO Auto-generated method stub
System.out.println("你开门一直可以的");
}
}
public class TestDeme {
public static void main(String[] args) {
IMessage msg = new Message();
msg.print();
msg.fun();
}
}范例:追加静态方法
2
3
4
5
6
7
8
9
10
11
12
13
14
15
16
17
18
19
20
21
22
23
24
25
26
27
public default void fun() { // 追加了普通方法体
System.out.println("Hello world!!");
}
// 可以由类名称直接调用
public static IMessage getInstance() {
return new Message();
}
public void print();
}
class Message implements IMessage{
public void print() {
// TODO Auto-generated method stub
System.out.println("你开门一直可以的");
}
}
public class TestDeme {
public static void main(String[] args) {
IMessage msg = new Message();
msg.print();
msg.fun();
}
}
更像抽象类了。但可以多继承;这是一种挽救设计
函数式编程
1. lambda表达式
1 | interface IMessage{ |
面对对象方法太完整了;使用时需要写的太多了。而使用lambda表达式就可以写出一个简单的救急函数;
函数式编程模型,同样的效果:
1 | interface IMessage{ |
面对对象的要求在于结构必须非常完整
但是要想使用函数式编程,接口方法只能有一个;
所以可以加一个注解:@FunctionalInterface,加上这个注解的接口的方法就不能是两个及两个以上;
1 |
|
()->括号里写参数
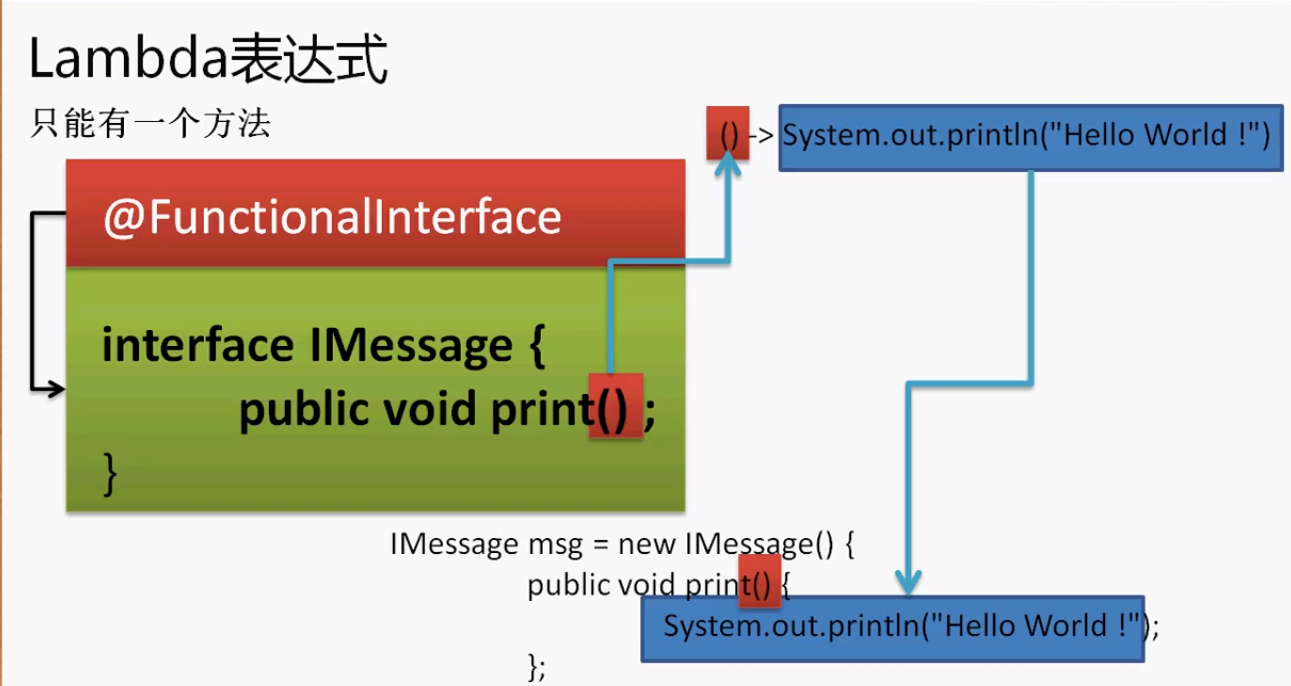
1 | IMessage msg1 = ()->System.out.println("hello world!"); // 单行语句 |
如果是返回,可以不写return直接写结果即可;
1 |
|
2.方法引用
数组、类有引用;
方法引用也就是别名;
- 引用静态方法:
类名称 :: static方法名称 - 引用某个对象方法:
实例化对象 :: 普通方法 - 引用某个特定类的方法:
类名称 :: 普通方法
范例:引用静态方法:
- 在String类中有一个valueof()
1 |
|
给函数起了个别名
范例:引用某一个对象中的方法
- 使用大写转换
2
3
4
5
6
7
8
9
10
11
interface IUtil<R>{
public R transfor();
}
public class TestDeme {
public static void main(String[] args) {
IUtil<String> iu = "hello"::toUpperCase; // 进行方法引用
System.out.println(iu.transfor());
}
}
/*HELLO*/范例:引用类中的普通方法
- String类有一个compareTo
2
3
4
5
6
7
8
9
10
11
12
13
interface IUtil<R,P>{
public R transfor(P p1,P p2);
}
public class TestDeme {
public static void main(String[] args) {
IUtil<Integer,String> iu = String::compareTo; // 进行方法引用
System.out.println(iu.transfor("H","h"));
}
}
/*
-32
*/范例:引用构造方法
2
3
4
5
6
7
8
9
10
11
12
13
14
15
16
17
18
19
20
21
22
23
24
25
26
27
private String name;
private int age;
public Person(String name, int age) {
super();
this.name = name;
this.age = age;
}
public String toString() {
return "Person [name=" + name + ", age=" + age + "]";
}
}
interface IUtil<R,FP,SP>{
public R transfor(FP p1,SP p2);
}
public class TestDeme {
public static void main(String[] args) {
IUtil<Person,String,Integer> iu = Person::new; // 进行方法引用
System.out.println(iu.transfor("张三",20));
}
}
/*
Person [name=张三, age=20]
*/
3. 内建函数式接口
lambda的核心在于函数式接口;函数式接口的核心在于只有一个方法;在函数式编程里面只需要有四类接口(java.util.function)
功能型的函数式接口:
1
public interface Function<T,R> {public R apply(T t);}
供给型函数式接口
1
public interface Supplier<T> {public T get();}
消费型函数式接口
1
public interface Consumer<T> {public void accept(T t);}
断言型函数式接口
1
public interface Predicate<T> {public boolean test(T t);}
范例:功能型的函数式接口
- String.valueOf
2
3
4
5
6
7
8
public class TestDeme {
public static void main(String[] args) {
Function<Integer,String> fun = String::valueOf;
System.out.println(fun.apply(1000));
}
}
输入一个数据对数据处理后再进行输出;
如果知道输入的是 Integer 可以用 IntFunction<R>泛型仅表示一个返回值;
范例:扩展的Function接口
2
3
4
5
6
7
8
public class TestDeme {
public static void main(String[] args) {
IntFunction<String> fun = String::valueOf;
System.out.println(fun.apply(1000));
}
}范例:使用供给型函数式接口
- “hello”.toUpperCase()
2
3
4
5
6
7
8
public class TestDeme {
public static void main(String[] args) {
Supplier<String> sup = "Hello"::toUpperCase;
System.out.println(sup.get());
}
}范例:消费型函数式接口
- System.out.println
2
3
4
5
6
7
8
public class TestDeme {
public static void main(String[] args) {
Consumer<String> fun = System.out::println;
System.out.println(fun.accept("Hello world"));
}
}范例:断言型函数式接口
- isempty()
2
3
4
5
6
7
8
public class TestDeme {
public static void main(String[] args) {
Predicate<String> pre = "hello"::startsWith;
System.out.println(pre.test("he"));
}
}
多线程编程
java的多线程编程是最大的特色
1. 进程与线程

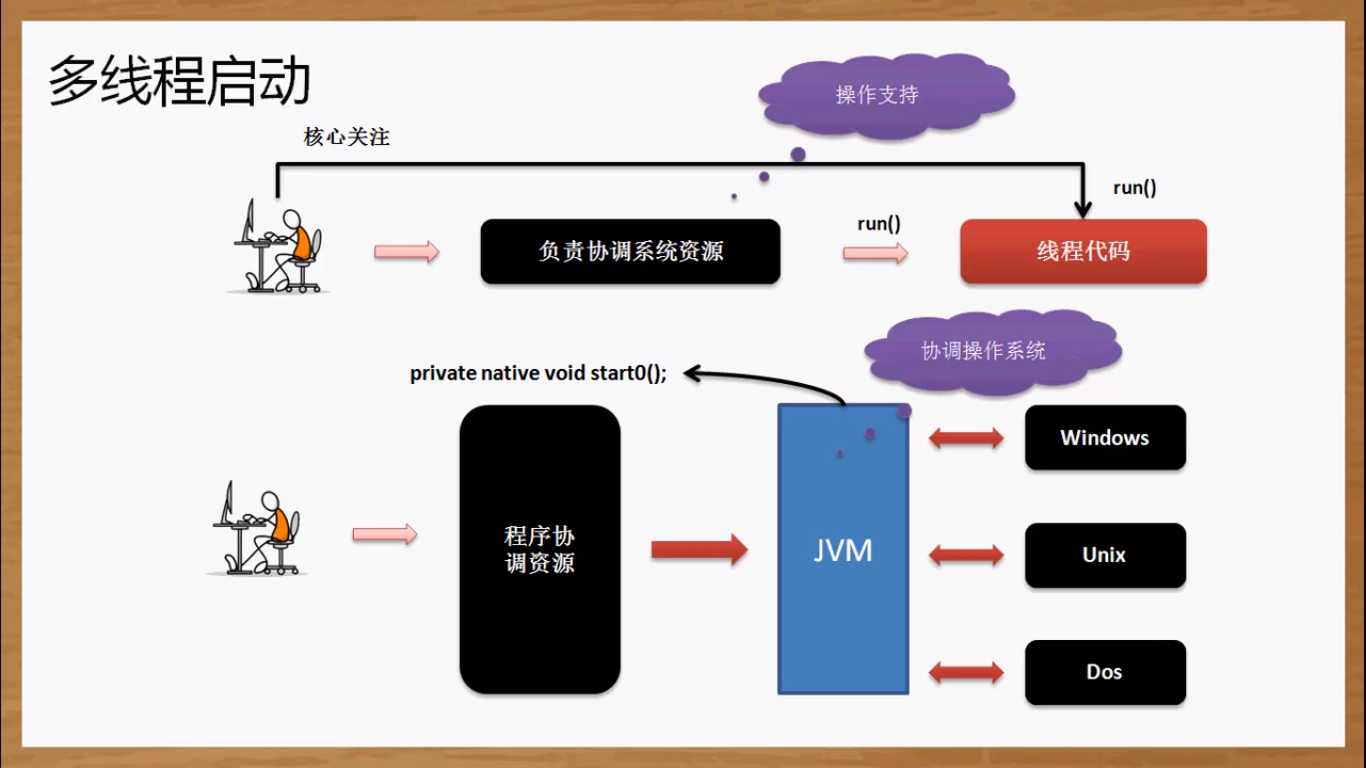
线程启动所花费的时间一定是短的;进程一定要比线程慢;
思考:那里体现了多线程的应用
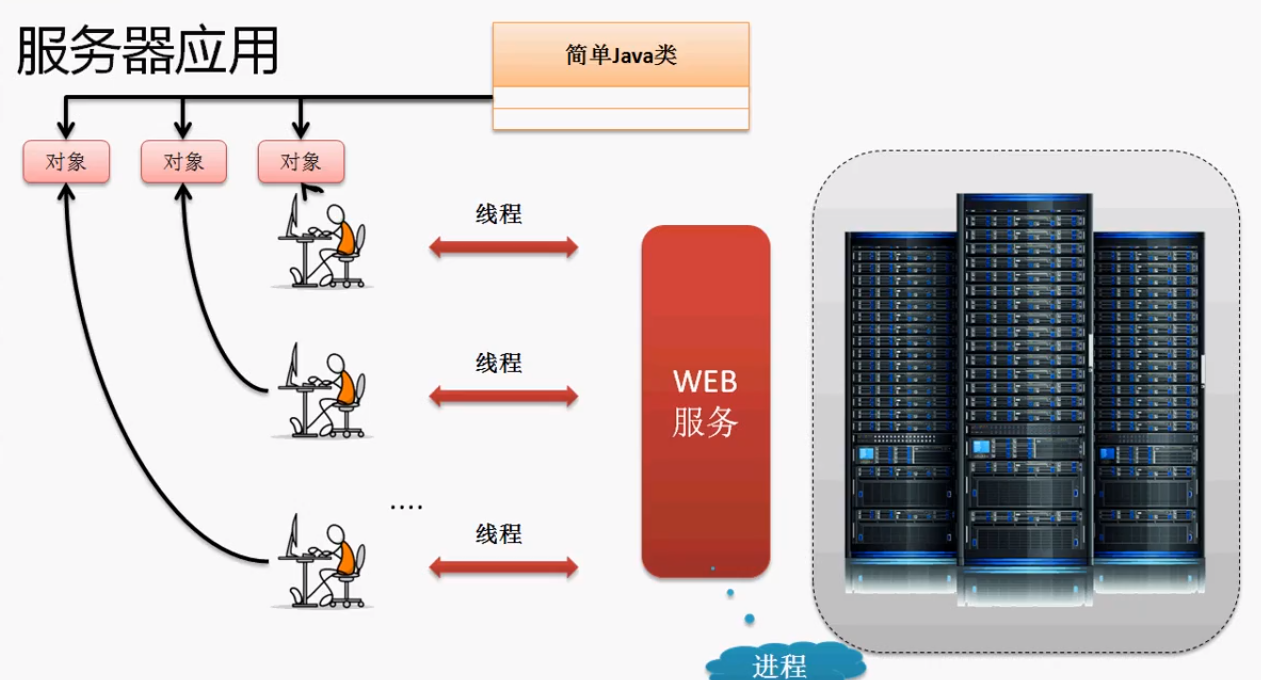
所谓的高并发指的就是访问的线程量暴高;高并发最直白的问题是:服务器的内存不够用了,无法处理过多的线程(用户)
线程实在进程基础上的一个划分。没有进程就没有线程;进程消失了,线程也就消失了;
2. 继承Thread类实现多线程
实现多线程的前提是:在一个执行主类里;
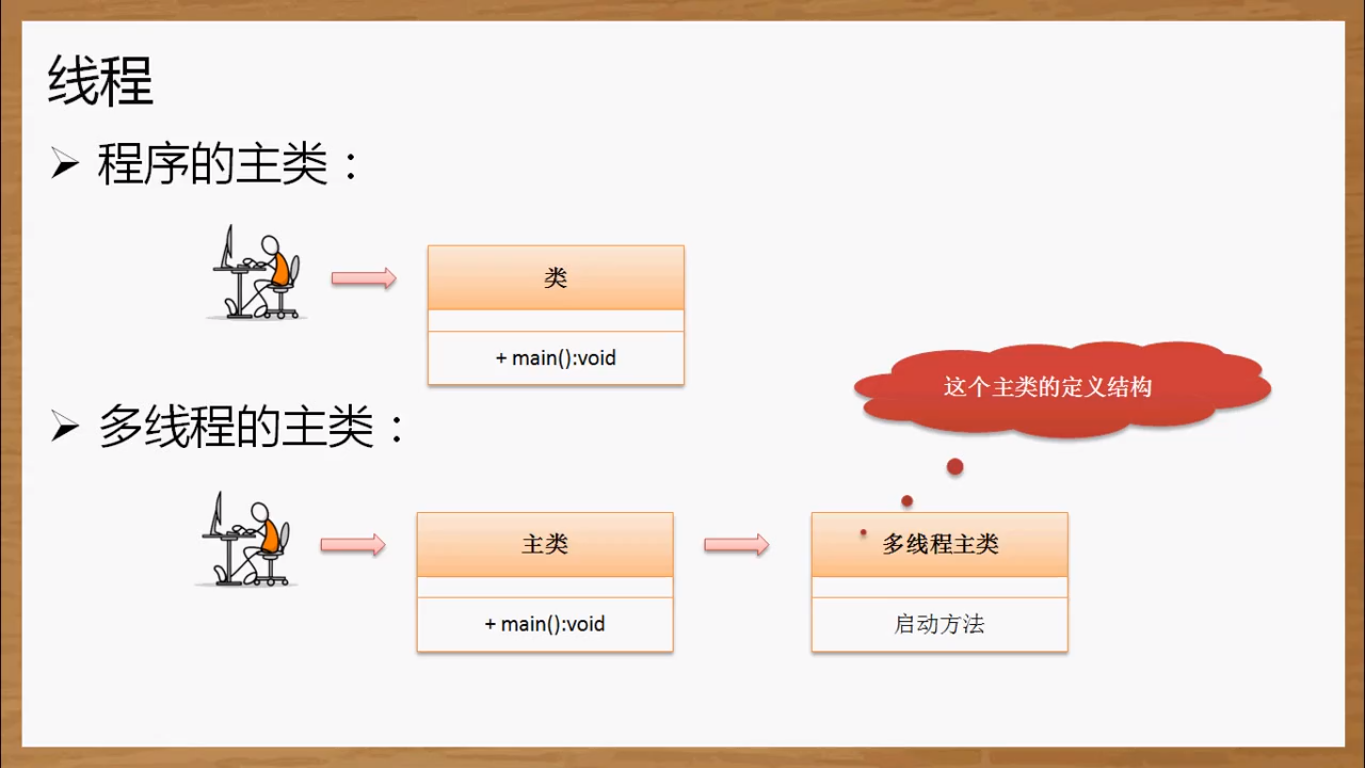
有两种途径实现多线程主类:
- 继承Thread类
- 【推荐】实现Runnable、Callable接口
java.lang.Thread是核心类; 若想定义一个线程的主类,直接的方法就是继承Thread类,而后覆写其中的run()方法(相当于线程中的主方法)。
范例:定义线程主体类
2
3
4
5
6
7
8
9
10
11
12
13
14
15
private String title;
public MyThread(String title) {
super();
this.title = title;
}
public void run() { // 所有的线程从此处开始执行;
// TODO Auto-generated method stub
super.run();
for (int x=0;x<10;x++) {
System.out.println(this.title+", x = "+x);
}
}
}
一般认为有了主题类就产生对象,执行run方法;但这里不能直接调用run方法;
范例:观察直接调用run方法
2
3
4
5
6
7
8
9
10
11
12
13
14
15
16
17
18
public static void main(String[] args) {
MyThread mt1 = new MyThread("线程A");
MyThread mt2 = new MyThread("线程B");
MyThread mt3 = new MyThread("线程C");
mt1.run();
mt2.run();
mt3.run();
}
}
/*
线程A, x = 0
线程A, x = 1
线程B, x = 0
线程B, x = 1
线程C, x = 0
线程C, x = 1
*/仅做了一个顺序打印,和多线程没有关系;多线程也是交替执行,不是各自执行各自的;
正确启动多线程的方式是Thread类中的start方法
- 启动多线程:
public void start()
范例:正确启动多线程
2
3
4
5
6
7
8
9
10
11
12
13
14
15
16
17
18
19
20
21
public static void main(String[] args) {
MyThread mt1 = new MyThread("线程A");
MyThread mt2 = new MyThread("线程B");
MyThread mt3 = new MyThread("线程C");
mt1.start();
mt2.start();
mt3.start();
}
}
/*
线程B, x = 0
线程B, x = 1
线程C, x = 0
线程C, x = 1
线程C, x = 2
线程A, x = 0
线程B, x = 2
线程A, x = 1
线程A, x = 2
*/此时执行代码发现所有的线程对象变为了交替执行;
为什么要这样做而不是直接执行start?
这里它查看了源代码:
- 每一个线程只能启动一次
3. 使用Runable接口实现多线程
Thread类的核心功能是进行线程启动,但是如果一个类直接继承Thread类所造成的问题就是单继承局限;
另一种实现模式:Runnable接口
1 |
|
同时也存在一个run方法和Thread一样得
范例:利用Runnable定义线程主体类
2
3
4
5
6
7
8
9
10
11
12
13
14
15
16
17
private String title;
public MyThread(String title) {
super();
this.title = title;
}
public void run() {
// TODO Auto-generated method stub
for (int x = 0; x<10;x++) {
System.out.println(this.title + ", x="+x);
}
}
}
但是此时没有了start类,解决方法是Thread类里有一个构造方法:
1 | public Thread(Runnable target) |
可以接收Runnable的接口对象,也就是可以通过Thread去启动它;
范例:启动多线程
2
3
4
5
6
7
8
9
10
11
12
13
14
15
16
17
18
19
20
21
22
23
24
public static void main(String[] args) {
MyThread mt1 = new MyThread("线程A");
MyThread mt2 = new MyThread("线程B");
MyThread mt3 = new MyThread("线程C");
new Thread(mt1).start();
new Thread(mt2).start();
new Thread(mt3).start();
}
}
/*
线程A, x=0
线程C, x=0
线程B, x=0
线程C, x=1
线程C, x=2
线程B, x=1
线程A, x=1
线程B, x=2
线程C, x=3
线程B, x=3
线程A, x=2
线程A, x=3
*/这时就启动了多线程,多线程的启动永远都是THread类里的start方法;
也可以启动多个:
2
3
4
5
6
7
8
9
10
11
12
13
14
15
16
17
18
19
public static void main(String[] args) {
MyThread mt1 = new MyThread("线程A");
MyThread mt2 = new MyThread("线程B");
MyThread mt3 = new MyThread("线程C");
new Thread(mt1).start();
new Thread(mt1).start();
}
}
/*
线程A, x=0
线程A, x=0
线程A, x=1
线程A, x=2
线程A, x=1
线程A, x=3
线程A, x=2
线程A, x=3
*/
此时的Runnable接口对象也可以采用匿名内部类或lambda表达式来定义
范例:通过匿名内部类定义操作
2
3
4
5
6
7
8
9
10
11
public static void main(String[] args) {
new Thread(new Runnable() {
public void run() {
// TODO Auto-generated method stub
System.out.println("Hello world!!");
}
}).start();
}
}范例:使用lambda
2
3
4
5
public static void main(String[] args) {
new Thread(()->System.out.println("Hello world")).start();
}
}
4. Thread和Runnable的区别
使用形式上来说Runable可以实现多继承;
但这两个都有一定的联系;
首先观察Thread类的继承定义形式
1 | public class Thread extends Object implements Runnable |
翻开源代码看到Thread实现了Runnable中的run()方法,他写的是:如果targe不为空就运行这个target
这个target在Thread类的构造时赋值进来的。Thread初始化时把它作为属性保存了起来;
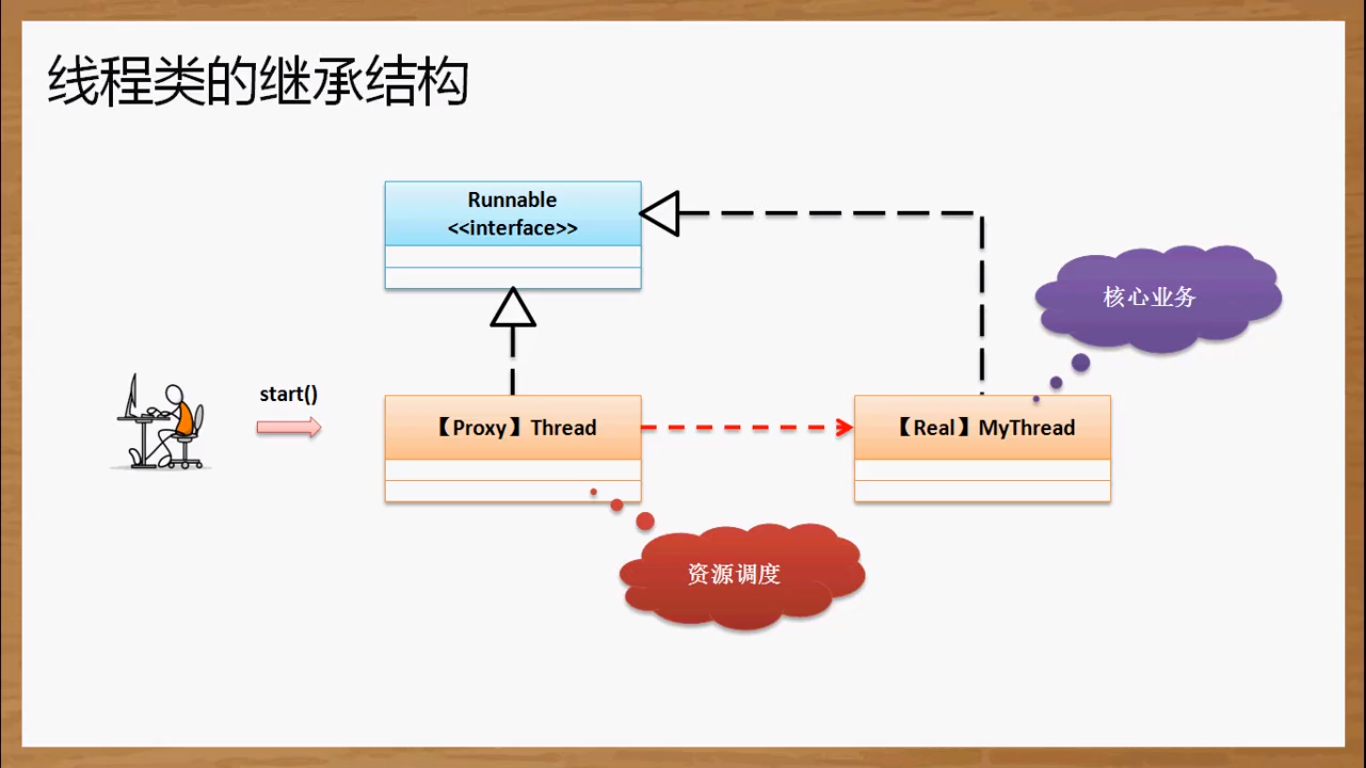
所以在多线程的处理上使用的就是代理设计模式;
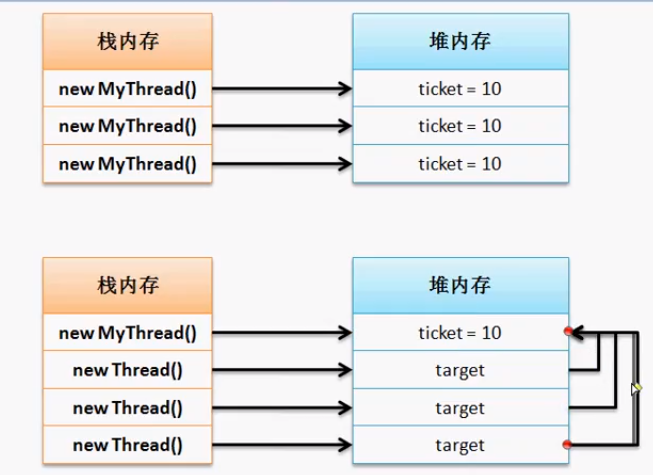
实际上开发过程中Runnable还有一个特点:使用Runnable实现的多线程的程序类可以更好地描述出数据的共享的概念;(并不是说Thread不能)
目标只是希望产生若干个线程进行同一数据的处理操作
范例:使用Thread实现数据操作
2
3
4
5
6
7
8
9
10
11
12
13
14
15
16
17
18
19
20
21
22
23
24
25
26
27
28
29
30
31
32
33
34
35
36
37
38
39
40
41
42
43
44
45
46
47
48
49
50
51
52
private int ticket = 10;
public void run() {
// TODO Auto-generated method stub
for (int x = 0; x < 10; x++) {
if (this.ticket>0) {
System.out.println("卖票,票剩 = "+ this.ticket--);
}
}
}
}
public class TestDeme {
public static void main(String[] args) {
new MyThread().start();
new MyThread().start();
new MyThread().start();
}
}
/*
卖票,票剩 = 10
卖票,票剩 = 9
卖票,票剩 = 8
卖票,票剩 = 7
卖票,票剩 = 6
卖票,票剩 = 5
卖票,票剩 = 4
卖票,票剩 = 3
卖票,票剩 = 2
卖票,票剩 = 1
卖票,票剩 = 10
卖票,票剩 = 10
卖票,票剩 = 9
卖票,票剩 = 9
卖票,票剩 = 8
卖票,票剩 = 8
卖票,票剩 = 7
卖票,票剩 = 7
卖票,票剩 = 6
卖票,票剩 = 5
卖票,票剩 = 6
卖票,票剩 = 4
卖票,票剩 = 5
卖票,票剩 = 3
卖票,票剩 = 2
卖票,票剩 = 1
卖票,票剩 = 4
卖票,票剩 = 3
卖票,票剩 = 2
卖票,票剩 = 1
*/各自卖各自的10张票
范例:用Thraed实现数据共享
2
3
4
5
6
7
8
9
10
11
12
13
14
15
16
17
18
19
20
public static void main(String[] args) {
MyThread mt = new MyThread();
new Thread(mt).start();
new Thread(mt).start();
new Thread(mt).start();
}
}
/*
卖票,票剩 = 10
卖票,票剩 = 9
卖票,票剩 = 7
卖票,票剩 = 8
卖票,票剩 = 5
卖票,票剩 = 6
卖票,票剩 = 3
卖票,票剩 = 4
卖票,票剩 = 1
卖票,票剩 = 2
*/它把同一堆内存空间(MyThread对象)传给了一个新的Thread对象让其各自start;但是这样有点多此一举,因为MyThread也有继承自Thread里的start方法;它用了别人的
此时的MyThread对象各自有各自的空间就像图中上面的这个;
范例:实现Runnable实现数据共享
2
3
4
5
6
7
8
9
10
11
12
13
14
15
16
17
18
19
20
21
22
23
24
25
26
27
28
29
30
31
32
33
private int ticket = 10;
public void run() {
// TODO Auto-generated method stub
for (int x = 0; x < 10; x++) {
if (this.ticket>0) {
System.out.println("卖票,票剩 = "+ this.ticket--);
}
}
}
}
public class TestDeme {
public static void main(String[] args) {
MyThread mt = new MyThread();
new Thread(mt).start();
new Thread(mt).start();
new Thread(mt).start();
}
}
/*
卖票,票剩 = 10
卖票,票剩 = 8
卖票,票剩 = 7
卖票,票剩 = 6
卖票,票剩 = 5
卖票,票剩 = 4
卖票,票剩 = 3
卖票,票剩 = 2
卖票,票剩 = 1
卖票,票剩 = 9
*/此时Runnable是没有
start()方法的它传给Thread类是合适的
5. 线程运行状态

调用了start不是立即执行,而是就绪,等待资源分配给了线程后才进入运行资源;
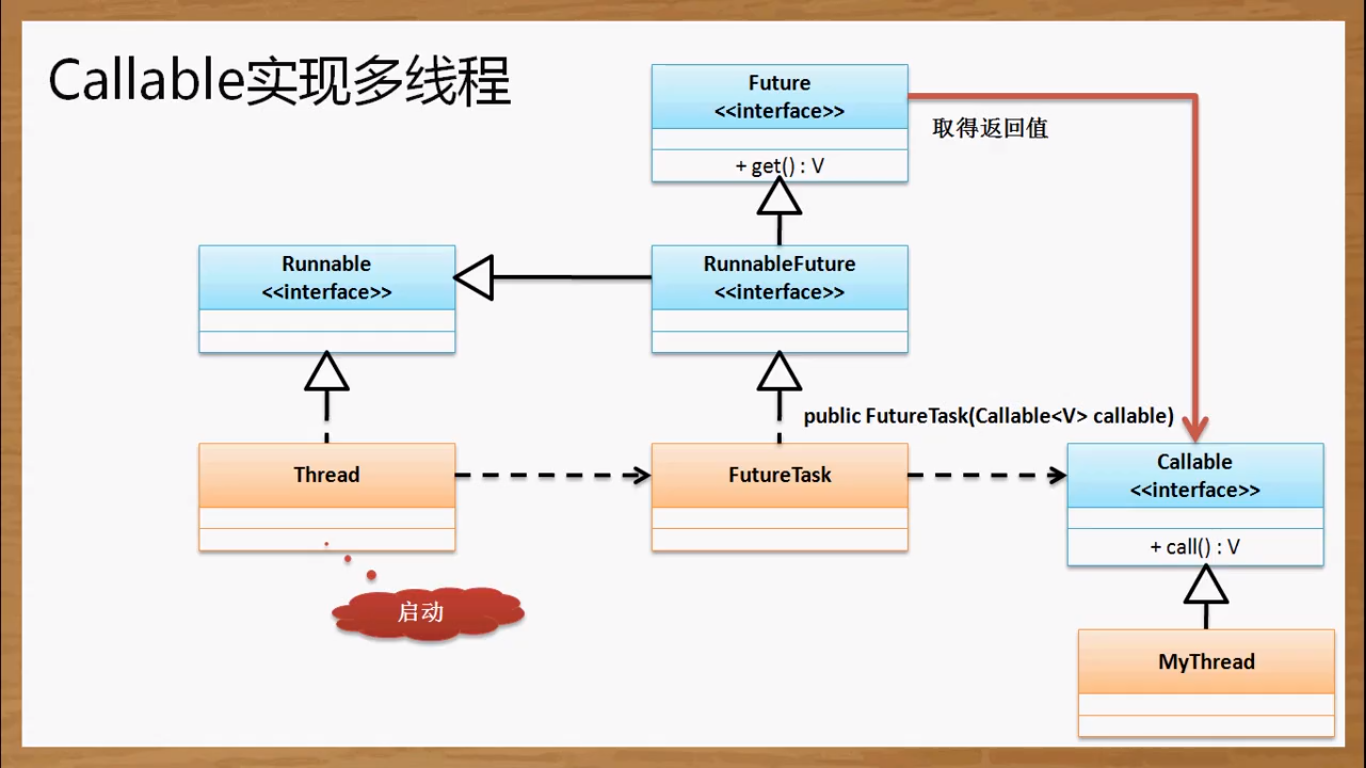
6. 通过Callable实现多线程
JDK1.5加入了一个新的开发包:java.util.concurrent,主要进行高性能开发使用的,提供高并发操作才会用到的类。在这个包里面定义有一个新接口Callable
1 | public interface Callable<V>{ |
Runnable虽也是线程主方法,但是它么有返回值;很多时候需要返回值时就可以用Callable
范例:使用Callable定义线程主体类
2
3
4
5
6
7
8
9
10
11
12
class MyThread implements Callable<String>{
public String call() throws Exception {
// TODO Auto-generated method stub
for (int x = 0; x < 10; x++) {
System.out.println("卖票,x = "+ x);
}
return "票卖完了";
}
}
Thread貌似与Callable没啥关系但通过分析得出以下的关系图
范例:启动Callable多线程
2
3
4
5
6
7
8
9
10
11
12
13
14
15
16
17
18
19
20
public static void main(String[] args) throws InterruptedException, ExecutionException {
FutureTask<String> task = new FutureTask<String>(new MyThread());
new Thread(task).start();
System.out.println(task.get());
}
}
/*
卖票,x = 0
卖票,x = 1
卖票,x = 2
卖票,x = 3
卖票,x = 4
卖票,x = 5
卖票,x = 6
卖票,x = 7
卖票,x = 8
卖票,x = 9
票卖完了
*/
多线程常用操作方法
多线程的主要操作方法都在Thread里面。重点掌握核心几个方法就可以了;
1. 线程的命名及取得
Thread类里提供了如下的名称操作方法;
| No. | 方法 | 类型 | 描述 |
|---|---|---|---|
| 1 | public Thread(Runnable target, String name) |
构造 | 创建线程对象时设置好名字 |
| 2 | public final void setName(String name) |
普通 | 设置线程名字 |
| 3 | public final String getName() |
普通 | 取得线程名字 |
如果想要取得线程的对象,在Thread类有一个方法:
- 取得当前线程对象:
public static Thread currentThread();
范例:观察线程名称的取得
2
3
4
5
6
7
8
9
10
11
12
13
14
15
16
17
18
19
20
21
22
23
24
25
26
27
28
29
30
31
public void run() {
// TODO Auto-generated method stub
for (int x = 0; x < 4; x++) {
System.out.println(Thread.currentThread().getName()+",x = "+x);
}
}
}
public class TestDeme {
public static void main(String[] args) {
MyThread mt = new MyThread();
new Thread(mt).start();
new Thread(mt).start();
new Thread(mt,"有名线程").start();
}
}
/*
Thread-0,x = 0
Thread-0,x = 1
有名线程,x = 0
Thread-1,x = 0
有名线程,x = 1
Thread-0,x = 2
有名线程,x = 2
Thread-1,x = 1
Thread-1,x = 2
Thread-1,x = 3
有名线程,x = 3
Thread-0,x = 3
*/没有设置线程名字会自动分配一个;
范例:观察线程执行结果
2
3
4
5
6
7
8
9
10
11
12
13
14
15
16
17
18
public void run() {
// TODO Auto-generated method stub
System.out.println(Thread.currentThread().getName());
}
}
public class TestDeme {
public static void main(String[] args) {
MyThread mt = new MyThread();
mt.run(); // 通过对象调用run方法 main
new Thread(mt).start(); //没有名字通过线程调用 Thread-0
}
}
/*
main
Thread-0
*/主方法就是一个线程;其他线程就是由主线程创建的
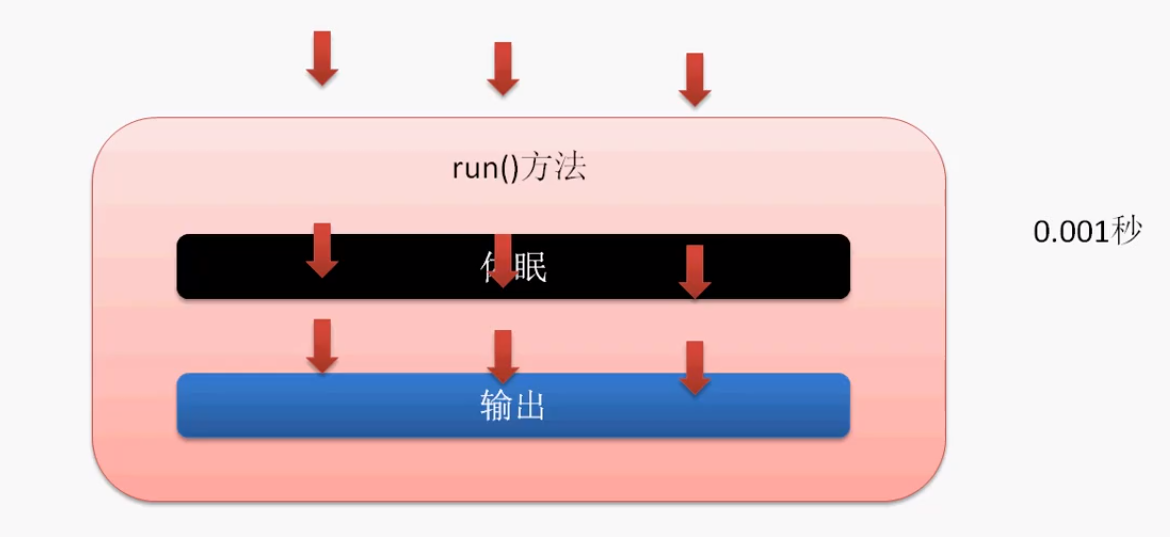
2. 线程休眠
用来模拟延迟操作;
指的是让线程暂缓执行,等到了一定的时间再运行;
方法:
1
public static void sleep(long millis) throws InterruptedException
- 休眠实现使用毫秒为单位
范例:休眠操作
2
3
4
5
6
7
8
9
10
11
12
13
14
15
public void run() {
// TODO Auto-generated method stub
for (int x = 0; x < 20; x++) {
try {
Thread.sleep(1000);
} catch (InterruptedException e) {
// TODO Auto-generated catch block
e.printStackTrace();
}
System.out.println(Thread.currentThread().getName()+",x = "+x);
}
}
}进入代码的顺序有差异,但他们的执行基本是并发执行
3. 线程中断
线程被打断一定是由其他线程完成的;Thread类里提供的中断执行处理方法:
- 判断线程是否被中断:
public boolean isInterrupted() - 中断线程执行:
public void interrupt();
范例:观察线程中断处理
2
3
4
5
6
7
8
9
10
11
12
13
14
15
16
17
18
19
20
21
22
23
24
25
public static void main(String[] args) {
Thread thread = new Thread(()->{
System.out.println("我想睡觉");
try {
Thread.sleep(10000);
System.out.println("睡够了!!");
} catch (InterruptedException e) {
// TODO Auto-generated catch block
System.out.println("谁把我弄醒了");
}
});
thread.start();
try {
Thread.sleep(1000);
} catch (InterruptedException e) {
// TODO Auto-generated catch block
e.printStackTrace();
}
if (!thread.isInterrupted()) {
System.out.println("打扰你睡眠");
thread.interrupt();
}
}
}所有执行的线程都是可以被中断的;
4. 线程强制执行
线程强制执行是指当满足某些条件之后,某一线程对象将可以一直独占资源,一直到程序执行结束;
范例:没有强制执行的程序
2
3
4
5
6
7
8
9
10
11
12
13
14
15
16
17
18
19
20
21
22
23
24
25
26
27
28
29
30
31
32
33
34
35
36
37
38
39
40
41
42
43
44
45
46
47
public static void main(String[] args) {
Thread thread = new Thread(() -> {
for (int x = 0; x < 20; x++) {
System.out.println(Thread.currentThread().getName() + ",x = " + x);
}
}, "正常的线程");
thread.start();
for (int x = 0; x < 20; x++) {
System.out.println("[霸道的Main线程] Number = " + x);
}
}
}
/*
[霸道的Main线程] Number = 0
正常的线程,x = 0
[霸道的Main线程] Number = 1
正常的线程,x = 1
[霸道的Main线程] Number = 2
正常的线程,x = 2
[霸道的Main线程] Number = 3
[霸道的Main线程] Number = 4
正常的线程,x = 3
[霸道的Main线程] Number = 5
正常的线程,x = 4
[霸道的Main线程] Number = 6
[霸道的Main线程] Number = 7
[霸道的Main线程] Number = 8
[霸道的Main线程] Number = 9
[霸道的Main线程] Number = 10
[霸道的Main线程] Number = 11
[霸道的Main线程] Number = 12
正常的线程,x = 5
[霸道的Main线程] Number = 13
正常的线程,x = 6
[霸道的Main线程] Number = 14
正常的线程,x = 7
[霸道的Main线程] Number = 15
[霸道的Main线程] Number = 16
[霸道的Main线程] Number = 17
[霸道的Main线程] Number = 18
[霸道的Main线程] Number = 19
正常的线程,x = 8
正常的线程,x = 9
正常的线程,x = 10
正常的线程,x = 11
*/
强制执行的方法:
1 | public final void join() throws InterruptedException |
范例:强制执行
2
3
4
5
6
7
8
9
10
11
12
13
14
15
16
17
18
19
20
21
22
23
24
25
26
27
28
29
30
31
32
33
34
35
36
37
38
39
40
41
42
43
44
45
46
47
48
49
50
51
52
53
54
55
56
57
58
59
60
61
62
63
64
public static void main(String[] args) {
Thread MainThread = Thread.currentThread(); // 获得主线程
Thread thread = new Thread(() -> {
for (int x = 0; x < 20; x++) {
if (x>3) {
try {
MainThread.join(); // 霸道线程独占!
} catch (InterruptedException e) {
// TODO Auto-generated catch block
e.printStackTrace();
}
}
System.out.println(Thread.currentThread().getName() + ",x = " + x);
}
}, "正常的线程");
thread.start();
for (int x = 0; x < 20; x++) {
System.out.println("[霸道的Main线程] Number = " + x);
}
}
}
/*
[霸道的Main线程] Number = 0
[霸道的Main线程] Number = 1
正常的线程,x = 0
[霸道的Main线程] Number = 2
正常的线程,x = 1
[霸道的Main线程] Number = 3
正常的线程,x = 2
[霸道的Main线程] Number = 4
正常的线程,x = 3
[霸道的Main线程] Number = 5
[霸道的Main线程] Number = 6
[霸道的Main线程] Number = 7
[霸道的Main线程] Number = 8
[霸道的Main线程] Number = 9
[霸道的Main线程] Number = 10
[霸道的Main线程] Number = 11
[霸道的Main线程] Number = 12
[霸道的Main线程] Number = 13
[霸道的Main线程] Number = 14
[霸道的Main线程] Number = 15
[霸道的Main线程] Number = 16
[霸道的Main线程] Number = 17
[霸道的Main线程] Number = 18
[霸道的Main线程] Number = 19
正常的线程,x = 4
正常的线程,x = 5
正常的线程,x = 6
正常的线程,x = 7
正常的线程,x = 8
正常的线程,x = 9
正常的线程,x = 10
正常的线程,x = 11
正常的线程,x = 12
正常的线程,x = 13
正常的线程,x = 14
正常的线程,x = 15
正常的线程,x = 16
正常的线程,x = 17
正常的线程,x = 18
正常的线程,x = 19
*/
5.线程礼让
先将资源让出去,让别的线程先完成;用Thread中的方法:
- 礼让:
public static void yield()
1 | public class TestDeme { |
每一次礼让只会礼让当前一次的资源;可能就是一次程序轮转的机会;
6. 线程优先级
优先级越高越有可能先执行
Thread类里有以下优先级操作:
- 设置优先级:
public final void setPriority(int newPriority) - 取得优先级:
public final int getPriority()
对于优先级设置的内容可以通过Thread类的几个常量来决定;
- 最高优先级:
public static final int MAX_PRIORITY - 中等优先级:
public static final int NORM_PRIORITY - 最低优先级:
public static final int MIN_PRIORITY

范例:设置优先级
2
3
4
5
6
7
8
9
10
11
12
13
14
15
16
17
18
19
20
21
22
23
24
25
26
27
28
29
30
public void run() {
// TODO Auto-generated method stub
for (int x = 0; x < 20; x++) {
try {
Thread.sleep(1000);
} catch (InterruptedException e) {
// TODO Auto-generated catch block
e.printStackTrace();
}
System.out.println(Thread.currentThread().getName() + ",x = " + x);
}
}
}
public class TestDeme {
public static void main(String[] args) {
MyThread mt = new MyThread();
Thread t1 = new Thread(mt,"线程A");
Thread t2 = new Thread(mt,"线程B");
Thread t3 = new Thread(mt,"线程C");
t1.setPriority(Thread.MAX_PRIORITY);
t2.setPriority(Thread.MIN_PRIORITY);
t3.setPriority(Thread.NORM_PRIORITY);
t1.start();
t2.start();
t3.start();
}
}
主方法是一个线程,那么主线程的优先级可以这么得到:
1 | public class TestDeme { |
线程的同步与死锁
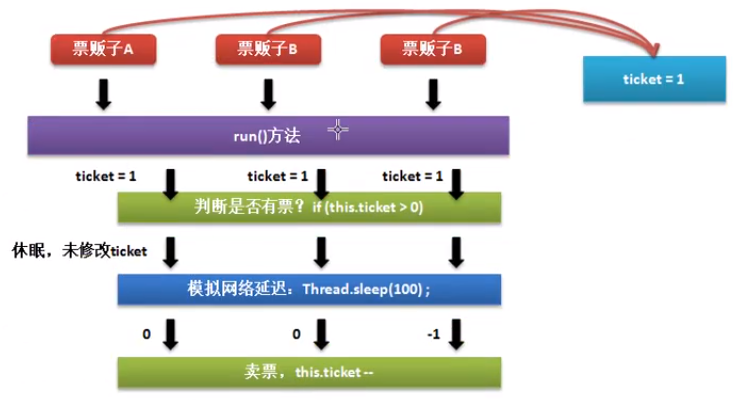
1.同步问题的引出
编写一个卖票操作
1 | class MyThread implements Runnable { |
三个票贩子卖十张票;看似没有问题,但这是有问题的,加入延迟操作来查看一下
1 | class MyThread implements Runnable { |
2. 线程同步处理
同步问题的解决关键是锁:当一个线程执行操作的时候,其他线程外边等着;
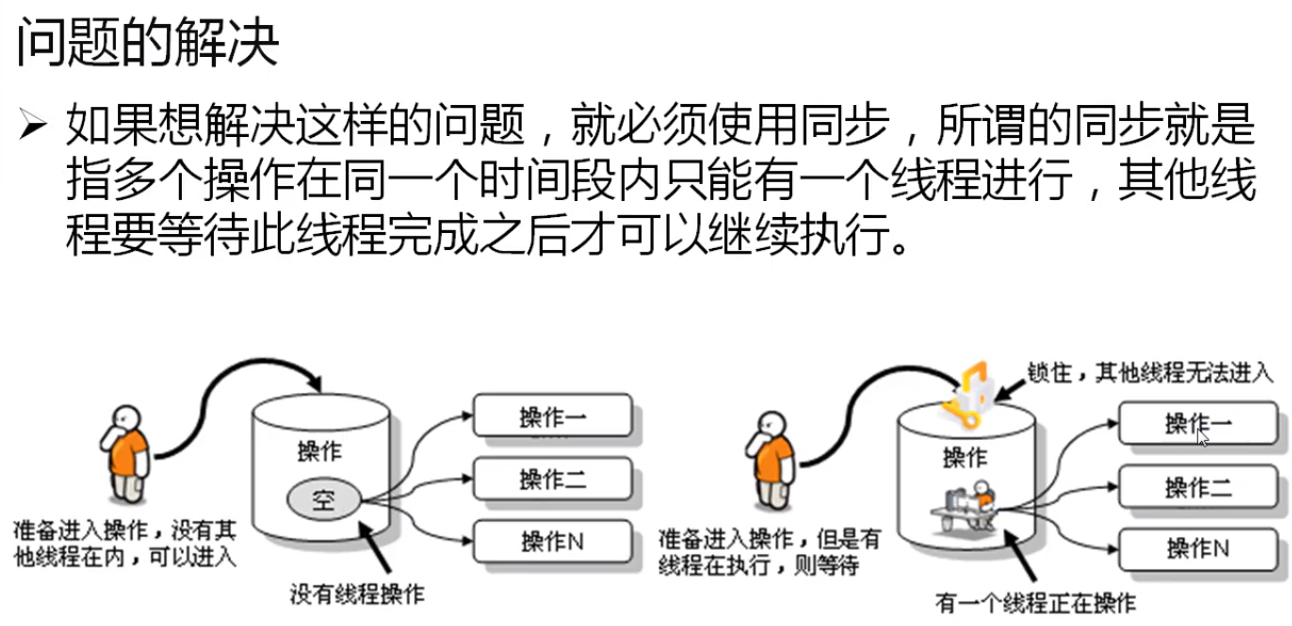
要实现这把锁的功能,就要用synchronized关键字来实现,利用此关键字可以定义同步方法或者同步代码块;在同步代码块里只允许一个线程执行;
- 利用同步代码块来执行
1 | synchronized(同步对象){ |
一般进行同步对象,处理的时候采用当前对象this进行同步;
范例:利用同步代码块解决数据同步访问问题
2
3
4
5
6
7
8
9
10
11
12
13
14
15
16
17
18
19
20
21
22
23
24
25
26
27
28
29
30
31
32
private int ticket = 10; //总票数
public void run() {
// TODO Auto-generated method stub
while (true) {
synchronized(this) { // 每一次只允许一个线程进行访问
if (this.ticket>0) {
try {
Thread.sleep(50); // 模拟网络延迟
} catch (InterruptedException e) {
// TODO Auto-generated catch block
e.printStackTrace();
}
System.out.println(Thread.currentThread().getName()+",剩余票数"+this.ticket--);
} else {
System.out.println("**票卖光了**");
break;
}
}
}
}
}
public class TestDeme {
public static void main(String[] args) {
MyThread mt = new MyThread();
new Thread(mt,"票贩子A").start();
new Thread(mt,"票贩子B").start();
new Thread(mt,"票贩子C").start();
}
}加入同步解决了上述的问题,但是一个线程运行的时间太长了;同步实际上造成了性能的降低;
- 利用同步方法解决:只需要在方法定义上使用
synchronized;
范例:同步方法
2
3
4
5
6
7
8
9
10
11
12
13
14
15
16
17
18
19
20
21
22
23
24
25
26
27
28
29
30
31
32
33
private int ticket = 10; //总票数
public synchronized boolean sale() {
if (this.ticket>0) {
try {
Thread.sleep(50); // 模拟网络延迟
} catch (InterruptedException e) {
// TODO Auto-generated catch block
e.printStackTrace();
}
System.out.println(Thread.currentThread().getName()+",剩余票数"+this.ticket--);
return true;
} else {
System.out.println("**票卖光了**");
return false;
}
}
public void run() {
// TODO Auto-generated method stub
while (this.sale()) {
}
}
}
public class TestDeme {
public static void main(String[] args) {
MyThread mt = new MyThread();
new Thread(mt,"票贩子A").start();
new Thread(mt,"票贩子B").start();
new Thread(mt,"票贩子C").start();
}
}
同步会造成性能的下降
3. 线程死锁
死锁是在进行多线程同步处理之中有可能产生的一种问题,所谓的死锁指的是若干个线程彼此等待对方释放资源的过程;
范例:死锁展示
2
3
4
5
6
7
8
9
10
11
12
13
14
15
16
17
18
19
20
21
22
23
24
25
26
27
28
29
30
31
32
33
34
35
public synchronized void say(Li l) {
System.out.println("【王】要想过路先交钱!!");
l.get();
}
public synchronized void get() {
System.out.println("【王】拿到钱了!!你过吧");
}
}
class Li{
public synchronized void say(Wang w) {
System.out.println("【李】先过路再交钱!!");
w.get();
}
public synchronized void get() {
System.out.println("【李】过来了,还是先跑吧");
}
}
public class DeadLock implements Runnable {
private Wang w = new Wang();
private Li l = new Li();
public DeadLock() {
new Thread(this).start();
l.say(w);
}
public void run() {
// TODO Auto-generated method stub
w.say(l);
}
public static void main(String[] args) {
new DeadLock();
}
}
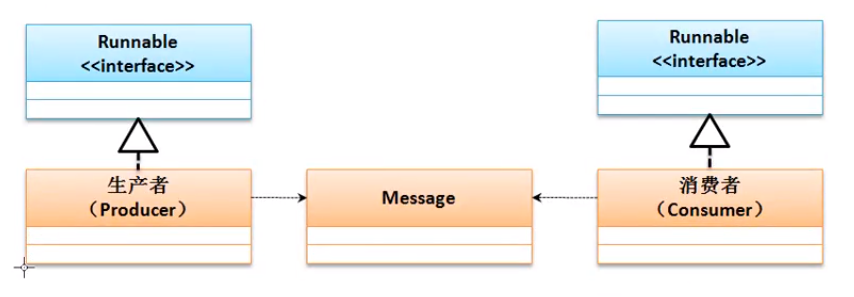
综合实战:”生产者-消费者“模型
流程如下:
- 生产者负责信息内容的生产
- 每当生产者生产完一项完整的信息之后消费者要从这里取走信息;
- 如果生产者没有生产则消费者要等待他生产完成;
- 如果消费者没有及时对信息进行消费,则生产者应该等待消费完成之后再继续生产;
1. 生产者消费者基本程序模型
将生产者与消费者定义为两个独立的线程类对象,对于生产的数据可以使用如下的组成
- 数据一:
- 数据二:
两个线程独立,那么两个线程之间需要有一个存放数据的地方
范例:实现基本结构
2
3
4
5
6
7
8
9
10
11
12
13
14
15
16
17
18
19
20
21
22
23
24
25
26
27
28
29
30
31
32
33
34
35
36
37
38
39
40
41
42
43
44
45
46
47
48
49
50
51
52
53
54
55
56
57
58
59
60
61
62
63
64
65
66
67
68
69
70
71
72
73
74
75
76
77
78
79
80
81
82
83
84
85
86
87
88
89
90
91
92
93
94
95
96
97
98
99
100
101
102
103
104
105
private Message msg ;
public Producter(Message msg) {
super();
this.msg = msg;
}
public void run() {
// TODO Auto-generated method stub
for (int x = 0;x<100;x++) {
if (x%2==0) {
this.msg.setTitle("小王");
try {
Thread.sleep(100);
} catch (InterruptedException e) {
// TODO Auto-generated catch block
e.printStackTrace();
}
this.msg.setContent("宇宙大帅哥");
} else {
this.msg.setTitle("小李");
try {
Thread.sleep(100);
} catch (InterruptedException e) {
// TODO Auto-generated catch block
e.printStackTrace();
}
this.msg.setContent("猥琐第一人");
}
}
}
}
class Consumer implements Runnable{
private Message msg ;
public Consumer(Message msg) {
super();
this.msg = msg;
}
public void run() {
// TODO Auto-generated method stub
for (int x = 0;x<100;x++) {
try {
Thread.sleep(10);
} catch (InterruptedException e) {
// TODO Auto-generated catch block
e.printStackTrace();
}
System.out.println(this.msg.getTitle()+" - "+this.msg.getContent());
}
}
}
class Message{
private String title;
private String content;
public String getTitle() {
return title;
}
public void setTitle(String title) {
this.title = title;
}
public String getContent() {
return content;
}
public void setContent(String content) {
this.content = content;
}
}
public class TestDeme {
public static void main(String[] args) {
Message msg = new Message();
new Thread(new Producter(msg)).start();
new Thread(new Consumer(msg)).start();
}
}
/*
小王 - null
小王 - null
小王 - null
小王 - null
小王 - null
小王 - null
小王 - 宇宙大帅哥
小李 - 宇宙大帅哥
小李 - 宇宙大帅哥
小李 - 宇宙大帅哥
小李 - 宇宙大帅哥
小李 - 宇宙大帅哥
小李 - 宇宙大帅哥
小李 - 宇宙大帅哥
小李 - 宇宙大帅哥
小李 - 宇宙大帅哥
小王 - 猥琐第一人
小王 - 猥琐第一人
小王 - 猥琐第一人
小王 - 猥琐第一人
小王 - 猥琐第一人
小王 - 猥琐第一人
小王 - 猥琐第一人
小王 - 猥琐第一人
小王 - 猥琐第一人
小李 - 宇宙大帅哥
小李 - 宇宙大帅哥
*/通过程序执行法系拿了两个问题:
- 问题一:数据不同步;
- 问题二:应该生产一个取走一个,但发现有了重复生产,重复取出的问题
2. 解决消费者-生产者同步问题
最简单的解决同步使用synchronized关键字;
把数据的set与get的同步交给Message类来处理;
范例:解决同步
2
3
4
5
6
7
8
9
10
11
12
13
14
15
16
17
18
19
20
21
22
23
24
25
26
27
28
29
30
31
32
33
34
35
36
37
38
39
40
41
42
43
44
45
46
47
48
49
50
51
52
53
54
55
56
57
58
59
60
61
62
63
64
65
66
67
68
69
70
71
72
73
74
75
76
77
78
79
80
81
82
83
84
85
86
87
88
89
90
91
92
93
94
95
96
97
98
99
100
101
102
103
104
105
106
private Message msg ;
public Producter(Message msg) {
super();
this.msg = msg;
}
public void run() {
// TODO Auto-generated method stub
for (int x = 0;x<100;x++) {
if (x%2==0) {
this.msg.set("小王","宇宙大帅哥",x);
} else {
this.msg.set("小李","猥琐第一人",x);
}
}
}
}
class Consumer implements Runnable{
private Message msg ;
public Consumer(Message msg) {
super();
this.msg = msg;
}
public void run() {
// TODO Auto-generated method stub
for (int x = 0;x<100;x++) {
System.out.println("第" + x + "次取值: "+ this.msg.get());
}
}
}
class Message{
private String title;
private String content;
private int id; // 生产批号
public synchronized void set(String title,String content,int id) {
this.title = title;
this.id = id;
try {
Thread.sleep(100);
} catch (InterruptedException e) {
// TODO Auto-generated catch block
e.printStackTrace();
}
this.content = content;
}
public synchronized String get() {
try {
Thread.sleep(10);
} catch (InterruptedException e) {
// TODO Auto-generated catch block
e.printStackTrace();
}
return this.title+" - "+this.content+" -id- "+this.id;
}
}
public class TestDeme {
public static void main(String[] args) {
Message msg = new Message();
new Thread(new Producter(msg)).start();
new Thread(new Consumer(msg)).start();
}
}
/*
第0次取值: 小王 - 宇宙大帅哥 -id- 0
第1次取值: 小李 - 猥琐第一人 -id- 1
第2次取值: 小王 - 宇宙大帅哥 -id- 2
第3次取值: 小王 - 宇宙大帅哥 -id- 14
第4次取值: 小王 - 宇宙大帅哥 -id- 28
第5次取值: 小李 - 猥琐第一人 -id- 33
第6次取值: 小李 - 猥琐第一人 -id- 37
第7次取值: 小王 - 宇宙大帅哥 -id- 40
第8次取值: 小王 - 宇宙大帅哥 -id- 42
第9次取值: 小李 - 猥琐第一人 -id- 45
第10次取值: 小李 - 猥琐第一人 -id- 47
第11次取值: 小李 - 猥琐第一人 -id- 49
第12次取值: 小李 - 猥琐第一人 -id- 53
第13次取值: 小王 - 宇宙大帅哥 -id- 56
第14次取值: 小李 - 猥琐第一人 -id- 57
第15次取值: 小李 - 猥琐第一人 -id- 59
第16次取值: 小王 - 宇宙大帅哥 -id- 62
第17次取值: 小王 - 宇宙大帅哥 -id- 64
第18次取值: 小李 - 猥琐第一人 -id- 65
第19次取值: 小王 - 宇宙大帅哥 -id- 66
第20次取值: 小王 - 宇宙大帅哥 -id- 68
第21次取值: 小李 - 猥琐第一人 -id- 69
第22次取值: 小王 - 宇宙大帅哥 -id- 70
第23次取值: 小李 - 猥琐第一人 -id- 71
第24次取值: 小王 - 宇宙大帅哥 -id- 78
第25次取值: 小王 - 宇宙大帅哥 -id- 84
第26次取值: 小李 - 猥琐第一人 -id- 85
第27次取值: 小李 - 猥琐第一人 -id- 87
第28次取值: 小王 - 宇宙大帅哥 -id- 88
第29次取值: 小李 - 猥琐第一人 -id- 89
第30次取值: 小李 - 猥琐第一人 -id- 91
第31次取值: 小王 - 宇宙大帅哥 -id- 92
第32次取值: 小李 - 猥琐第一人 -id- 99
第33次取值: 小李 - 猥琐第一人 -id- 99
第34次取值: 小李 - 猥琐第一人 -id- 99
第35次取值: 小李 - 猥琐第一人 -id- 99
第36次取值: 小李 - 猥琐第一人 -id- 99
*/可以看出他们的信息同步了,但是生产者-消费者之间的协作还不够;存在消费者重复操作的问题;
3. 利用Object类解决重复操作:线程等待与唤醒机制
等待与唤醒利用Object类中的三个方法:
等待机制:
- 死等:
1
public final void wait() throws InterruptedException
- 设置等待时间
1
public final void wait(long timeout) throws InterruptedException
- 设置等待时间:
1
public final void wait(long timeout, int nanos) throws InterruptedException
唤醒机制
- 唤醒第一个等待进程
1
public final void notify() // 有若干个等待线程,唤醒其中的的第一个等待的;
- 唤醒全部等待线程
1
public final void notify() // 唤醒所有的等待进程
范例:修改Message类
2
3
4
5
6
7
8
9
10
11
12
13
14
15
16
17
18
19
20
21
22
23
24
25
26
27
28
29
30
31
32
33
34
35
36
37
38
39
40
41
42
43
44
45
46
47
48
49
50
51
52
53
54
55
56
57
58
59
60
61
62
63
64
65
66
67
68
69
70
71
72
73
74
75
76
77
78
79
80
81
82
83
84
85
86
87
88
89
90
91
92
93
94
95
96
97
98
99
100
101
102
103
104
105
106
107
108
109
110
111
112
113
114
115
116
117
118
119
120
121
122
123
124
125
126
127
128
129
130
131
132
133
134
135
136
137
138
139
140
141
142
143
144
145
146
147
148
149
150
151
152
153
154
155
156
157
158
159
160
161
162
163
164
165
166
167
168
169
170
171
172
173
174
175
176
177
178
179
180
181
182
183
184
185
186
187
188
189
190
191
192
193
194
195
private Message msg ;
public Producter(Message msg) {
super();
this.msg = msg;
}
public void run() {
// TODO Auto-generated method stub
for (int x = 0;x<100;x++) {
if (x%2==0) {
this.msg.set("小王","宇宙大帅哥",x);
} else {
this.msg.set("小李","猥琐第一人",x);
}
}
}
}
class Consumer implements Runnable{
private Message msg ;
public Consumer(Message msg) {
super();
this.msg = msg;
}
public void run() {
// TODO Auto-generated method stub
for (int x = 0;x<100;x++) {
System.out.println("第" + x + "次取值: "+ this.msg.get());
}
}
}
class Message{
private String title;
private String content;
private int id; // 生产批号
private boolean flag = true;
// flag = True 允许生产,不许消费
// flag = False 允许消费不许生产
public synchronized void set(String title,String content,int id) {
if(!this.flag) {
try {
super.wait();
} catch (InterruptedException e) {
// TODO Auto-generated catch block
e.printStackTrace();
}
}
this.title = title;
this.id = id;
try {
Thread.sleep(100);
} catch (InterruptedException e) {
// TODO Auto-generated catch block
e.printStackTrace();
}
this.content = content;
this.flag = false;
super.notify();
}
public synchronized String get() {
if (this.flag) {
try {
super.wait();
} catch (InterruptedException e) {
// TODO Auto-generated catch block
e.printStackTrace();
}
}
try {
Thread.sleep(10);
} catch (InterruptedException e) {
// TODO Auto-generated catch block
e.printStackTrace();
}
try {
return this.title+" - "+this.content+" -id- "+this.id;
} finally {
this.flag = true;
super.notify();
}
}
}
public class TestDeme {
public static void main(String[] args) {
Message msg = new Message();
new Thread(new Producter(msg)).start();
new Thread(new Consumer(msg)).start();
}
}
/*
第0次取值: 小王 - 宇宙大帅哥 -id- 0
第1次取值: 小李 - 猥琐第一人 -id- 1
第2次取值: 小王 - 宇宙大帅哥 -id- 2
第3次取值: 小李 - 猥琐第一人 -id- 3
第4次取值: 小王 - 宇宙大帅哥 -id- 4
第5次取值: 小李 - 猥琐第一人 -id- 5
第6次取值: 小王 - 宇宙大帅哥 -id- 6
第7次取值: 小李 - 猥琐第一人 -id- 7
第8次取值: 小王 - 宇宙大帅哥 -id- 8
第9次取值: 小李 - 猥琐第一人 -id- 9
第10次取值: 小王 - 宇宙大帅哥 -id- 10
第11次取值: 小李 - 猥琐第一人 -id- 11
第12次取值: 小王 - 宇宙大帅哥 -id- 12
第13次取值: 小李 - 猥琐第一人 -id- 13
第14次取值: 小王 - 宇宙大帅哥 -id- 14
第15次取值: 小李 - 猥琐第一人 -id- 15
第16次取值: 小王 - 宇宙大帅哥 -id- 16
第17次取值: 小李 - 猥琐第一人 -id- 17
第18次取值: 小王 - 宇宙大帅哥 -id- 18
第19次取值: 小李 - 猥琐第一人 -id- 19
第20次取值: 小王 - 宇宙大帅哥 -id- 20
第21次取值: 小李 - 猥琐第一人 -id- 21
第22次取值: 小王 - 宇宙大帅哥 -id- 22
第23次取值: 小李 - 猥琐第一人 -id- 23
第24次取值: 小王 - 宇宙大帅哥 -id- 24
第25次取值: 小李 - 猥琐第一人 -id- 25
第26次取值: 小王 - 宇宙大帅哥 -id- 26
第27次取值: 小李 - 猥琐第一人 -id- 27
第28次取值: 小王 - 宇宙大帅哥 -id- 28
第29次取值: 小李 - 猥琐第一人 -id- 29
第30次取值: 小王 - 宇宙大帅哥 -id- 30
第31次取值: 小李 - 猥琐第一人 -id- 31
第32次取值: 小王 - 宇宙大帅哥 -id- 32
第33次取值: 小李 - 猥琐第一人 -id- 33
第34次取值: 小王 - 宇宙大帅哥 -id- 34
第35次取值: 小李 - 猥琐第一人 -id- 35
第36次取值: 小王 - 宇宙大帅哥 -id- 36
第37次取值: 小李 - 猥琐第一人 -id- 37
第38次取值: 小王 - 宇宙大帅哥 -id- 38
第39次取值: 小李 - 猥琐第一人 -id- 39
第40次取值: 小王 - 宇宙大帅哥 -id- 40
第41次取值: 小李 - 猥琐第一人 -id- 41
第42次取值: 小王 - 宇宙大帅哥 -id- 42
第43次取值: 小李 - 猥琐第一人 -id- 43
第44次取值: 小王 - 宇宙大帅哥 -id- 44
第45次取值: 小李 - 猥琐第一人 -id- 45
第46次取值: 小王 - 宇宙大帅哥 -id- 46
第47次取值: 小李 - 猥琐第一人 -id- 47
第48次取值: 小王 - 宇宙大帅哥 -id- 48
第49次取值: 小李 - 猥琐第一人 -id- 49
第50次取值: 小王 - 宇宙大帅哥 -id- 50
第51次取值: 小李 - 猥琐第一人 -id- 51
第52次取值: 小王 - 宇宙大帅哥 -id- 52
第53次取值: 小李 - 猥琐第一人 -id- 53
第54次取值: 小王 - 宇宙大帅哥 -id- 54
第55次取值: 小李 - 猥琐第一人 -id- 55
第56次取值: 小王 - 宇宙大帅哥 -id- 56
第57次取值: 小李 - 猥琐第一人 -id- 57
第58次取值: 小王 - 宇宙大帅哥 -id- 58
第59次取值: 小李 - 猥琐第一人 -id- 59
第60次取值: 小王 - 宇宙大帅哥 -id- 60
第61次取值: 小李 - 猥琐第一人 -id- 61
第62次取值: 小王 - 宇宙大帅哥 -id- 62
第63次取值: 小李 - 猥琐第一人 -id- 63
第64次取值: 小王 - 宇宙大帅哥 -id- 64
第65次取值: 小李 - 猥琐第一人 -id- 65
第66次取值: 小王 - 宇宙大帅哥 -id- 66
第67次取值: 小李 - 猥琐第一人 -id- 67
第68次取值: 小王 - 宇宙大帅哥 -id- 68
第69次取值: 小李 - 猥琐第一人 -id- 69
第70次取值: 小王 - 宇宙大帅哥 -id- 70
第71次取值: 小李 - 猥琐第一人 -id- 71
第72次取值: 小王 - 宇宙大帅哥 -id- 72
第73次取值: 小李 - 猥琐第一人 -id- 73
第74次取值: 小王 - 宇宙大帅哥 -id- 74
第75次取值: 小李 - 猥琐第一人 -id- 75
第76次取值: 小王 - 宇宙大帅哥 -id- 76
第77次取值: 小李 - 猥琐第一人 -id- 77
第78次取值: 小王 - 宇宙大帅哥 -id- 78
第79次取值: 小李 - 猥琐第一人 -id- 79
第80次取值: 小王 - 宇宙大帅哥 -id- 80
第81次取值: 小李 - 猥琐第一人 -id- 81
第82次取值: 小王 - 宇宙大帅哥 -id- 82
第83次取值: 小李 - 猥琐第一人 -id- 83
第84次取值: 小王 - 宇宙大帅哥 -id- 84
第85次取值: 小李 - 猥琐第一人 -id- 85
第86次取值: 小王 - 宇宙大帅哥 -id- 86
第87次取值: 小李 - 猥琐第一人 -id- 87
第88次取值: 小王 - 宇宙大帅哥 -id- 88
第89次取值: 小李 - 猥琐第一人 -id- 89
第90次取值: 小王 - 宇宙大帅哥 -id- 90
第91次取值: 小李 - 猥琐第一人 -id- 91
第92次取值: 小王 - 宇宙大帅哥 -id- 92
第93次取值: 小李 - 猥琐第一人 -id- 93
第94次取值: 小王 - 宇宙大帅哥 -id- 94
第95次取值: 小李 - 猥琐第一人 -id- 95
第96次取值: 小王 - 宇宙大帅哥 -id- 96
第97次取值: 小李 - 猥琐第一人 -id- 97
第98次取值: 小王 - 宇宙大帅哥 -id- 98
第99次取值: 小李 - 猥琐第一人 -id- 99
*/注意初始的flag应设置为true让它能够生产
多线程深入话题
1. 优雅的停止线程
原本提供了stop方法,destory方法,suspend方法,resume方法(回复挂起线程执行);需要一种柔和的方式在进行线程停止;
范例:实现柔和的停止
2
3
4
5
6
7
8
9
10
11
12
13
14
15
16
17
18
19
20
21
22
23
24
public static boolean flag = true;
public static void main(String[] args) {
new Thread(()->{
long num = 0;
while(flag) {
try {
Thread.sleep(10);
} catch (InterruptedException e) {
// TODO Auto-generated catch block
e.printStackTrace();
}
System.out.println(Thread.currentThread().getName()+" 正在运行"+ num++);
}
},"执行线程").start();
try {
Thread.sleep(200);
} catch (InterruptedException e) {
// TODO Auto-generated catch block
e.printStackTrace();
}
flag = false;
}
}其他线程控制这个flag,也不是说立马就能停止,而是根据flag的内容来判断的;
2. 后台守护线程
所以多线程里可以进行守护线程
在Thread类里提供的守护线程的操作方法:
- 设置为守护线程:
1 | public final void setDaemon(boolean on) |
- 判断是否为守护线程
1 | public final boolean isDaemon() |
范例:使用守护线程
2
3
4
5
6
7
8
9
10
11
12
13
14
15
16
17
18
19
20
21
22
23
24
25
26
27
28
29
30
31
32
33
34
35
36
37
38
39
40
41
42
43
44
45
46
47
48
49
50
51
52
public static boolean flag = true;
public static void main(String[] args) {
Thread userThread = new Thread(() -> {
for (int x = 0;x<10;x++) {
try {
Thread.sleep(100);
} catch (InterruptedException e) {
// TODO Auto-generated catch block
e.printStackTrace();
}
System.out.println(Thread.currentThread().getName()+" 正在运行"+ x);
}
},"用户线程"); // 完成核心业务
Thread daemonThread = new Thread(() -> {
for (int x = 0;x<Integer.MAX_VALUE;x++) {
try {
Thread.sleep(100);
} catch (InterruptedException e) {
// TODO Auto-generated catch block
e.printStackTrace();
}
System.out.println(Thread.currentThread().getName()+" 正在运行"+ x);
}
},"守护线程");
daemonThread.setDaemon(true);
userThread.start();
daemonThread.start();
}
}
/*
守护线程 正在运行0
用户线程 正在运行0
守护线程 正在运行1
用户线程 正在运行1
守护线程 正在运行2
用户线程 正在运行2
守护线程 正在运行3
用户线程 正在运行3
用户线程 正在运行4
守护线程 正在运行4
用户线程 正在运行5
守护线程 正在运行5
守护线程 正在运行6
用户线程 正在运行6
守护线程 正在运行7
用户线程 正在运行7
用户线程 正在运行8
守护线程 正在运行8
用户线程 正在运行9
守护线程 正在运行9
* */用户线程完毕了,守护线程也就消失了。java程序中最大的守护线程就是GC线程;
3. volatile关键字
volatile关键字是在属性定义上使用的,表示此属性为直接数据操作,而不进行副本的拷贝处理;但是他不是同步操作;
在进行变量处理的时候会进行如下几个步骤:
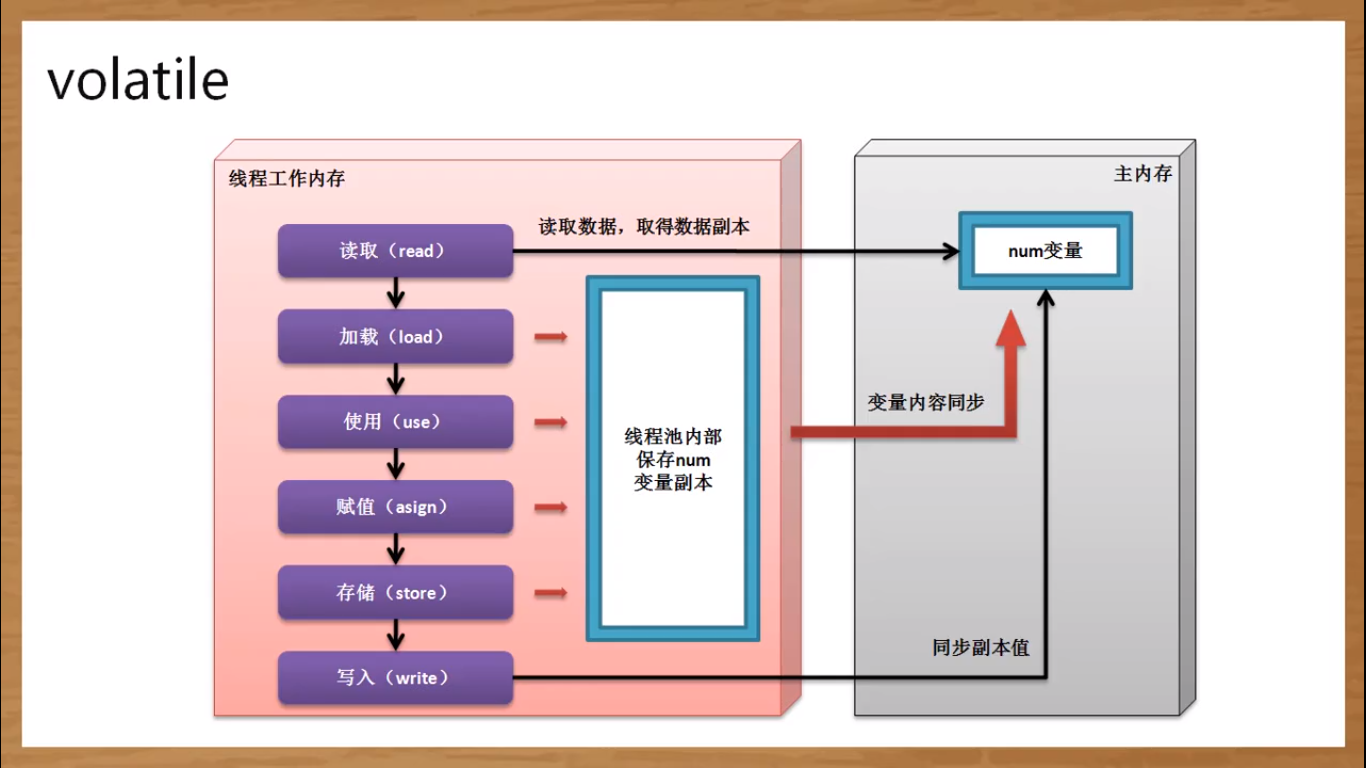
- 获取变量原有的数据内容副本
- 利用副本为变量及逆行数学计算
- 将计算后的变量保存到原始空间中
如果属性加了 volatile关键字,表示就是不使用副本,而是直接在原变量上操作’;
面试题:volatile关键字与sychronized的区别:
- volatile在属性,sychronized在代码块与方法上使用;
- volatile无法描述同步处理,只是一种直接内存的处理
线程池
所谓的线程池就是多个线程封装在一起进行操作
1. 线程池简介
用来处理问题的线程池不同情况下:
- 要解决的活很大有多少人来多少人
- 活很大,但要求只招聘10个人
- 活虽然很大,但只允许一个人做
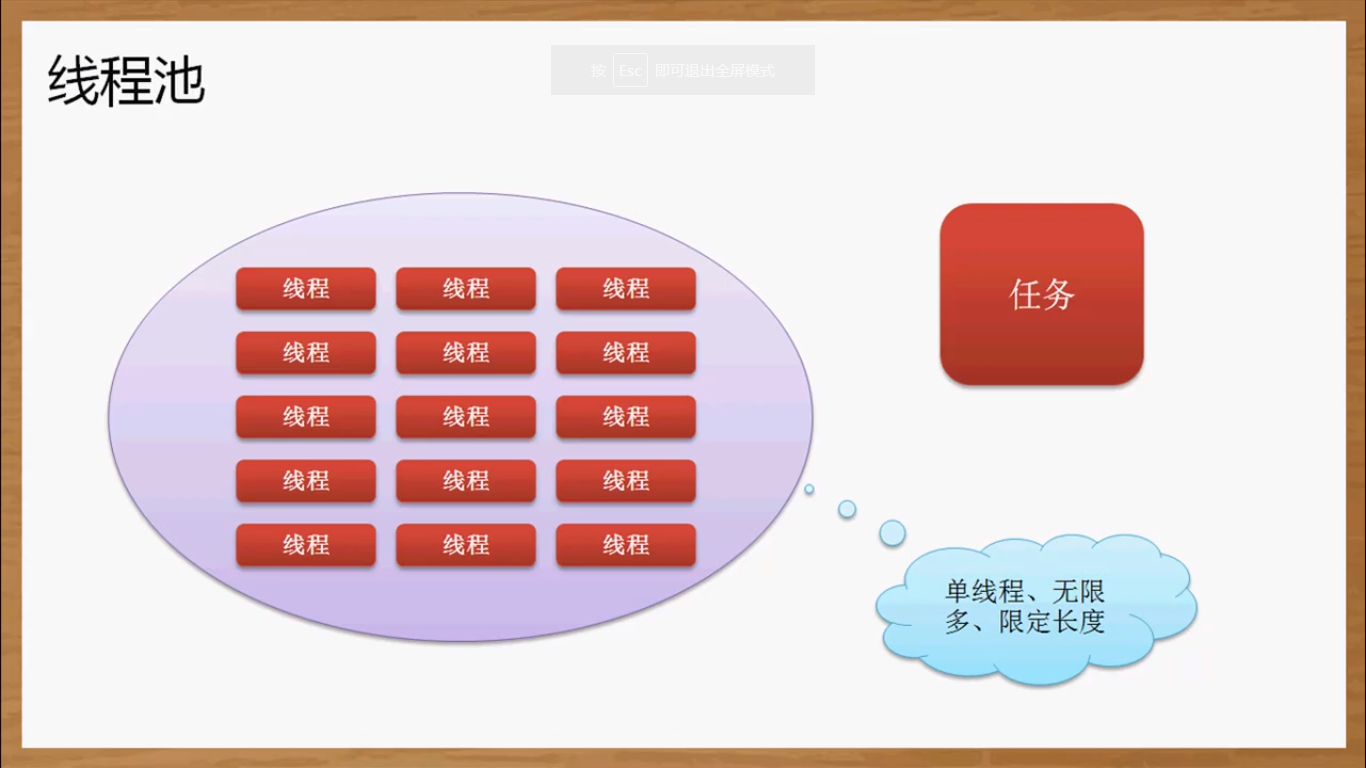
JDK 1.5后追加了一并发访问的程序包:java.util.concurrent,对于线程池操作的核心类和接口就定义在此包之中,这里面有两个核心的接口:
- 普通的执行线程池定义
1 | java.util.concurrent.ExecutorService |
- 调度线程池:
1 | java.util.concurrent.ScheduledExecutorService |
要进行线程池的创建,一般可以使用java.util.concurrent.Executors 类完成,有以下几个方法:
- 创建无大小限制的线程池:
1 | public static ExecutorService newCachedThreadPool() |
- 创建固定大小的线性池:
1 | public static ExecutorService newFixedThreadPool(int nThreads,ThreadFactorythreadFactory) |
- 单线程池:
1 | public static ScheduledExecutorService newSingleThreadScheduledExecutor() |
- 创建定时调度池
1 | public static ScheduledExecutorService newScheduledThreadPool(int corePoolSize) |
2. 线程池的实现
无限大小的线程池
1
2
3
4
5
6
7
8
9
10
11
12
13
14
15
16
17import java.util.concurrent.ExecutorService;
import java.util.concurrent.Executors;
public class ThreadDemo {
public static void main(String[] args) throws InterruptedException {
// 创建了线程池模型,但里面没有线程
ExecutorService newCachedThreadPool = Executors.newCachedThreadPool();//核心
for (int x = 0;x<10;x++) {
Thread.sleep(200);
int index = x;
newCachedThreadPool.submit(() -> {
System.out.println(Thread.currentThread().getName() + ",x = "+ index);
});
}
newCachedThreadPool.shutdown(); // 关闭线程池
}
}
创建单线程线程池
1
2
3
4
5
6
7
8
9
10
11
12
13public class ThreadDemo {
public static void main(String[] args) throws InterruptedException {
// 创建了线程池模型,但里面没有线程
ExecutorService newCachedThreadPool = Executors.newSingleThreadScheduledExecutor(); //核心
for (int x = 0;x<10;x++) {
int index = x;
newCachedThreadPool.submit(() -> {
System.out.println(Thread.currentThread().getName() + ",x = "+ index);
});
}
newCachedThreadPool.shutdown(); // 关闭线程池
}
}
创建固定大小的线程池
1
2
3
4
5
6
7
8
9
10
11
12
13
14
15
16import java.util.concurrent.ExecutorService;
import java.util.concurrent.Executors;
public class ThreadDemo {
public static void main(String[] args) throws InterruptedException {
// 创建了线程池模型,但里面没有线程
ExecutorService newCachedThreadPool = Executors.newFixedThreadPool(3); //核心
for (int x = 0;x<10;x++) {
int index = x;
newCachedThreadPool.submit(() -> {
System.out.println(Thread.currentThread().getName() + ",x = "+ index);
});
}
newCachedThreadPool.shutdown(); // 关闭线程池
}
}
定时调度池
1
2
3
4
5
6
7
8
9
10
11
12
13
14
15
16
17
18
19
20
21
22import java.util.concurrent.ScheduledExecutorService;
import java.util.concurrent.TimeUnit;
public class ThreadDemo {
public static void main(String[] args) throws InterruptedException {
// 三个大小的定时调度池
ScheduledExecutorService newCachedThreadPool = Executors.newScheduledThreadPool(1);
for (int x = 0;x<10;x++) {
int index = x;
newCachedThreadPool.scheduleAtFixedRate(new Runnable(){
public void run() {
// TODO Auto-generated method stub
System.out.println(Thread.currentThread().getName() + ",x = "+ index);
}
}, 3, 2, TimeUnit.SECONDS); // 使用的是秒的单位,表示3秒后执行,而后每2秒执行一次
}
newCachedThreadPool.shutdown(); // 关闭线程池
}
}
多线程综合案例
1. 数字加减
设计4个线程对象,两个线程执行减操作,两个线程执行加操作;
1 | public class ThreadDemo { |
2. 生产电脑
要求生产出来一台电脑就搬走一台电脑;
如果没有新的电脑生产出来,搬运工要等电脑生产出来;
如果没有搬走则要等电脑搬走后再生产,并统计处生产的电脑数量;
1 | public class ThreadDemo { |
3. 竞争抢答
有三个抢答者。同时发出抢答指令,抢答成功者给出成功提示,未抢答成功的给出失败提示;
这是看到有返回,则用Callable是比较合适的;
1 | package cn.jubingyi.Demo; |
只返回一个信息的结果:
1 | package cn.jubingyi.Demo; |
java基础类库
1. StringBuffer类
String类是所有项目开发中,一定会使用到的一个功能类,这个类有如下的特点:
- 每个字符串常量都属于String类的匿名对象,并且不可更改;
- String有两个常量池:静态常量池,运行时常量池;
- String实例化建议直接使用赋值的形式完成,这样可以把对象保存在常量池中,方便下次重用;
字符串目前所能看到的最大的弊端就是字符串不允许修改;
为了解决此问题,专门提供了一个StringBuffer类可以使用String字符串内容的处理;
范例:观察String与StringBuffer类
| String类引用传递 | StringBuffer类应用传递 |
|---|---|
1 | package cn.jubingyi.Demo; |
StringBuffer没有String类的两种对象实例化方式,StringBuffer得像普通类对象一样先对象实例化,再调用方法执行处理
构造方法:
1
2public StringBuffer()
public StringBuffer(String str)数据追加:
1
2
3StringBuffer append(float f)
StringBuffer append(int n)
// 有各种类型参数的此方法
1 | package cn.jubingyi.Demo; |
实际上,大部分情况下,很少会出现字符串内容的改变,改变指的并不是针对静态常量池的改变
范例:分析已有问题
2
3
4
5
6
7
public static void main(String[] args) {
String strA = "Hello world";
String strB = "Hello " + "world";
System.out.println(strA == strB);
}
}这时候strB对象的内容并不算是改变;对于strB再程序编译后会变成如下形式
String strB = “Hello “ + “world”; StringBuffer buf = new StringBuffer();
buf.append(“Hello “).append(“world”);String 方法的”+“在编译之后都变为了StringBuffer里的append方法;StringBuffer和String类之间可以相互转换;
- String类变为StringBuffer类:StringBuffer类的构造方法或者使用append
- 所有的类通过
toString方法将其变为String类型;
其他方法:
插入数据:
1
2
3
4
5
6
7
8
9
10
11public StringBuffer insert(int offset, 数据类型 b)
public class JavaApiDemo {
public static void main(String[] args) {
StringBuffer buf = new StringBuffer();
buf.append("miao").insert(0,"Hello").insert(5, " ");
System.out.println(buf);
}
}删除指定范围
1
2
3
4
5
6
7
8
9
10
11
12
13public StringBuffer delete(int start,int end)
public class JavaApiDemo {
public static void main(String[] args) {
StringBuffer buf = new StringBuffer();
buf.append("Hello world").delete(1,3);
System.out.println(buf);
}
}
/*
Hlo world
*/字符串反转
1
2
3
4
5
6
7
8
9
10
11
12
13
14public StringBuffer reverse()
public class JavaApiDemo {
public static void main(String[] args) {
StringBuffer buf = new StringBuffer();
buf.append("Hello world");
System.out.println(buf.reverse());
}
}
/*
dlrow olleH
*/
与StringBuffer类有一个类似的功能类:StringBuilder:提供的方法与StringBuffer有相同的方法;
StringBuffer属于线程安全的,全部使用了synchronnized关键字;StringBuffer没有这个;
2. CharSequence接口
这个接口描述字符串接口的接口,实现了这个接口的有三个常用子类:String,StringBuffer,StringBuilder
| String | StringBuffer | StringBuilder |
|---|---|---|
public final class String extends Object implements Serializable, Comparable<String>, CharSequence |
public final class StringBuffer extends Object implements Serializable, CharSequence |
public final class StringBuilder extends Object implements Serializable, CharSequence |
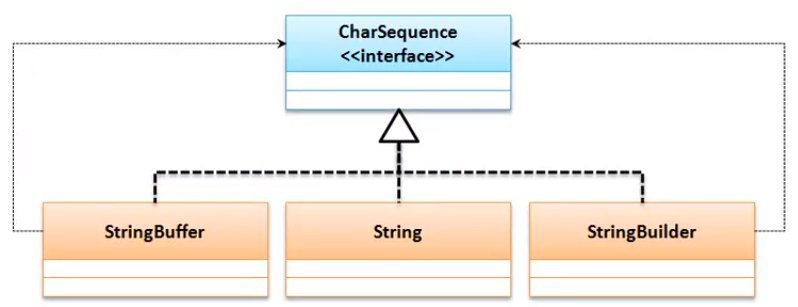
现在只要有字符串就可以为CharSequence接口实例化
1 | public class JavaApiDemo { |
CharSequence中定义的操作方法如下:
获取指定索引字符:
1
public char charAt(int index);
获取字符串长度:
1
public int length()
截取部分字符串
1
public CharSequence subSequence(int start, int end);
范例:字符串截取
2
3
4
5
6
public static void main(String[] args) {
CharSequence str = "Hello world"; // 子类实例向父接口转型
System.out.println(str.subSequence(0, 5));
}
}
CharSequence描述的就是一个字符串
3. AutoCloseable接口
用于资源开发的处理,以实现资源的自动关闭;
更好的说明资源问题,通过一个消息的发送处理来完成;
范例:手工实现资源处理:反正就是调用close函数关闭资源;
这个接口只提供了一个方法:
- 关闭方法
1 | public void close() throws Exception |
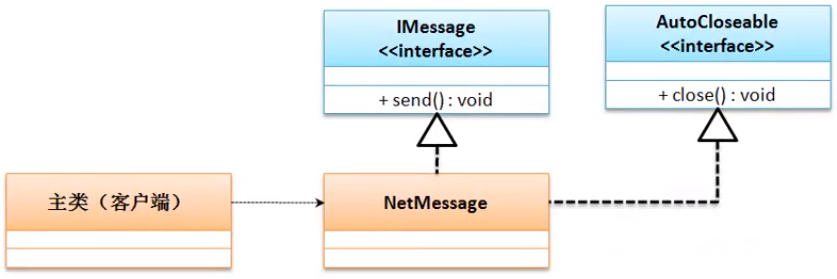
要想使用自动关闭除了AutoCloseable之外,还需要结合异常处理语句才可以;
范例:实现自动关闭:
2
3
4
5
6
7
8
9
10
11
12
13
14
15
16
17
18
19
20
21
22
23
24
25
26
27
28
29
30
31
32
33
34
35
public static void main(String[] args) throws Exception {
try (NetMessage nm = new NetMessage("Hello world")){
nm.send();
} catch (Exception e) {}
}
}
interface IMessage{
public void send();
}
class NetMessage implements IMessage, AutoCloseable{
private String msg ;
public NetMessage(String msg) {
super();
this.msg = msg;
}
public boolean open() {
System.out.println("【open】获取消息发送连接资源");
return true;
}
public void close() throws Exception {
// TODO Auto-generated method stub
System.out.println("【close】关闭消息发送通道");
}
public void send() {
// TODO Auto-generated method stub
if (this.open()) {
System.out.println("【*** 发送消息 ***】 "+this.msg);
}
}
}
以后接触到资源关闭时经常会遇到AutoCloseable
4. Runtime类
描述运行时的状态;Runtime是唯一一个与JVM运行状态有关的类,并且默认提供一个该类的实例化对象;
由于JVM运行时只有一个Runtime类对象,所以这个类的构造方法私有化了。也就是单例设计模式;
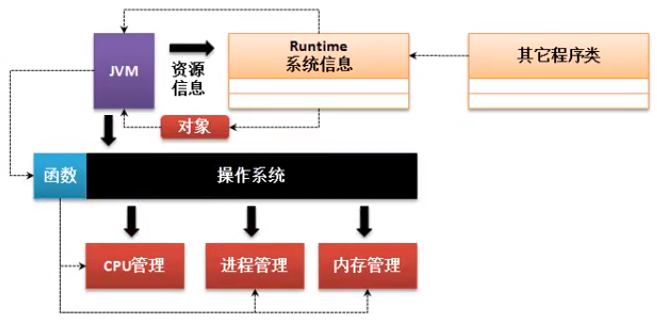
Runtime类负责描述系统信息,由JVM维护,所以就只有一个;
如果想获取这个对象可以使用Runtime类中的getRuntime方法获得;
获取实例化对象
1
public static Runtime getRuntime()
范例:获取Runtime对象
2
3
4
5
6
7
public static void main(String[] args) throws Exception {
Runtime run = Runtime.getRuntime();
// 获取内核数availableProcessors()
System.out.println("可用的进程数量:"+run.availableProcessors());
}
}
获取最大内存空间:默认为本机系统内存的四分之一
1
public long maxMemory()
获取内存空间:默认为本机系统内存的64分之一
1
public long totalMemory()
获取空闲内存空间:
1
public long freeMemory()
手工进行垃圾回收处理:
1
public void gc()
范例:观察内存状态
2
3
4
5
6
7
8
9
public static void main(String[] args) throws Exception {
Runtime run = Runtime.getRuntime();
System.out.println("可用的进程数量:"+run.availableProcessors());
System.out.println("最大内存空间"+run.maxMemory());
System.out.println("空闲内存空间"+run.freeMemory());
System.out.println("获取内存空间"+run.totalMemory());
}
}
5. system类
其他方法:
- 数组拷贝
1 | public static void arraycopy(Object src,int srcPos,Object dest,int destPos,int length) |
- 获取当前日期时间数值
1 | public static long currentTimeMillis() // 计算程序耗时 |
- 垃圾回收
1 | public static void gc(){ // 和Runtime.getRuntime().gc()是一样的; |
6. cleaner类
对象清理操作,主要功能是进行finalize()方法的替代;
C++类中的函数:构造函数,析构函数(对象手工回收);java中由垃圾回收机制不太用这类析构函数;
Java给提供了用户收尾操作,Object类中的finalized();JDK 9 之后不建议使用了;
1 |
|
这个类最大特征是抛出Throwable异常类型; 这个异常类型分为两个子类型:Error,Exception,平常都是Exception;
范例:观察传统回收
2
3
4
5
6
7
8
9
10
11
12
13
14
15
16
17
18
19
20
21
22
23
24
25
public Member(){
System.out.println("【构造】你诞生了!!");
}
public void finalize() throws Exception {
System.out.println("【回收】凡人终有一死");
throw new Exception("哎,我还想活500年");
}
}
public class JavaApiDemo {
public static void main(String[] args) throws Exception {
Member m = new Member();
m = null;
System.gc();
System.out.println("太阳照常升起");
}
}
/*
【构造】你诞生了!!
太阳照常升起
【回收】凡人终有一死
*/
JDK 1.9开始finalize已经不建议使用了;建议使用 java.lang.ref.Cleaner类进行回收处理;(Cleaner也支持AutoCloseable接口处理)
1 | import java.lang.ref.Cleaner; |
7. 对象克隆
要使用Object类里的clone()方法
1 | protected Object clone() throws CloneNotSupportedException |
所有的类都会继承这个方法,但不是所有类都可以被克隆;要实现克隆就要实现一个接口Cloneable,这个接口没有任何方法提供;它只描述一种能力
1 | **Throws:** |
范例:实现clone
2
3
4
5
6
7
8
9
10
11
12
13
14
15
16
17
18
19
20
21
22
23
24
25
26
27
28
29
30
31
32
33
34
35
36
37
38
private String name;
private int age;
public Member(String name, int age) {
super();
this.name = name;
this.age = age;
}
public String toString() {
return "【"+super.toString()+"】 Member [name=" + name + ", age=" + age + "]";
}
protected Object clone() throws CloneNotSupportedException {
// TODO Auto-generated method stub
return super.clone();
}
}
public class JavaApiDemo {
public static void main(String[] args) throws Exception {
Member mem = new Member("小王",23);
Member mem_clone = (Member)mem.clone();
System.out.println(mem);
System.out.println(mem_clone);
}
}
/*
【cn.jubingyi.Demo.Member@54bedef2】 Member [name=小王, age=23]
【cn.jubingyi.Demo.Member@5caf905d】 Member [name=小王, age=23]
*/
不覆写clone方法的话就会报错:The method clone() from the type Object is not visible
不实现Cloneable接口就会抛出CloneNotSupportedException异常:
调用clone后返回的是一个Object类方法,还需要向下转
数学操作类
1. Math数学计算类
这个类构造方法被私有化了,但不是单例;
其中很多方法都是static,可以直接通过类名称调用
1 | public class JavaApiDemo { |
范例:实现自定义的四舍五入
2
3
4
5
6
7
8
9
10
11
12
13
14
15
16
17
18
public static void main(String[] args){
System.out.println(MathUtil.round(19.562, -2));
}
}
class MathUtil{
private MathUtil() {}
/**
* 实现四舍五入操作
* @param num:要进行的数字
* @param scale:四舍五入保留的位数
* @return 四舍五入处理后的结果
*/
public static double round(double num,int scale ) {
return Math.round(num * Math.pow(10, scale)) / Math.pow(10, scale);
}
}
2. Random随机数生成类
java.util.Random类,这个类主要靠内部提供的方法来完成:
产生一个不大于边界的随机非负整数:
1
public int nextInt(int bound)
1
2
3
4
5
6
7
8
9
10import java.util.Random;
public class JavaApiDemo {
public static void main(String[] args){
Random a = new Random();
for (int x = 0; x < 20; x++) {
System.out.print(a.nextInt(5)+" ");
}
}
}
有一款彩票叫做36选7,利用Random实现随机生成彩票号:
范例:随机生成彩票号:
2
3
4
5
6
7
8
9
10
11
12
13
14
15
16
17
18
19
20
21
22
23
24
25
26
27
28
29
30
31
32
33
34
35
36
public class JavaApiDemo {
public static void main(String[] args){
int data [] = new int[7];
Random rand = new Random();
int foot = 0;
while (foot<7) {
int num = rand.nextInt(37);
if (isUsable(num, data)) {
data[foot++] = num;
}
}
java.util.Arrays.sort(data);
for (int t:data) {
System.out.print(t+" ");
}
}
/**
* 判断传入的数组是否为0以及是否在数组中中存在
* @param num 要判断的数字
* @param temp 已经存在的数据
* @return 判断是否可用
*/
public static boolean isUsable(int num, int temp[]) {
if (num == 0) {
return false;
}
for (int x:temp) {
if (x == num) {
return false;
}
}
return true;
}
}
3. 大数字处理类
海量数字计算(基础计算);在java.math包里提供了BigInteger,BigDecimal;他们继承自Number类;
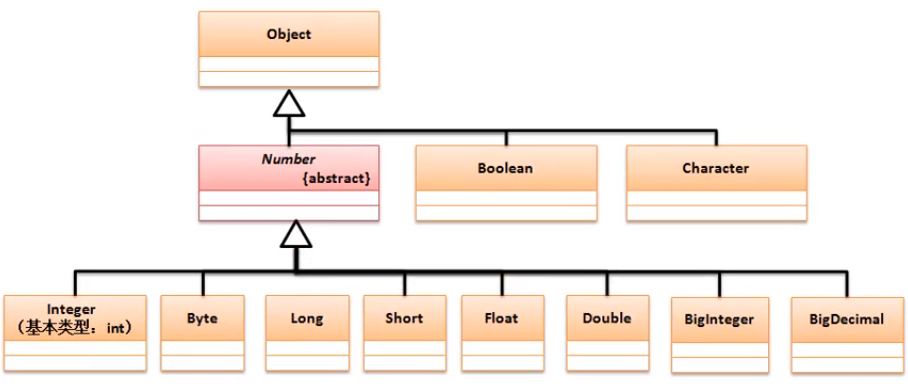
观察两个大数字操作类的构造方法
BigInteger类构造
1
public BigInteger(String val)
BigDecimal类构造:
1 | public BigDecimal(String val) |
范例:使用BIgInteger实现四则运算
2
3
4
5
6
7
8
9
10
11
12
13
14
import java.util.Random;
public class JavaApiDemo {
public static void main(String[] args){
BigInteger bigA = new BigInteger("234234234234234234243242678678678676786883432");
BigInteger bigB = new BigInteger("23423423");
System.out.println("加法操作"+bigA.add(bigB));
System.out.println("减法操作"+bigA.subtract(bigB));
System.out.println("除法操作"+bigA.divide(bigB));
System.out.println("乘法操作"+bigA.multiply(bigB));
}
}虽然可以但还是要考虑性能问题
范例:观察性能问题
这种计算是非常缓慢的,任何电脑都是有极限的;
求余:
1
public BigInteger[] divideAndRemainder(BigInteger val)
范例:求余除法:
2
3
4
5
6
7
8
9
10
public class JavaApiDemo {
public static void main(String[] args){
BigInteger bigA = new BigInteger("234234234234234234243242678678678676786883432");
BigInteger bigB = new BigInteger("23423423");
BigInteger result [] = bigA.divideAndRemainder(bigB);
System.out.println("商: "+result[0]+"、余数"+result[1]);
}
}
BigDicimal都是非常类似的,都有基础的数学支持;
范例:使用BigDecimal计算
2
3
4
5
6
7
8
9
10
11
12
13
14
public class JavaApiDemo {
public static void main(String[] args){
BigDecimal bigA = new BigDecimal("234234234234234234243242678678678676786883432");
BigDecimal bigB = new BigDecimal("23423423");
System.out.println("加法操作"+bigA.add(bigB));
System.out.println("减法操作"+bigA.subtract(bigB));
System.out.println("除法操作"+bigA.divide(bigB,6,BigDecimal.ROUND_HALF_UP));
System.out.println("乘法操作"+bigA.multiply(bigB));
BigDecimal result [] = bigA.divideAndRemainder(bigB);
System.out.println("除法计算:商: "+ result[0] + "、 余数:" + result[1]);
}
}其中除法操作:第二个参数表示精度,第三个表示进位模式;但是已经被废弃了;
日期操作类
因为java的设计来自于数据表中的结构,数据表中的字符,数字都学了;现在就差日期了;
java提供了一个java.util.Data类,直接实例化就可以获取当前的日期时间;
范例:观察
java.util.Data类
2
3
4
5
6
7
8
public class JavaApiDemo {
public static void main(String[] args){
Date date = new Date();
System.out.println(date);
}
}观察:Data构造:
2
3
this(System.currentTimeMillis());
}
2
3
fastTime = date;
}
结论:Data类只不过是对long数据的一种包装;所以Data类中一定有所谓的日期与long之间的转换的方法:
将long转为日期:
1
2
3public Date(long date) {
fastTime = date;
}将日期转为Long:
1
public long getTime()
范例:观察Data与long之间的转换:
2
3
4
5
6
7
8
9
10
11
12
public class JavaApiDemo {
public static void main(String[] args){
Date date = new Date();
long current = date.getTime();
current += 864000000;
Date date2 = new Date(current);
System.out.println(date);
System.out.println(date2);
}
}
2. 日期的格式化处理
Data类输出的日期结构不习惯,进行格式化日期使用:java.text.SimpleDateFormat类;
这个类是DateFormat类的子类,在这个类中提供有如下的方法:
【DateFormat继承】将日期格式化:
1
public final String format(Date date)
【DateFormat继承】将字符串转为日期:
1
public Date parse(String source) throws ParseException
【SimpleDateFormat】构造方法
1
public SimpleDateFormat(String pattern)
- 日期格式描述:年(yyyy)、月(MM)、日(dd)、时(H,h)、分(m)、秒(ss)、毫秒(SSS);
Letter
Date or Time Component
Presentation
Examples
G
AD
y
1996; 96
Y
2009; 09
M
July; Jul; 07
L
July; Jul; 07
w
27
W
2
D
189
d
10
F
2
E
Tuesday; Tue
u
1
a
PM
H
0
k
24
K
0
h
12
m
30
s
55
S
978
z
Pacific Standard Time; PST; GMT-08:00
Z
-0800
X
-08; -0800; -08:00
</table>>
| Date and Time Pattern | Result |
|---|---|
"yyyy.MM.dd G 'at' HH:mm:ss z"
| 2001.07.04 AD at 12:08:56 PDT
|
"EEE, MMM d, ''yy"
| Wed, Jul 4, '01
|
"h:mm a"
| 12:08 PM
|
"hh 'o''clock' a, zzzz"
| 12 o'clock PM, Pacific Daylight Time
|
"K:mm a, z"
| 0:08 PM, PDT
|
"yyyyy.MMMMM.dd GGG hh:mm aaa"
| 02001.July.04 AD 12:08 PM
|
"EEE, d MMM yyyy HH:mm:ss Z"
| Wed, 4 Jul 2001 12:08:56 -0700
|
"yyMMddHHmmssZ"
| 010704120856-0700
|
"yyyy-MM-dd'T'HH:mm:ss.SSSZ"
| 2001-07-04T12:08:56.235-0700
|
"yyyy-MM-dd'T'HH:mm:ss.SSSXXX"
| 2001-07-04T12:08:56.235-07:00
|
"YYYY-'W'ww-u"
| 2001-W27-3
|
范例: 格式化日期显示
2
3
4
5
6
7
8
9
10
11
12
13
14
import java.util.Date;
public class JavaApiDemo {
public static void main(String[] args){
Date date = new Date();
SimpleDateFormat sdf = new SimpleDateFormat("yyyy-MM-dd HH:mm:ss.SSS");
String str = sdf.format(date);
System.out.println(str);
}
}
/*
2020-06-23 17:15:08.686
*/
范例: 接下来实现字符串转为date;
2
3
4
5
6
7
8
9
10
11
12
13
14
15
import java.text.SimpleDateFormat;
import java.util.Date;
public class JavaApiDemo {
public static void main(String[] args) throws ParseException{
String birthday = "1995-09-24 00:40:00.000";
SimpleDateFormat sdf = new SimpleDateFormat("yyyy-MM-dd HH:mm:ss.SSS");
Date date = sdf.parse(birthday);
System.out.println(date);
}
}
/*
Sun Sep 24 00:40:00 CST 1995
*/范例:数字格式化
到目前可以发现字符串可以向所有类型转换:基本类型,日期类型;
正则表达式
1. 认识正则表达式
基本数用户输入的信息用String表示,为了转换的正确性需要进行一些复杂的验证处理;
给一个字符串判断是否由数字所组成,如果为数字所组成,就把它变为数字进行乘法计算
范例:字符串转数字
2
3
4
5
6
7
8
9
10
11
12
public static void main(String[] args) throws ParseException{
String str = "123";
if (str.matches("\\d+")) {
int num = Integer.parseInt(str);
System.out.println(num * 2);
}
}
}
/*
246
*/
有开发包java.util.regex,也有String类里的直接支持
正则方便进行验证处理,方便机型复杂字符串的修改处理;
2. 常用正则标记
在java.util.regex有一个pattern类,这个程序类定义所有支持的正则标记;
【数量:单个】字符匹配
任意字符:表示有任意字符组成
范例
1
2
3public class JavaApiDemo {
public static void main(String[] args) throws ParseException{
String str = "a";String regex = "a"; System.out.println(str.matches(regex)); } }1
\ \: 匹配 ” \ “
- \n :匹配换行
- \t : 匹配制表符
【数量:单个】字符集(可以从其中选一个字符)
[ abc ] : 表示其中任意一个
[ ^abc ] : 不是a、b、c
- [ a-zA-Z ] : 表示所有字母步在意大小写
- [ 0-9 ] : 数字
【数量:单个】简化字符集
- ”.” : 任意的一个字符
- ”\d“ : 表示一个数字等价于[ 0-9 ]
- ”\D“ : 不是一个数字等价于[ ^0-9 ]
- “\s” : 匹配任意的一位空格,可能是空格、换行、制表符;
- “\S” : 匹配任意的一位非(空格,可能是空格、换行、制表符);
- ”\w“ : 匹配字母与数字下划线
- ”\W“ : 求反
边界匹配
- ^ : 匹配边界开始
- $ :匹配边界结束
数量表达:默认情况下只有添加上了数量单位才可以匹配多位字符
- 表达式?: 该表达式可以出现0次或1次
- 表达式* : 该正则可以出现0次、1次或多次;
- 表达式+ : 该正则可以出现1次或多次
- 表达式{n} :表达式长度为n次
- 表达式{n,} :表达式长度为n次及以上
- 表达式{n,m} :表达式长度为n~m次
逻辑表达式
- 表达式X表达式Y : X表达式后紧跟Y表达式;
- 表达式X|表达式Y : X表达式 或 Y表达式;
- (表达式) : 为表达式设置一个整体描述,可以为整体描述设置数量单位;
3. String类对正则的支持
String类里提供有如下方法:
| No | 方法名称 | 类型 | 描述 |
|---|---|---|---|
| 1 | public boolean matches(String regex) |
普通 | 与指定字符串进行正则判断 |
| 2 | public String replaceAll(String regex, String replacement) |
普通 | 替换全部 |
| 3 | public String replacefirst(String regex, String replacement) |
普通 | 替换首个 |
| 4 | public String[] split(String regex,int limit) |
普通 | 正则拆分 |
| 5 | public String[] split(String regex) |
普通 | 正则拆分 |
接下来范例说
范例:实现字符串替换(删除掉非字母和数组)
2
3
4
5
6
7
8
9
10
public static void main(String[] args) throws ParseException{
String str = "jfds91$%38&4fh&*931h&**((NKN$%^nununouuiu*(*(non^&*nfwqonf";
String regex = "\\W+";
System.out.println(str.replaceAll(regex, ""));
}
}
/*
jfds91384fh931hNKNnununouuiunonnfwqonf
*/范例:实现字符串的拆分 :一个含有字母和数字的字符串,把字母取出来
2
3
4
5
6
7
8
9
10
public static void main(String[] args) throws ParseException{
String str = "a1b22c333d4444e5555f666666";
String regex = "\\d+";
System.out.println(str.replaceAll(regex, ""));
}
}
/*
abcdef
*/范例:判断一个数据是不是小数如果是小数则把它转换为double类型
2
3
4
5
6
7
8
9
10
public static void main(String[] args) throws ParseException{
String str = "100.";
String regex = "\\d+(\\.\\d+)?";
System.out.println(str.matches(regex));
if (str.matches(regex)) {
System.out.println(Double.parseDouble(str));
}
}
}范例:判断一个字符串是否由日期所组成,如果是由日子所组成,则将其转成Date类型
2
3
4
5
6
7
8
9
10
public static void main(String[] args) throws ParseException{
String str = "2007-02-13";
String regex = "\\d{4}-\\d{2}-\\d{2}";
System.out.println(str.matches(regex));
if (str.matches(regex)) {
System.out.println(new SimpleDateFormat("yyyy-MM-dd").parseObject(str));
}
}
}范例:判定给定的电话号码是否正确
- 电话号码:52518590
- 电话号码:01052518590
- 电话号码:(010)-52518590
2
3
4
5
6
7
public static void main(String[] args) throws ParseException{
String str = "(010)-51283346";
String regex = "((\\d{3,4})|(\\(\\d{3,4}\\)-))?\\d{7,8}";
System.out.println(str.matches(regex));
}
}范例:实现一个email地址格式的验证
- email的用户名可以由字母、数字、下划线_、中划线- 所组成(不能用下划线开头)
- Email的域名由字母、数字、下划线_、中划线-;
- 后缀必须是:.cn .com .net .com.cn .gov
2
3
4
5
6
7
public static void main(String[] args) throws ParseException{
String str = "juyi006@163.com";
String regex = "[a-zA-Z0-9]\\w*@\\w+\\.(cn|com|com.cn|gov)";
System.out.println(str.matches(regex));
}
}
3. java.util.regex包支持
这个包有两个类:Pattern(正则表达式编译),Matcher(匹配)
pattern类提供有正则表达式的编译处理:
1
public static Pattern compile(String regex,int flags)
同时也有字符串拆分支持:
1
public String[] split(CharSequence input,int limit)
范例:Pattern的使用
2
3
4
5
6
7
8
9
10
11
public static void main(String[] args) throws ParseException{
String str = "juyi006@1jif_.com";
String regex = "[^a-zA-Z]+";
Pattern pat = Pattern.compile(regex);
String[] split = pat.split(str);
for (String temp:split) {
System.out.println(temp);
}
}
}
Matcher类:实现了正则匹配的处理类,这个类的实例化对象依靠Pattern类完成;
Pattern类提供的方法:
1
public Matcher matcher(CharSequence input)
当获取了Matcher类的对象之后就可以利用该类中的方法进行如下操作:
正则匹配:
1
public boolean matches()
字符串替换
1
public String replaceAll(String replacement)
范例:字符串匹配
2
3
4
5
6
7
8
9
10
11
import java.util.regex.Pattern;
public class JavaApiDemo {
public static void main(String[] args){
String str = "juyi006@1jif_.com";
String regex = "[^a-zA-Z]+";
Pattern pat = Pattern.compile(regex);
Matcher mat = pat.matcher(str);
System.out.println(mat.matches());
}
}
之前的拆分,匹配,替换都根本用不到这个开发包;但有一些正则是String不具备的:Matcher类里有一个分组的功能,这个功能时Matcher不具备的;
范例:用于分组把
2
3
4
5
6
7
8
9
10
11
12
13
14
import java.util.regex.Pattern;
public class JavaApiDemo {
public static void main(String[] args){
// 要求取出 #{}中的内容
String str = "INSERT INTO dept(deptno,dname,loc) VALUES (#{deptno},#{dname},#{loc})";
String regex = "#\\{\\w+\\}";
Pattern pat = Pattern.compile(regex);
Matcher mat = pat.matcher(str);
while(mat.find()) {
System.out.println(mat.group(0).replaceAll("#|\\{|\\}", ""));
}
}
}这个开发包不是很复杂的正则处理也很难用到;
国际化程序实现
同一个代码可以更具不同的国家实现不同的语言描述,但是程序处理的核心业务是相同的
1.国际化程序实现原理
语言环境不同;
通过分析,可以发现,想实现这个国际化程序开发,就要解决以下两点:
- 如何可以保存文字的文件信息;
- 如何可以根据不同的区域语言的编码读取指定的资源信息;
2. locale类
首先需要解决的就是不同国家用户的区域和语言编码问题,而在java.util.Locale类中就提供类似的功能;而后可以利用Locale类中的两个构造方法:
1 | public Locale(String language) |
此时需要知道国家和语言的代码:中文代码:zh_CN; 美国英语:en_US;
获取这些信息的方式:网上搜吧
范例:实例化Locale类对象
2
3
4
5
6
7
8
9
10
11
public class JavaApiDemo {
public static void main(String[] args){
Locale locale = new Locale("zh", "CN"); //中文环境
System.out.println(locale);
}
}
/*
zh_CN
*/
如果现在像自动获得当前的环境,就可以利用Locale类本身默认方法进行实例化:
1 | public static Locale getDefault() |
范例:当地的环境;
2
3
4
5
6
7
8
9
10
11
public class JavaApiDemo {
public static void main(String[] args){
Locale locale = Locale.getDefault();
System.out.println(locale);
}
}
/*
zh_CN
*/
在开发中并不关心国家和语言的编码,把著名的这些设置为了常量:
范例:读取常量
2
3
4
5
6
7
8
9
10
11
12
13
14
public class JavaApiDemo {
public static void main(String[] args){
Locale locale = Locale.CHINA;
Locale loc = Locale.CHINESE;
System.out.println(locale);
System.out.println(loc);
}
}
/*
zh_CN
zh
*/
3. ResourceBundle读取资源文件
现在已经准备好了资源文件,那么随后就需要进行资源文件;读取资源文件依靠:java.util.ResourceBundle类完成;此类定义如下:
1 | public abstract class ResourceBundle extends Object |
·ResourceBundle是一个抽象类,如果说要想进行此类的实例化可以直接·利用该类中提供的一个static方法来完成;
获取ResourceBundle类对象:
1
public static final ResourceBundle getBundle(String baseName)
- baseName:描述资源文件的名称,但是没有后缀
根据key读取读取资源内容:
1
public final String getString(String key)
范例:使用ResourceBundle类读取内容
在
cn.jubingyi.message下
2
3
4
5
6
7
8
9
10
public class JavaApiDemo {
public static void main(String[] args){
ResourceBundle resource = ResourceBundle.getBundle("cn.jubingyi.message.Message");
String val = resource.getString("info");
System.out.println(val);
}
}
在进行数据读取时,key一定要存在,如果不存在会出现异常;
4. 实现国际化程序开发
在CLASSPATH下建立:cn.jubingyi.message.Message_zh_CN.properties
1
info=\u5F88\u9AD8\u5174\u89C1\u5230\u4F60
在CLASSPATH下建立:cn.jubingyi.message.Message_en_US.properties
1
info=Welcome !
通过程序进行指定区域的资源信息加载
1
2
3
4
5
6
7
8
9
10
11
12import java.util.ResourceBundle;
public class JavaApiDemo {
public static void main(String[] args){
ResourceBundle resource = ResourceBundle.getBundle("cn.jubingyi.message.Message");
String val = resource.getString("info");
System.out.println(val);
}
}
/*
欢迎你的到来
*/这时没有指定locale对象,但是
Message_zh_CN.properties起作用了;getBundle这个方法默认获取当前本地Locale的资源;
如果有需要也可以修改当前的
locale环境,则可以使用ResourceBundle.getBundle的重载:- 获取ResourceBundle
1
public static final ResourceBundle getBundle(String baseName,Locale locale)
1
2
3
4
5
6
7
8
9
10
11
12
13
14import java.util.Locale;
import java.util.ResourceBundle;
public class JavaApiDemo {
public static void main(String[] args){
Locale locale = new Locale("en","US");
ResourceBundle resource = ResourceBundle.getBundle("cn.jubingyi.message.Message",locale);
String val = resource.getString("info");
System.out.println(val);
}
}
/*
Welcome !
*/如果资源包中没有德国但是设置了德国,则会读取本地的那一项:
1
2
3
4
5
6
7
8
9
10
11
12
13import java.util.ResourceBundle;
public class JavaApiDemo {
public static void main(String[] args){
Locale locale = Locale.GERMAN;
ResourceBundle resource = ResourceBundle.getBundle("cn.jubingyi.message.Message",locale);
String val = resource.getString("info");
System.out.println(val);
}
}
/*
欢迎您的访问
*/如果本地都没有(把
zh-CN文件去掉了),则显示Message.properties1
2
3
4
5
6
7
8
9
10
11
12
13import java.util.ResourceBundle;
public class JavaApiDemo {
public static void main(String[] args){
Locale locale = Locale.GERMAN;
ResourceBundle resource = ResourceBundle.getBundle("cn.jubingyi.message.Message",locale);
String val = resource.getString("info");
System.out.println(val);
}
}
/*
TaDaYiMaSi!
*/
读取顺序:读取指定区域的资源文件 > 默认本地资源 > 公共的资源(没有区域设置的)
5. 格式化文本显示
某一位用户登录成功:显示“xxx,欢迎您”;这样的信息保存在资源文件里就需要用占位符来描述;对于读取出来的数据进行消息格式化
范例:修改资源文件
【中文资源】cn.jubingyi.message.Message_zh_CN.properties info=欢迎{0}的访问,日期{1} 【英文资源】cn.jubingyi.message.Message_en_US.properties info=Welcome{0}, data:{1} !
如果有需要可增加{n}之类的内容;
如果要进行资源读取会将占位符的信息一起读取,所以此时就需要利用MessageFormat类进行格式化处理
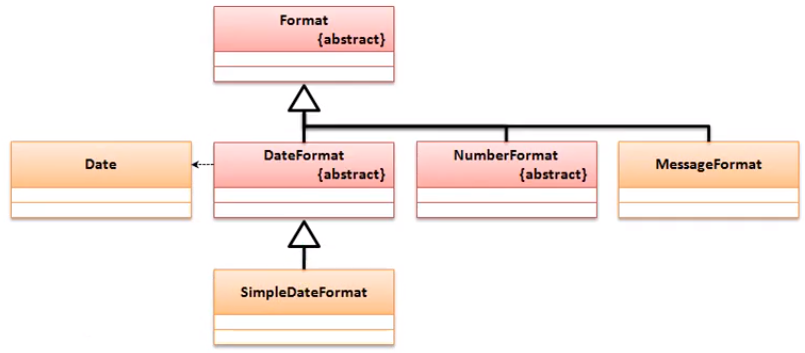
在MessageFormat里提供了一个格式化文本的方法:
1 | public static String format(String pattern,Object... arguments) |
范例:格式化国际化程序
2
3
4
5
6
7
8
9
10
11
12
13
14
15
16
17
import java.text.SimpleDateFormat;
import java.util.Date;
import java.util.Locale;
import java.util.ResourceBundle;
public class JavaApiDemo {
public static void main(String[] args){
Locale locale = Locale.US;
ResourceBundle resource = ResourceBundle.getBundle("cn.jubingyi.message.Message",locale);
String val = resource.getString("info");
System.out.println(MessageFormat.format(val, "zenner",new SimpleDateFormat("yyyy-MM-dd").format(new Date())));
}
}
/*
Welcome zenner, data: 2020-06-24 !
*/
日后见到资源文件里的{0},{1}的结构表示,要实现相应的格式化文本
开发支持类库
UUID生成无重复字符串的程序类,根据时间戳实现一个自动的无重复的字符串定义;
1 | import java.util.UUID; |
1. UUID类
A UUID represents a 128-bit value. There exist different variants of these global identifiers.
获取UUID对象:
1
public static UUID randomUUID()
根据字符串获取UUID内容
1
public static UUID fromString(String name)
在对一些文件进行自动命名处理的情况下,UUID非常好用;
2. Optional类
Optional类主要功能进行null的相关处理;在以前进行程序开发的时候,如果为了防止程序之中出现空指向异常往往可以追加有null的验证;
一般情况下都是在引用接收方被动进行判断,所以为了解决这种被动处理操作,在java中提供的Optional类;这个类提供的操作方法:
返回空的数据:
1
public static <T> Optional<T> empty()
获取数据:
1
public T get()
保存数据,但是不允许出现null:
1
public static <T> Optional<T> of(T value)
如果保存数据的时候存在有null,则会抛出NullPointerException异常
保存数据,允许为空
1
public static <T> Optional<T> ofNullable(T value)
空的时候,返回其他数据:
1
public T orElse(T other)
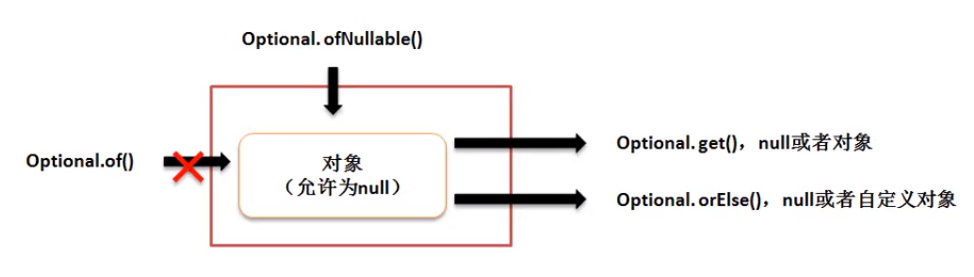
范例:修改程序,按照正规结构完成
2
3
4
5
6
7
8
9
10
11
12
13
14
15
16
17
18
19
20
21
22
23
24
25
26
27
28
29
public class JavaApiDemo {
public static void main(String[] args){
IMessage temp = MessageUtil.getMessage().get();
MessageUtil.useMessage(temp);
}
}
class MessageUtil{
private MessageUtil() {}
public static Optional<IMessage> getMessage() {
return Optional.of(new MessageImpl());
}
public static void useMessage(IMessage msg) {
if (msg != null) {
System.out.println(msg.getContent());
}
}
}
interface IMessage{
public String getContent();
}
class MessageImpl implements IMessage{
public String getContent() {
// TODO Auto-generated method stub
return "www.get.cn";
}
}
如果说现在数据保存的内容是null,则就会在保存处出现异常;
范例:修改 getMessage() 给他返回一个null
2
3
4
5
6
7
8
9
10
11
12
13
14
15
16
private MessageUtil() {}
public static Optional<IMessage> getMessage() {
return Optional.of(null); // 修改处
}
public static void useMessage(IMessage msg) {
if (msg != null) {
System.out.println(msg.getContent());
}
}
}
Exception in thread "main" java.lang.NullPointerException
at java.base/java.util.Objects.requireNonNull(Objects.java:222)
at java.base/java.util.Optional.of(Optional.java:111)
at cn.jubingyi.Demo.MessageUtil.getMessage(JavaApiDemo.java:14) // 报错了
at cn.jubingyi.Demo.JavaApiDemo.main(JavaApiDemo.java:7)
由于Optional类中允许保存有null的内容,所以在数据获取的时候也可以进行null的处理;但是如果为空,使用get获取对象时就会报错;
范例:处理空
2
3
4
5
6
7
8
9
10
11
12
13
14
15
16
17
18
19
20
21
22
23
24
25
26
27
28
29
30
public static void main(String[] args){
IMessage temp = MessageUtil.getMessage().get(); // get时就会报错
MessageUtil.useMessage(temp);
}
}
class MessageUtil{
private MessageUtil() {}
public static Optional<IMessage> getMessage() {
return Optional.ofNullable(null); // 修改为可以接受null的方法
}
public static void useMessage(IMessage msg) {
if (msg != null) {
System.out.println(msg.getContent());
}
}
}
interface IMessage{
public String getContent();
}
class MessageImpl implements IMessage{
public String getContent() {
// TODO Auto-generated method stub
return "www.get.cn";
}
}
Exception in thread "main" java.util.NoSuchElementException: No value present
at java.base/java.util.Optional.get(Optional.java:141)
at cn.jubingyi.Demo.JavaApiDemo.main(JavaApiDemo.java:7)
再把get换掉换成orelse,在为null时返回null或设定值;
范例:
2
3
4
5
6
7
8
9
10
11
12
13
14
15
16
17
18
19
20
21
22
23
24
25
26
27
28
29
30
31
32
33
34
35
36
37
38
39
public class JavaApiDemo {
public static void main(String[] args){
IMessage temp = MessageUtil.getMessage().orElse(new Message_send_Impl());
MessageUtil.useMessage(temp);
}
}
class MessageUtil{
MessageUtil() {}
public static Optional<IMessage> getMessage() {
return Optional.ofNullable(null);
}
public static void useMessage(IMessage msg) {
if (msg != null) {
System.out.println(msg.getContent());
}
}
}
interface IMessage{
public String getContent();
}
class MessageImpl implements IMessage{
public String getContent() {
// TODO Auto-generated method stub
return "www.get.cn";
}
}
class Message_send_Impl implements IMessage{
public String getContent() {
// TODO Auto-generated method stub
return "www.send.cn";
}
}
/*
www.send.cn
*/
在所有的引用数据类型的操作处理之中null是一个重要的问题
3. ThreadLocal类
解决了核心资源与多线程并发访问的处理情况
范例:定义一个消息发送结构:
2
3
4
5
6
7
8
9
10
11
12
13
14
15
16
17
18
19
20
21
22
23
24
25
26
27
28
29
30
31
32
33
34
35
public static void main(String[] args){
Message msg = new Message(); // 实例化消息对象
msg.setInfo("www.zenner.com"); // 设置要发送的内容
Channel.setMsg(msg); // 通道中设置要发送的消息
Channel.send(); // 发送消息
}
}
class Channel{ //消息发送通道
private static Message msg;
private Channel() {}
public static Message getMsg() {
return msg;
}
public static void setMsg(Message msg) {
Channel.msg = msg;
}
public static void send() {
System.out.println("【消息发送】"+msg.getInfo());
}
}
class Message{
private String info;
public String getInfo() {
return info;
}
public void setInfo(String info) {
this.info = info;
}
}
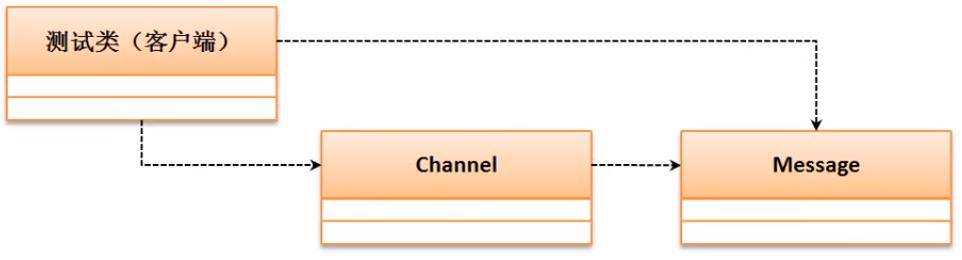
当前的程序实际上采用的是一种单线程的模式处理的;那么在多线程的状态下能否实现完全一致的效果呢?
范例:多线程影响
2
3
4
5
6
7
8
9
10
11
12
13
14
15
16
17
18
19
20
21
22
23
24
25
26
27
28
29
30
31
32
33
34
35
36
37
38
39
40
41
42
43
44
45
46
47
48
49
50
51
52
53
54
55
public static void main(String[] args){
new Thread(()->{
Message msg = new Message(); // 实例化消息对象
msg.setInfo("The 1-th Thread's MESSAGE"); // 设置要发送的内容
Channel.setMsg(msg); // 通道中设置要发送的消息
Channel.send(); // 发送消息
},"消息发送者A").start();
new Thread(()->{
Message msg = new Message(); // 实例化消息对象
msg.setInfo("The 2-th Thread's MESSAGE"); // 设置要发送的内容
Channel.setMsg(msg); // 通道中设置要发送的消息
Channel.send(); // 发送消息
},"消息发送者B").start();
new Thread(()->{
Message msg = new Message(); // 实例化消息对象
msg.setInfo("The 3-th Thread's MESSAGE"); // 设置要发送的内容
Channel.setMsg(msg); // 通道中设置要发送的消息
Channel.send(); // 发送消息
},"消息发送者C").start();
}
}
class Channel{ //消息发送通道
private static Message msg;
private Channel() {}
public static Message getMsg() {
return msg;
}
public static void setMsg(Message msg) {
Channel.msg = msg;
}
public static void send() {
System.out.println("【"+Thread.currentThread().getName()+"、消息发送】"+msg.getInfo());
}
}
class Message{
private String info;
public String getInfo() {
return info;
}
public void setInfo(String info) {
this.info = info;
}
}
/*
【消息发送者A、消息发送】The 2-th Thread's MESSAGE
【消息发送者B、消息发送】The 2-th Thread's MESSAGE
【消息发送者C、消息发送】The 3-th Thread's MESSAGE
*/
这个时候消息的处理产生了影响,出现了数据覆盖
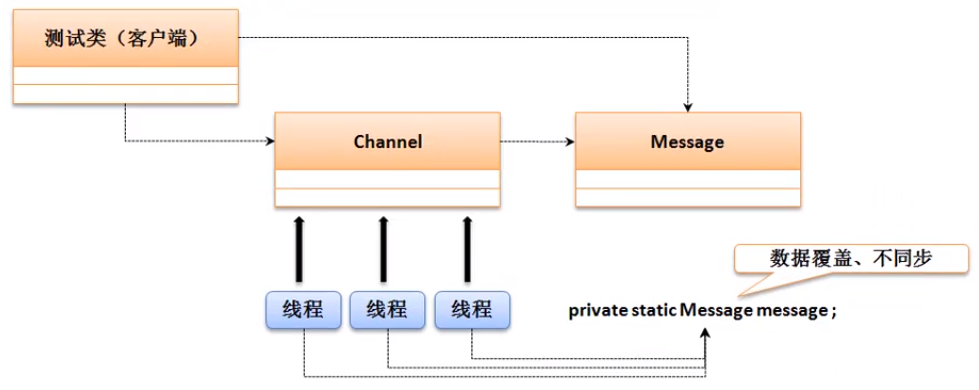
在保持Channel(所有发送的通道)核心结构不改变的情况下,需要考虑到每个线程的独立操作问题;在这种情况下,对于Channel类而言除了要保留有发送的消息之外,还应该对存放有每一个线程的标记(当前线程),那么我们就可以通过ThreadLocal类存放数据;在ThreadLocal里提供有如下的方法:
构造方法:创建有新的ThreadLocal类对象
1
public ThreadLocal()
设置数据
1
public void set(T value)
取出数据
1
public T get()
删除数据
1
public void remove()
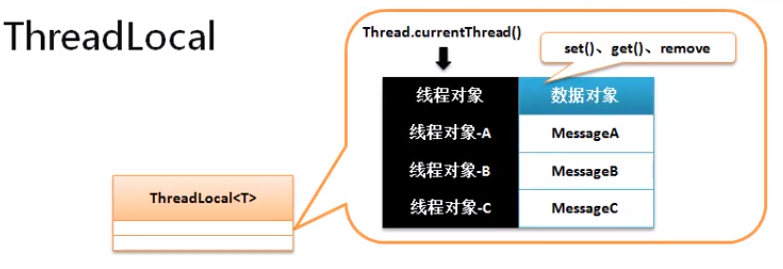
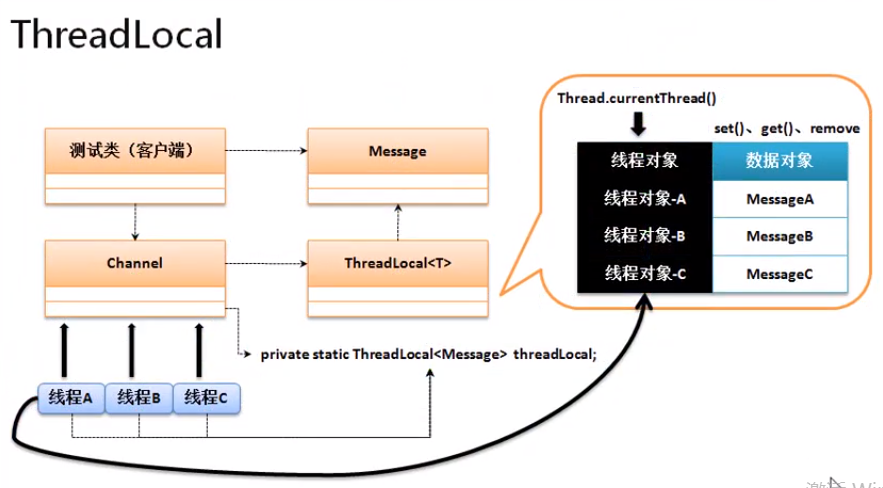
范例:使用ThreadLocal解决核心资源与多线程的问题
2
3
4
5
6
7
8
9
10
11
12
13
14
15
16
17
18
19
20
21
22
23
24
25
26
27
28
29
30
31
32
33
34
35
36
37
38
39
40
41
42
43
44
45
46
47
48
49
50
51
52
public static void main(String[] args){
new Thread(()->{
Message msg = new Message(); // 实例化消息对象
msg.setInfo("The 1-th Thread's MESSAGE"); // 设置要发送的内容
Channel.setMsg(msg); // 通道中设置要发送的消息
Channel.send(); // 发送消息
},"消息发送者A").start();
new Thread(()->{
Message msg = new Message(); // 实例化消息对象
msg.setInfo("The 2-th Thread's MESSAGE"); // 设置要发送的内容
Channel.setMsg(msg); // 通道中设置要发送的消息
Channel.send(); // 发送消息
},"消息发送者B").start();
new Thread(()->{
Message msg = new Message(); // 实例化消息对象
msg.setInfo("The 3-th Thread's MESSAGE"); // 设置要发送的内容
Channel.setMsg(msg); // 通道中设置要发送的消息
Channel.send(); // 发送消息
},"消息发送者C").start();
}
}
class Channel{ //消息发送通道
private static final ThreadLocal<Message> ThreadLocalMsg = new ThreadLocal<Message>();
private Channel() {}
public static void setMsg(Message msg) {
Channel.ThreadLocalMsg.set(msg);
}
public static void send() {
System.out.println("【"+Thread.currentThread().getName()+"、消息发送】"+ThreadLocalMsg.get().getInfo());
}
}
class Message{
private String info;
public String getInfo() {
return info;
}
public void setInfo(String info) {
this.info = info;
}
}
/*
【消息发送者C、消息发送】The 3-th Thread's MESSAGE
【消息发送者A、消息发送】The 1-th Thread's MESSAGE
【消息发送者B、消息发送】The 2-th Thread's MESSAGE
*/
每一个线程通过ThreaLocal只允许保存一个数据
4.定时调度
定时器的主要操作就是进行定时任务的处理,像闹钟一样;在java中有定时任务的支持,但是这种任务的处理只是实现了一种间隔触发的操作;如果要想实现定时的处理操作需要有一个定时操作的主体类,以及一个定时任务的控制; 可使用两个类实现:: Timer,TimeTask;
java.util.TimerTask类:实现定时任务处理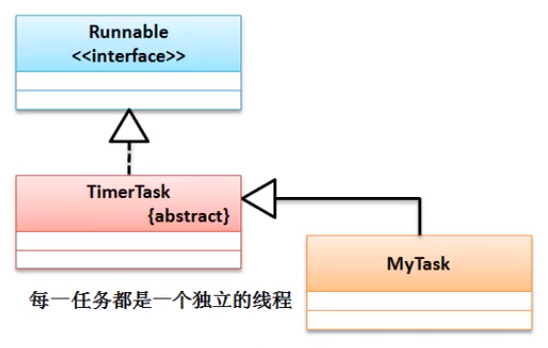
java.util.Timer类:进行任务的启动,启动的方法:任务启动
1
public void schedule(TimerTask task,long delay) // 延迟单位是毫秒
间隔触发:
1
public void scheduleAtFixedRate(TimerTask task, long delay, long period)
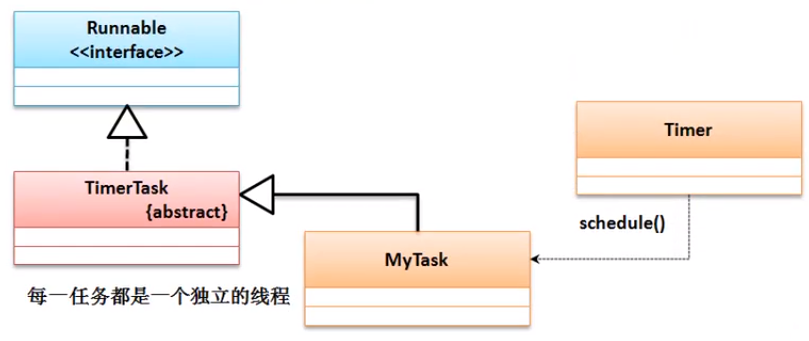
范例:实现定时任务处理
2
3
4
5
6
7
8
9
10
11
12
13
14
15
16
17
18
19
20
21
22
23
24
25
26
import java.util.Timer;
import java.util.TimerTask;
import javax.xml.crypto.Data;
class MyTask extends TimerTask{
public void run() {
// TODO Auto-generated method stub
System.out.println(Thread.currentThread().getName()+"、当前时间为: "+new Date(System.currentTimeMillis()));
}
}
public class JavaApiDemo {
public static void main(String[] args){
System.out.println(new Date());
Timer timer = new Timer();
timer.schedule(new MyTask(), 3000); // 修改点位
}
}
/*
Sun Jun 28 23:17:23 CST 2020
Timer-0、当前时间为: Sun Jun 28 23:17:26 CST 2020
*/范例:间隔启动任务
2
3
4
5
6
7
8
9
10
11
12
13
14
15
16
17
18
19
20
21
22
23
24
25
26
import java.util.Timer;
import java.util.TimerTask;
import javax.xml.crypto.Data;
class MyTask extends TimerTask{
public void run() {
// TODO Auto-generated method stub
System.out.println(Thread.currentThread().getName()+"、当前时间为: "+new Date(System.currentTimeMillis()));
}
}
public class JavaApiDemo {
public static void main(String[] args){
System.out.println(new Date());
Timer timer = new Timer();
timer.scheduleAtFixedRate(new MyTask(), 3000, period);
}
}
/*
Sun Jun 28 23:17:23 CST 2020
Timer-0、当前时间为: Sun Jun 28 23:17:26 CST 2020
*/
5. Base64 加密与解密
正常来说加密永远伴随着解密;加密与解密都伴随着一定的规则;提供的加密加密操作类:Base64,这个类里面有两个类:
Base64 Encoder:进行加密处理
加密处理
1
public byte[] encode(byte[] src)
Base64 Decoder :进行解密处理
解密处理
1
public byte[] decode(byte[] src)
范例:实现加密与解密操作
2
3
4
5
6
7
8
9
10
11
12
13
14
15
public class JavaApiDemo {
public static void main(String[] args){
String msg = "www.zenner.com"; // 要发送的信息内容
String encMsg = new String(Base64.getEncoder().encode(msg.getBytes()));
System.out.println(encMsg);
String oldMsg = new String(Base64.getDecoder().decode(encMsg));
System.out.println(oldMsg);
}
}
/*
d3d3Lnplbm5lci5jb20=
www.zenner.com
*/
目前这个只是对一个字符串进行加密加密;是一个公版算法,用这个加密不安全,那么最好的做法是使用盐值操作·
范例:盐值操作
2
3
4
5
6
7
8
9
10
11
12
13
14
15
16
public class JavaApiDemo {
public static void main(String[] args){
String salt = "zennerJBY";
String msg = "www.zenner.com"+"{"+salt+"}"; // 要发送的信息内容
String encMsg = new String(Base64.getEncoder().encode(msg.getBytes()));
System.out.println(encMsg);
String oldMsg = new String(Base64.getDecoder().decode(encMsg));
System.out.println(oldMsg);
}
}
/*
d3d3Lnplbm5lci5jb217emVubmVySkJZfQ==
www.zenner.com{zennerJBY}
*/
即便有盐值但加密的效果也不是很好;可以用多次加密;
范例:多层加密
1
2
3
4
5
6
7
8
9
10
11
12
13
14
15
16
17
18
19
20
21
22
23
24
25
26
27
28
29
30
31
32
33
34
35
36
37
38
39
40
41
42
43import java.util.Base64;
class StringUtil{
private static final String SALT = "zennerJBY"; // 公共盐值
private static final int REPEAT = 3;
/**
* 加密处理
* @param str
* @param repeat
* @return
*/
public static String encode(String str) {
String temp = str +"{"+SALT+"}"; // 盐值对外不公布
byte data[] = temp.getBytes();
for (int x = 0;x < REPEAT;x++) {
data = Base64.getEncoder().encode(data);
}
return new String(data);
}
/**
* 解密处理
* @return
*/
public static String decode(String str) {
byte data [] = str.getBytes();
for (int x = 0;x < REPEAT; x++) {
data = Base64.getDecoder().decode(data);
}
return new String(data).replaceAll("\\{\\w+\\}", "");
}
}
public class JavaApiDemo {
public static void main(String[] args){
String str = StringUtil.encode("www.zenner.com");
System.out.println(str);
System.out.println(StringUtil.decode(str));
}
}
/*
WkROa00weHVjR3hpYlRWc1kyazFhbUl5TVRkbGJWWjFZbTFXZVZOclNscG1VVDA5
www.zenner.com
*/
比较器
所谓的比较器就是进行大小关系的确定判断,分析比较器存在的意义是什么;
1. 比较器问题的引出
若要进行数组操作,肯定是用java.util.Arrays 的操作完成,这个类一定是提供有绝大部分的数组操作;这个类还提供了对象数组的排序支持;
1 | public static void sort(Object[] a) |
范例:实现对象数组得排序
2
3
4
5
6
7
8
9
10
11
public class JavaApiDemo {
public static void main(String[] args){
Integer data [] = new Integer [] {10,9,6,3,20};
Arrays.sort(data); // 进行对象数组的排序
System.out.println(Arrays.toString(data));
}
}
/*
[3, 6, 9, 10, 20]
*/
同样,如果数现在给定的是一个String型的对象数组,那么也是可以进行排序处理的;
范例:String 对象数组排序
2
3
4
5
6
7
8
9
10
11
public class JavaApiDemo {
public static void main(String[] args){
String data [] = new String [] {"X","B","A","E","G"};
Arrays.sort(data); // 进行对象数组的排序
System.out.println(Arrays.toString(data));
}
}
/*
[A, B, E, G, X]
*/
接下来看看自定义的类如何进行比较
范例:采用自定义类型进行排序
2
3
4
5
6
7
8
9
10
11
12
13
14
15
16
17
18
19
20
21
22
23
24
25
26
27
28
29
30
31
32
33
class Person{
private String name;
private int age;
public Person(String name, int age) {
super();
this.name = name;
this.age = age;
}
public String toString() {
return "【Person】 [name=" + name + ", age=" + age + "]\n";
}
}
public class JavaApiDemo {
public static void main(String[] args){
Person per [] = new Person [] {
new Person("小强-A",89),
new Person("小强-B",50),
new Person("小强-C",100),
};
Arrays.sort(per);
System.out.println(Arrays.toString(per));
}
}
/*
Exception in thread "main" java.lang.ClassCastException: class cn.jubingyi.Demo.Person cannot be cast to class java.lang.Comparable (cn.jubingyi.Demo.Person is in unnamed module of loader 'app'; java.lang.Comparable is in module java.base of loader 'bootstrap')
at java.base/java.util.ComparableTimSort.countRunAndMakeAscending(ComparableTimSort.java:320)
at java.base/java.util.ComparableTimSort.sort(ComparableTimSort.java:188)
at java.base/java.util.Arrays.sort(Arrays.java:1040)
at cn.jubingyi.Demo.JavaApiDemo.main(JavaApiDemo.java:25)
*/
任意一个类默认情况下是无法使用系统内部的类实现数组排序或比较需求的,是因为我们没有明确指出自定义类该如何比较(没有比较规则),所以提供有比较器的接口:Comparable接口
2. Comparable比较器
要实现对象的比较肯定需要有比较器来制定规则,而比较的规则则需要comparable来实现;对于Comparable需要清楚其定义的结构;
1 | public interface Comparable<T>{ |
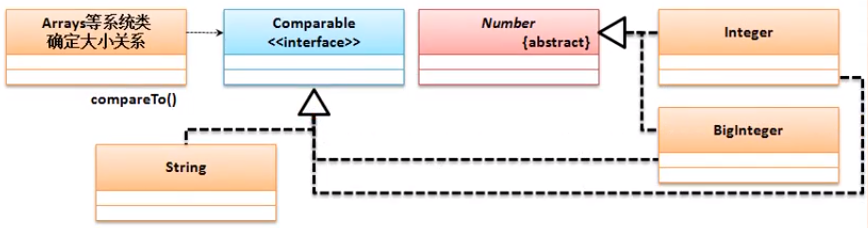
范例:实现自定义对象数组排序
2
3
4
5
6
7
8
9
10
11
12
13
14
15
16
17
18
19
20
21
22
23
24
25
26
27
28
29
30
31
32
33
34
35
36
37
class Person implements Comparable<Person>{
private String name;
private int age;
public Person(String name, int age) {
super();
this.name = name;
this.age = age;
}
public String toString() {
return "【Person】 [name=" + name + ", age=" + age + "]\n";
}
public int compareTo(Person o) {
// TODO Auto-generated method stub
return this.age - o.age;
}
}
public class JavaApiDemo {
public static void main(String[] args){
Person per [] = new Person [] {
new Person("小强-A",89),
new Person("小强-B",50),
new Person("小强-C",100),
};
Arrays.sort(per);
System.out.println(Arrays.toString(per));
}
}
/*
[【Person】 [name=小强-B, age=50]
, 【Person】 [name=小强-A, age=89]
, 【Person】 [name=小强-C, age=100]
]
*/
排序里面只需要有一个comparaTo()方法进行排序规则的定义,而后整个java系统里面就可以为其实现排序处理了;
3. Comparator比较器
Comparator是一种挽救的比较器支持,其主要目的是解决一些没有使用Comparable排序的类的对象数组;
范例:已开发完成的程序项目,并且先期设计没有考虑到所谓的比较器功能;
2
3
4
5
6
7
8
9
10
11
12
13
14
class Person{
private String name;
private int age;
public Person(String name, int age) {
super();
this.name = name;
this.age = age;
}
public String toString() {
return "【Person】 [name=" + name + ", age=" + age + "]\n";
}
}
就是上一版没有加入Comparable的 Person 类;后来需要进行对Person类进行排序处理,但是又不能修改Person类。此时就需要一种挽救的方法来实现比较,在Arrays类里排序有另外一种实现
基于
Comparator的排序处理(这是一个接口)1
public static <T> void sort(T[] a, Comparator<? super T> c)
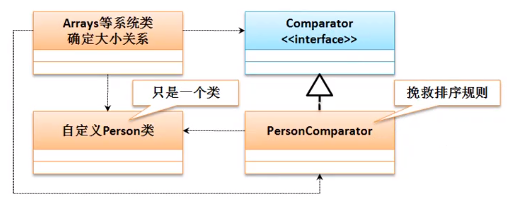
在排序类里引入一个要排序类的辅助类用来实现比较器;
在java.util.Comparator里最初只定义有一个排序的compare方法(int compare(T o1,T o2))后来添加了很多static方法
范例:定义排序规则类
2
3
4
5
6
7
public int compare(Person p1, Person p2) {
// TODO Auto-generated method stub
return p1.getAge() - p2.getAge();
}
}
在测试类进行测序处理时就可以利用排序规则实现操作。
范例:排序
2
3
4
5
6
7
8
9
10
11
12
13
14
15
16
17
18
19
20
21
22
23
24
25
26
27
28
29
30
31
32
33
34
35
36
37
38
39
40
41
42
43
44
45
46
47
48
49
50
51
52
53
54
55
56
57
58
59
import java.util.Comparator;
public class JavaApiDemo {
public static void main(String[] args){
Person per [] = new Person [] {
new Person("小强-A",89),
new Person("小强-B",50),
new Person("小强-C",100),
};
Arrays.sort(per,new PersonComparator()); // 使用了自定义的比较类
System.out.println(Arrays.toString(per));
}
}
class Person{
private String name;
private int age;
public Person(String name, int age) {
super();
this.name = name;
this.age = age;
}
public String getName() {
return name;
}
public void setName(String name) {
this.name = name;
}
public int getAge() {
return age;
}
public void setAge(int age) {
this.age = age;
}
public String toString() {
return "【Person】 [name=" + name + ", age=" + age + "]\n";
}
}
class PersonComparator implements Comparator<Person>{
public int compare(Person p1, Person p2) {
// TODO Auto-generated method stub
return p1.getAge() - p2.getAge();
}
}
/*
[【Person】 [name=小强-B, age=50]
, 【Person】 [name=小强-A, age=89]
, 【Person】 [name=小强-C, age=100]
]
*/面试题:请解释 Comparable 和 Comparator的区别?
java.lang.Comparable是在类定义的时候实现的父接口,主要用于定于排序规则,里面只有一个compareTo()方法java.util.Comparator是挽救的比较器操作,需要设置单独的比较器规则类实现排序,里面有compare方法
二叉树
1. 二叉树结构简介
数据的存储形式,在二叉树的实现之中其基本的实现原理如下:取第一个数据为保存的根节点,小于等于根节点的数据放在节点的左子树,大于的数组放在右子树;
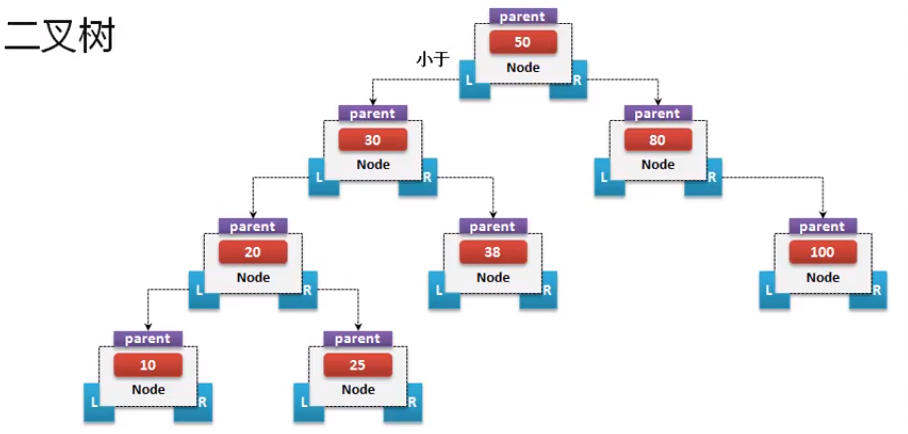
要进行信息检索,就需要进行每个节点的判断。他的时间复杂度是O(logn)
再有三种遍历方式:前序遍历,中序遍历,后序遍历
2. 二叉树基础实现
实现二叉树的处理中最为关键的问题在于数据的保存,而数据由于牵扯到对象比较的问题,这就需要到了比较器的支持,而且比较器首选Comparable,所以本次将保存Person类
范例:
2
3
4
5
6
7
8
9
10
11
12
13
14
15
16
17
18
19
20
21
22
23
24
25
26
27
28
29
30
31
32
33
34
35
36
37
38
39
40
41
42
43
44
45
46
47
48
49
50
51
52
53
54
55
56
57
58
59
60
61
62
63
64
65
66
67
68
69
70
71
72
73
74
75
76
77
78
79
80
81
82
83
84
85
86
87
88
89
90
91
92
93
94
95
96
97
98
99
100
101
102
103
104
105
106
107
108
109
110
111
112
113
114
115
public class JavaApiDemo {
public static void main(String[] args){
BinaryTree<Person> bt = new BinaryTree<Person>();
bt.add(new Person("小强-80",80));
bt.add(new Person("小强-30",30));
bt.add(new Person("小强-50",50));
bt.add(new Person("小强-60",60));
bt.add(new Person("小强-90",90));
System.out.println(Arrays.toString(bt.toArray()));
}
}
class BinaryTree <T extends Comparable<T>>{
private class Node{
private Comparable <T> data;
private Node parent;
private Node left;
private Node right;
public Node(Comparable<T> data) {
this.data = data;
}
/**
* 实现节点数据的适当位置的存储
* @param newNode 创建的新节点
*/
public void addNode(Node newNode) {
if (newNode.data.compareTo((T)this.data) <= 0) {
if (this.left == null) {
this.left = newNode;
this.parent = this;
}else {
this.left.addNode(newNode);
}
}else {
if (this.right == null) {
this.right = newNode;
newNode.parent = this;
}else {
this.right.addNode(newNode);
}
}
}
/**
* 实现所有数据的获取处理,按照中序遍历的形式来完成
*/
public void toArrayNode() {
if (this.left != null) {
this.left.toArrayNode();
}
BinaryTree.this.returnData[BinaryTree.this.foot++] = this.data;
if (this.right != null) {
this.right.toArrayNode();
}
}
}
// ------------------- 以下为二叉树的功能实现 ---------
private Node root;
private int count;
private Object [] returnData;
private int foot = 0; // 角标控制
public void add(Comparable<T> data) {
if (data == null) {
throw new NullPointerException("保存的数据不允许为空");
}
// 所有的数据本身不具有节点关系的匹配,一定要将其包装在Node类中;
Node newNode = new Node(data);
if (this.root == null) {
this.root = newNode;
}else { //保存到合适的位置
this.root.addNode(newNode);
}
this.count ++;
}
/**
* 以对象数组的形式返回全部数据,如果没有数据返回null
* @return
*/
public Object[] toArray() {
if (this.count == 0) {
return null;
}
this.returnData = new Object [this.count];
this.foot = 0;
this.root.toArrayNode(); // 直接由Node类来负责
return this.returnData;
}
}
class Person implements Comparable<Person>{
private String name;
private int age;
public Person(String name, int age) {
super();
this.name = name;
this.age = age;
}
public String toString() {
return "【Person】 [name=" + name + ", age=" + age + "]\n";
}
public int compareTo(Person o) {
// TODO Auto-generated method stub
return this.age - o.age;
}
}
/*
[【Person】 [name=小强-30, age=30]
, 【Person】 [name=小强-50, age=50]
, 【Person】 [name=小强-60, age=60]
, 【Person】 [name=小强-80, age=80]
, 【Person】 [name=小强-90, age=90]
]
*/
在进行数据添加的时候只是实现了节点关系的保存,而这种关系保存后的结果就是所有的数据都是有序排列;
3. 数据删除
二叉树的节点删除非常复杂,要考虑的情况是非常多的。
情况一:如果待删除的节点没有子节点,那么直接删除;
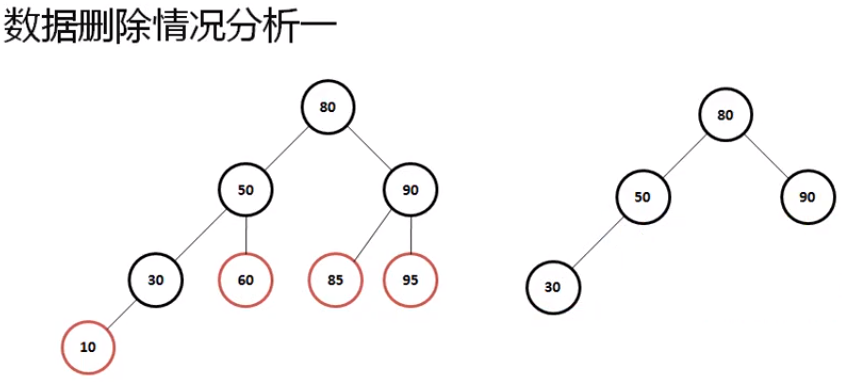
情况二:如果待删除节点只有一个子节点,那么直接删除,并用其子节点去顶替它
只有左子树
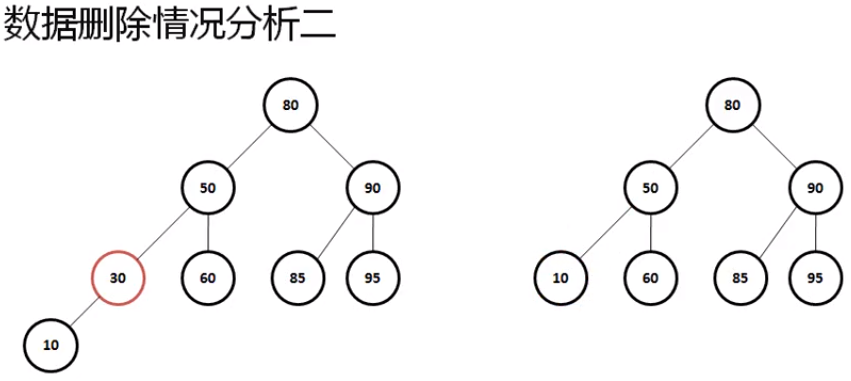
只有右子树
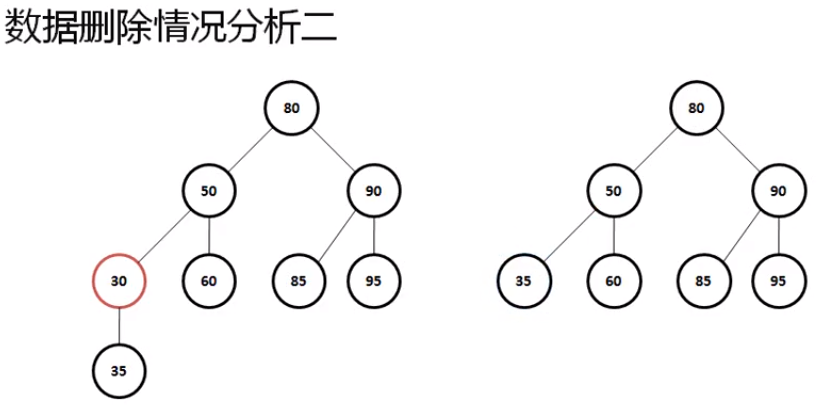
情况三:如果待删除的节点有两个子节点,首选找出它的后继节点,然后处理“后继节点” 和“被删节点的父节点”的关系
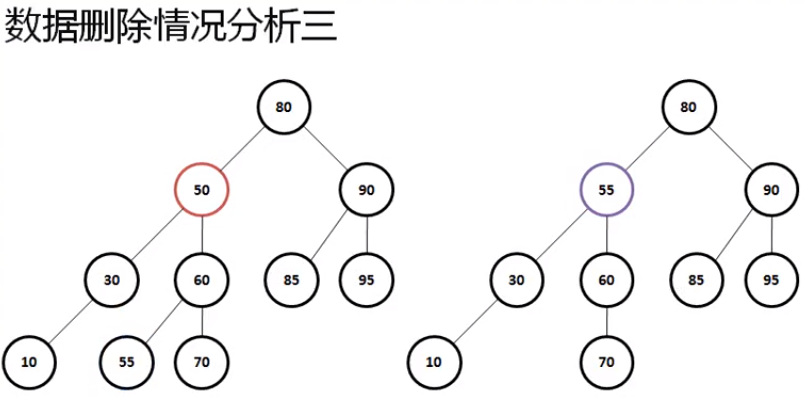
范例:在Node类中追加由新的处理功能
2
3
4
5
6
7
8
9
10
11
12
13
14
15
16
17
18
19
20
21
22
* 获取要删除的节点
* @param data 比较的对象
* @return 要删除的节点对象
*/
public BinaryTree<T>.Node getRemoveNode(Comparable<T> data) {
if (data.compareTo((T)this.data) == 0) {
return this;
}else if (data.compareTo((T)this.data) < 0) {
if (this.left != null) {
return this.left.getRemoveNode(data);
}else {
return null;
}
}else {
if (this.right != null) {
return this.right.getRemoveNode(data);
}else {
return null;
}
}
}范例:在BinaryTree 里面进行节点的处理
2
3
4
5
6
7
8
9
10
11
12
13
14
15
16
17
18
19
20
21
22
23
24
25
26
27
28
29
30
31
32
33
34
35
36
37
38
39
40
41
42
43
44
45
46
47
48
49
50
51
52
53
54
55
56
57
58
59
60
61
62
63
64
65
66
67
68
69
70
71
72
73
* 执行数据删除处理
* @param data 要删除的数据
*/
public void remove(Comparable<T> data) {
if (this.root == null) {
return ;
}else {
if (this.root.data.compareTo((T)data)==0) { // 要删除的是根节点
Node moveNode = root.right;
while (moveNode.left != null) {
moveNode = moveNode.left;
}
if (moveNode.parent.left.data.compareTo((T)moveNode.data)==0) {
moveNode.parent.left = null;
}else {
moveNode.parent.right = null;
}
moveNode.parent = root.parent;
System.out.println(moveNode.toString());
moveNode.right = root.right;
moveNode.left = root.left;
this.root = moveNode;
}else {
Node removeNode = this.root.getRemoveNode(data);
if (removeNode != null) { // 找到要删除的对象信息
System.out.println(removeNode.toString());
// 情况一:没有任何的子节点
if (removeNode.left == null && removeNode.right == null) {
removeNode.parent.left = null;
removeNode.parent.right = null;
removeNode.parent = null;
}else if (removeNode.left != null && removeNode.right == null) {
if (removeNode.parent.left.data.compareTo((T)removeNode.data)==0) {
removeNode.parent.left = removeNode.left;
}else {
removeNode.parent.right = removeNode.left;
}
removeNode.left.parent = removeNode.parent;
}else if (removeNode.left == null && removeNode.right != null){
if (removeNode.parent.left.data.compareTo((T)removeNode.data)==0) {
removeNode.parent.left = removeNode.right;
}else {
removeNode.parent.right = removeNode.right;
}
removeNode.right.parent = removeNode.parent;
}else {
Node moveNode = removeNode.right;
while (moveNode.left != null) {
moveNode = moveNode.left;
}
if (moveNode.parent.left.data.compareTo((T)moveNode.data)==0) {
moveNode.parent.left = null;
}else {
moveNode.parent.right = null;
}
moveNode.parent = removeNode.parent;
System.out.println(moveNode.toString());
if (removeNode.parent.left.data.compareTo((T)removeNode.data)==0) {
removeNode.parent.left = moveNode;
}else {
removeNode.parent.right = moveNode;
}
moveNode.right = removeNode.right;
moveNode.left = removeNode.left;
}
}else {
return ;
}
}
this.count --;
}
}范例:全代码
2
3
4
5
6
7
8
9
10
11
12
13
14
15
16
17
18
19
20
21
22
23
24
25
26
27
28
29
30
31
32
33
34
35
36
37
38
39
40
41
42
43
44
45
46
47
48
49
50
51
52
53
54
55
56
57
58
59
60
61
62
63
64
65
66
67
68
69
70
71
72
73
74
75
76
77
78
79
80
81
82
83
84
85
86
87
88
89
90
91
92
93
94
95
96
97
98
99
100
101
102
103
104
105
106
107
108
109
110
111
112
113
114
115
116
117
118
119
120
121
122
123
124
125
126
127
128
129
130
131
132
133
134
135
136
137
138
139
140
141
142
143
144
145
146
147
148
149
150
151
152
153
154
155
156
157
158
159
160
161
162
163
164
165
166
167
168
169
170
171
172
173
174
175
176
177
178
179
180
181
182
183
184
185
186
187
188
189
190
191
192
193
194
195
196
197
198
199
200
201
202
203
204
205
206
207
208
209
210
211
212
213
214
215
216
217
218
219
220
221
222
223
224
225
226
227
228
229
230
231
232
233
234
235
236
237
238
239
240
241
242
243
244
245
246
247
248
249
250
251
public class JavaApiDemo {
public static void main(String[] args){
BinaryTree<Person> bt = new BinaryTree<Person>();
bt.add(new Person("小强-80",80));
bt.add(new Person("小强-50",50));
bt.add(new Person("小强-60",60));
bt.add(new Person("小强-30",30));
bt.add(new Person("小强-90",90));
bt.add(new Person("小强-10",10));
bt.add(new Person("小强-55",55));
bt.add(new Person("小强-70",70));
bt.add(new Person("小强-85",85));
bt.add(new Person("小强-95",95));
bt.remove(new Person("小强-61",61));
System.out.println(Arrays.toString(bt.toArray()));
}
}
class BinaryTree <T extends Comparable<T>>{
private class Node{
private Comparable <T> data;
private Node parent;
private Node left;
private Node right;
public Node(Comparable<T> data) {
this.data = data;
}
public String toString() {
return "Node [data=" + data + "]";
}
/**
* 实现节点数据的适当位置的存储
* @param newNode 创建的新节点
*/
public void addNode(Node newNode) {
if (newNode.data.compareTo((T)this.data) <= 0) {
if (this.left == null) {
this.left = newNode;
newNode.parent = this;
}else {
this.left.addNode(newNode);
}
}else {
if (this.right == null) {
this.right = newNode;
newNode.parent = this;
}else {
this.right.addNode(newNode);
}
}
}
/**
* 实现所有数据的获取处理,按照中序遍历的形式来完成
*/
public void toArrayNode() {
if (this.left != null) {
this.left.toArrayNode();
}
BinaryTree.this.returnData[BinaryTree.this.foot++] = this.data;
if (this.right != null) {
this.right.toArrayNode();
}
}
/**
* 判断节点是否存在给定的数据
* @param data 给定的数据
* @return 存在返回true,不存在返回false
*/
public boolean containsNode(Comparable<T> data) {
if (data.compareTo((T)this.data) == 0) {
return true;
}else if (data.compareTo((T)this.data) < 0) {
if (this.left != null) {
return this.left.containsNode(data);
}else {
return false;
}
}else {
if (this.right != null) {
return this.right.containsNode(data);
}else {
return false;
}
}
}
/**
* 获取要删除的节点
* @param data 比较的对象
* @return 要删除的节点对象
*/
public BinaryTree<T>.Node getRemoveNode(Comparable<T> data) {
if (data.compareTo((T)this.data) == 0) {
return this;
}else if (data.compareTo((T)this.data) < 0) {
if (this.left != null) {
return this.left.getRemoveNode(data);
}else {
return null;
}
}else {
if (this.right != null) {
return this.right.getRemoveNode(data);
}else {
return null;
}
}
}
}
// ------------------- 以下为二叉树的功能实现 ---------
private Node root;
private int count;
private Object [] returnData;
private int foot = 0; // 角标控制
public boolean Contains(Comparable<T> data) {
if (this.count == 0) {
return false;
}else {
return this.root.containsNode(data);
}
}
public void add(Comparable<T> data) {
if (data == null) {
throw new NullPointerException("保存的数据不允许为空");
}
// 所有的数据本身不具有节点关系的匹配,一定要将其包装在Node类中;
Node newNode = new Node(data);
if (this.root == null) {
this.root = newNode;
newNode.parent = null;
}else { //保存到合适的位置
this.root.addNode(newNode);
}
this.count ++;
}
/**
* 以对象数组的形式返回全部数据,如果没有数据返回null
* @return
*/
public Object[] toArray() {
if (this.count == 0) {
return null;
}
this.returnData = new Object [this.count];
this.foot = 0;
this.root.toArrayNode(); // 直接由Node类来负责
return this.returnData;
}
/**
* 执行数据删除处理
* @param data 要删除的数据
*/
public void remove(Comparable<T> data) {
if (this.root == null) {
return ;
}else {
if (this.root.data.compareTo((T)data)==0) { // 要删除的是根节点
Node moveNode = root.right;
while (moveNode.left != null) {
moveNode = moveNode.left;
}
if (moveNode.parent.left.data.compareTo((T)moveNode.data)==0) {
moveNode.parent.left = null;
}else {
moveNode.parent.right = null;
}
moveNode.parent = root.parent;
System.out.println(moveNode.toString());
moveNode.right = root.right;
moveNode.left = root.left;
this.root = moveNode;
}else {
Node removeNode = this.root.getRemoveNode(data);
if (removeNode != null) { // 找到要删除的对象信息
System.out.println(removeNode.toString());
// 情况一:没有任何的子节点
if (removeNode.left == null && removeNode.right == null) {
removeNode.parent.left = null;
removeNode.parent.right = null;
removeNode.parent = null;
}else if (removeNode.left != null && removeNode.right == null) {
if (removeNode.parent.left.data.compareTo((T)removeNode.data)==0) {
removeNode.parent.left = removeNode.left;
}else {
removeNode.parent.right = removeNode.left;
}
removeNode.left.parent = removeNode.parent;
}else if (removeNode.left == null && removeNode.right != null){
if (removeNode.parent.left.data.compareTo((T)removeNode.data)==0) {
removeNode.parent.left = removeNode.right;
}else {
removeNode.parent.right = removeNode.right;
}
removeNode.right.parent = removeNode.parent;
}else {
Node moveNode = removeNode.right;
while (moveNode.left != null) {
moveNode = moveNode.left;
}
if (moveNode.parent.left.data.compareTo((T)moveNode.data)==0) {
moveNode.parent.left = null;
}else {
moveNode.parent.right = null;
}
moveNode.parent = removeNode.parent;
System.out.println(moveNode.toString());
if (removeNode.parent.left.data.compareTo((T)removeNode.data)==0) {
removeNode.parent.left = moveNode;
}else {
removeNode.parent.right = moveNode;
}
moveNode.right = removeNode.right;
moveNode.left = removeNode.left;
}
}else {
return ;
}
}
this.count --;
}
}
}
class Person implements Comparable<Person>{
private String name;
private int age;
public int getAge() {
return age;
}
public void setAge(int age) {
this.age = age;
}
public Person(String name, int age) {
super();
this.name = name;
this.age = age;
}
public String toString() {
return "【Person】 [name=" + name + ", age=" + age + "]\n";
}
public int compareTo(Person o) {
// TODO Auto-generated method stub
return this.age - o.age;
}
}
4. 红黑树原理简介
二叉树的主要特点:数据查询的时候可以提供更好的查询性能,这种原始的二叉树结构是有明显缺陷的。当改变二叉树结构的时候可能会产生树的不平衡

成为了一个链表结构;要想达到最良好效果的二叉树,那么他应该是一个平衡二叉树,同时所有的节点层次深度应该不超过1;
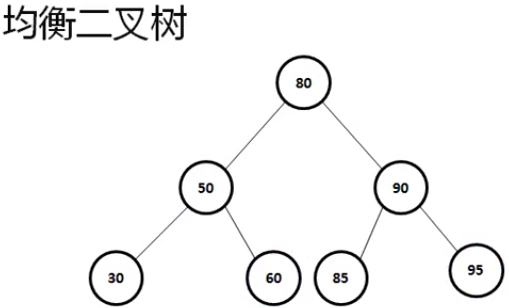
这个时候二叉树的检索操作效率一定是最高的,并且树可以忍受着这些频繁的增加或者删除操作;所以针对二叉树有着进一步的设计要求:
红黑树本质上是一种二叉查找树,但它在二叉查找树的基础上额外添加了一个标记(颜色),同时具有一定的规则。这些规则是红黑树保证了一种平衡,插入,删除,查找的最坏时间复杂度都为O(logn);
红黑树本质上在节点上追加了一个表示颜色的操作信息而已;
1 | enum Color{ |
红黑树的不一定要用枚举,用true或者false来实现也可以;不一定非要用枚举类;
一个标准的红黑树的结构如下所示
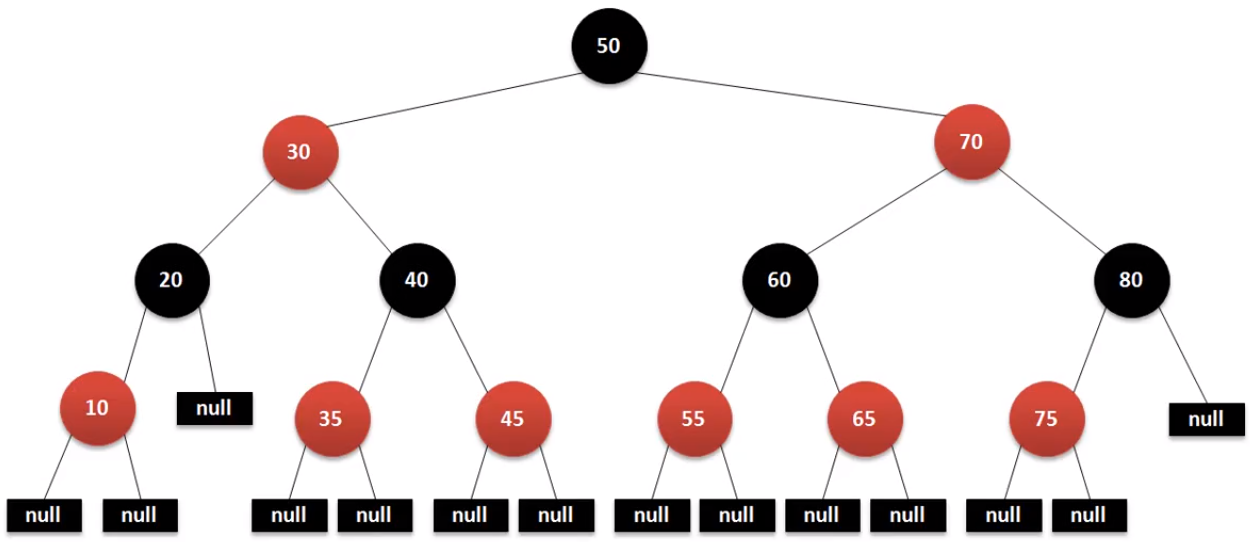
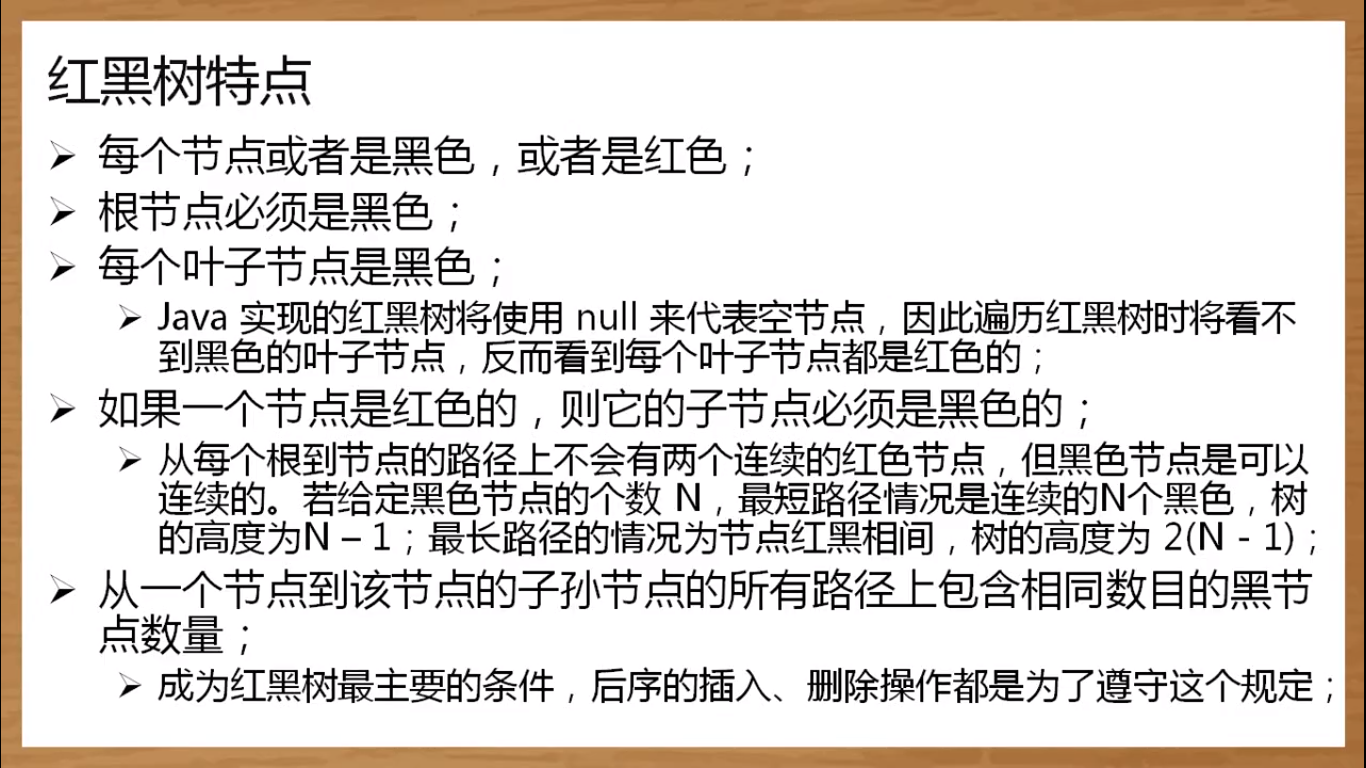
主要是利用这个红色节点和黑色节点实现均衡的控制;简单理解红黑树的结构就是为了实现左旋,右旋操作,已保证树的平衡;
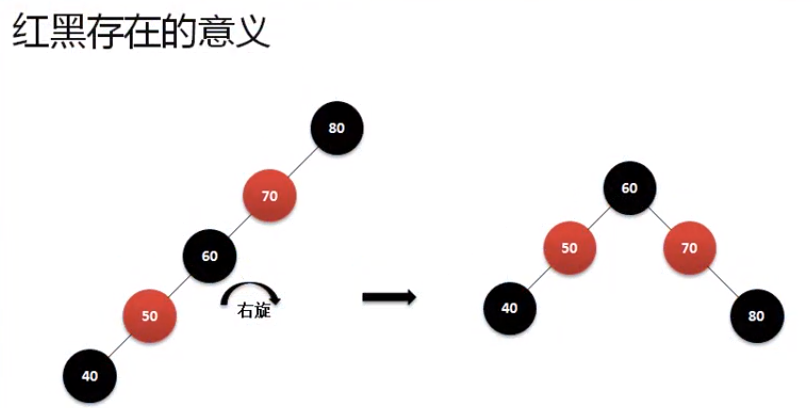
但是对于平衡,还需要考虑数据增加的平衡以及数据删除的平衡,增加和删除都是需要对这颗树进行平衡修复的;
数据插入的平衡修复
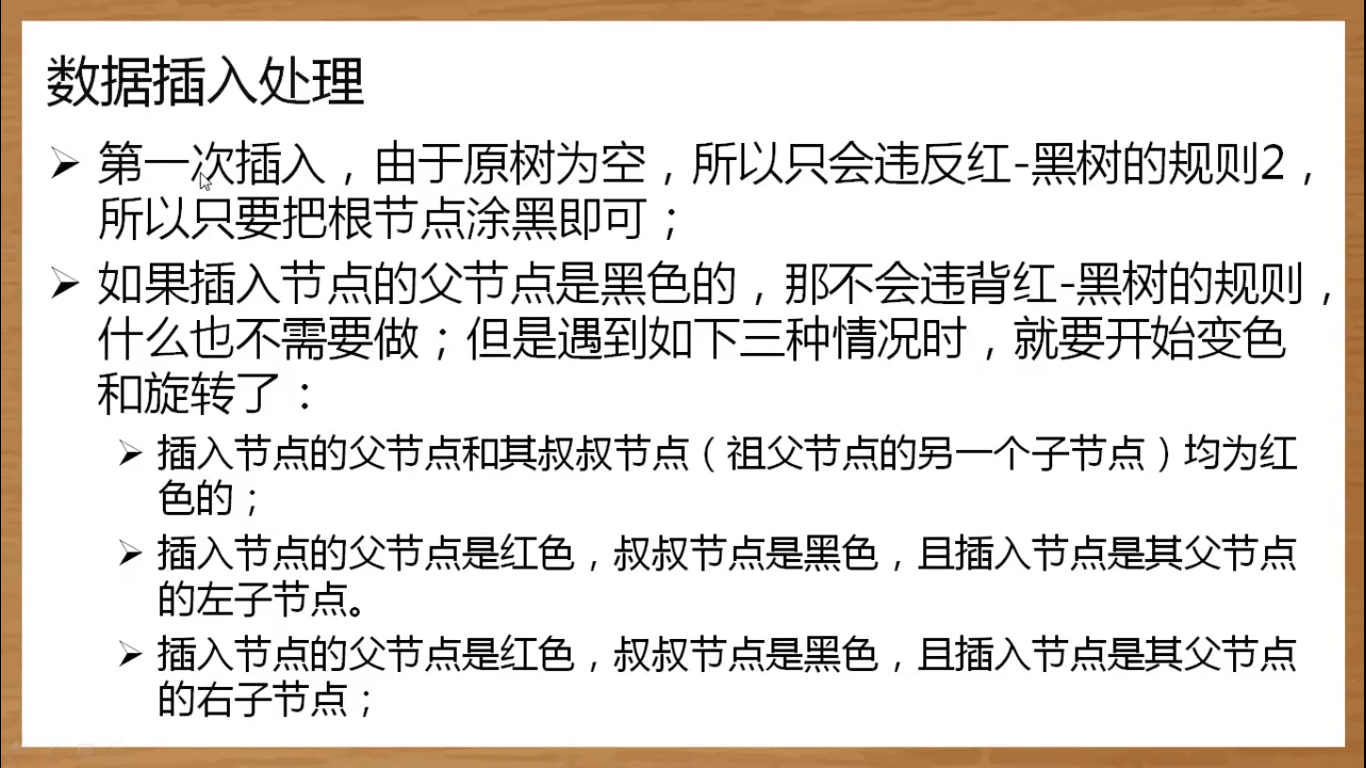
在进行红黑树处理的时候为了方便操作都会将新的节点使用红色来描述。于是当设置根节点的时候就会违反规则2:根节点为黑色;那么这时候只需要将节点的颜色涂黑即可;
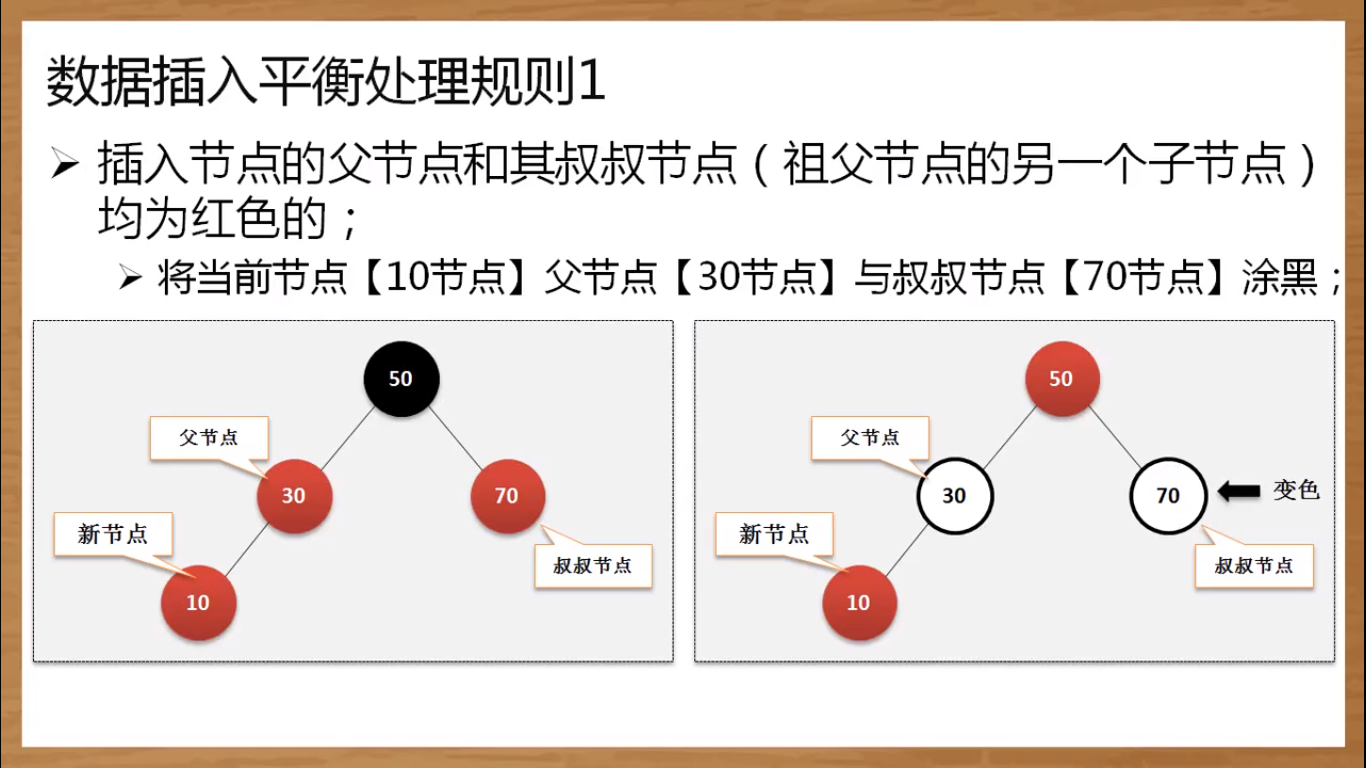
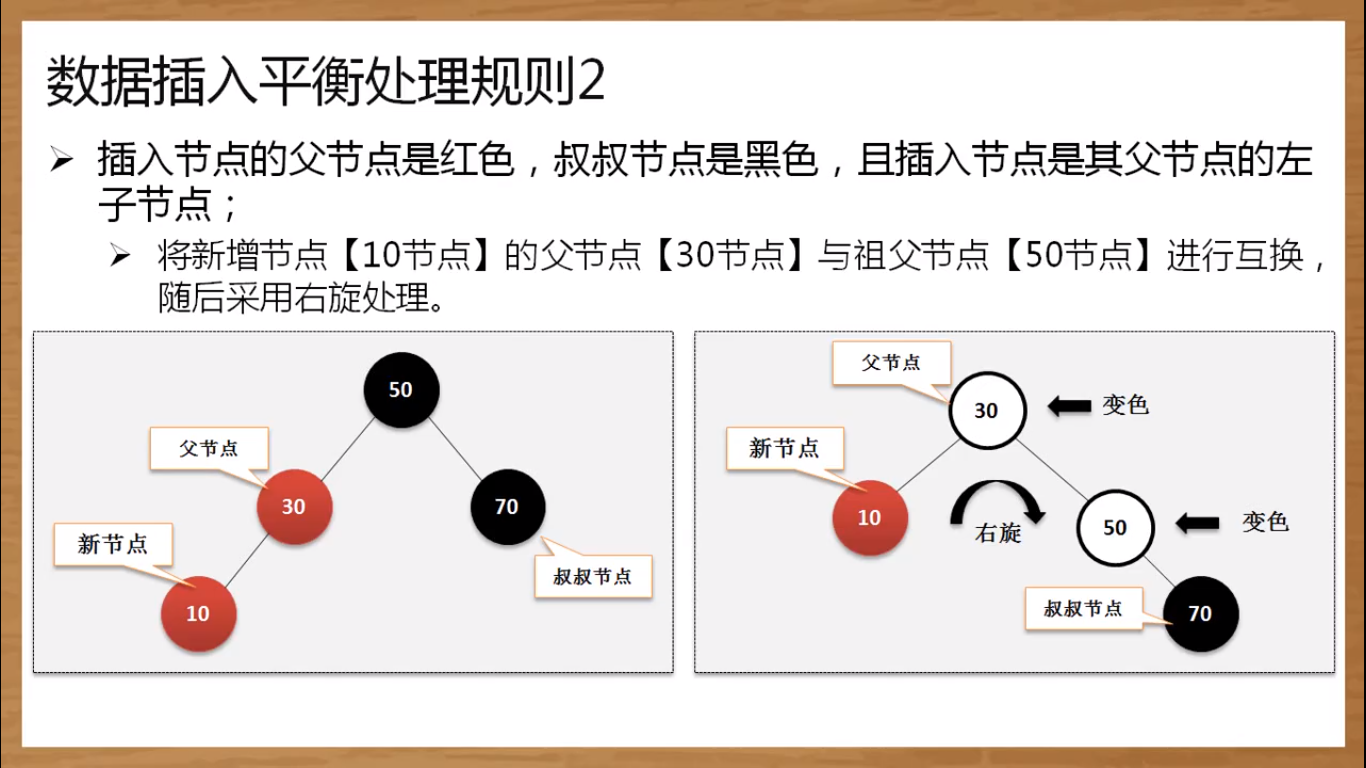
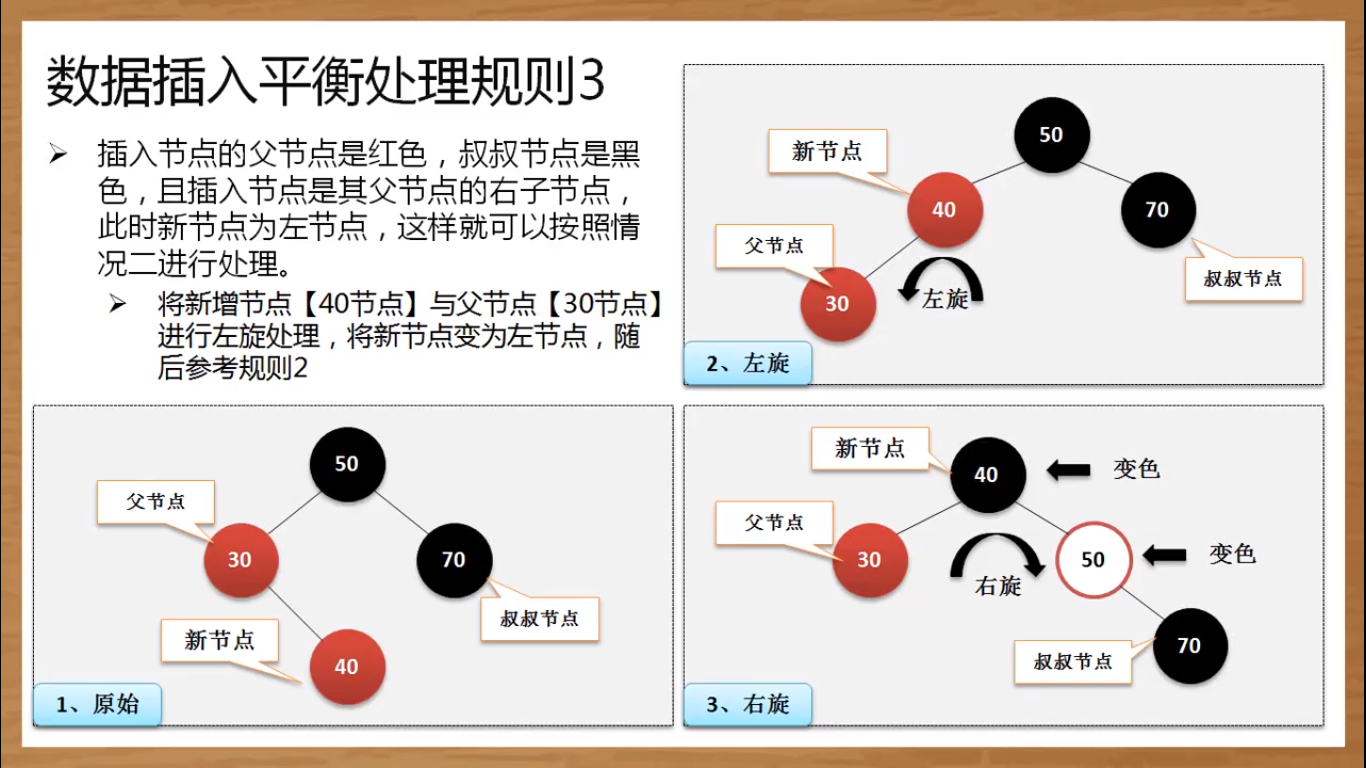
在红黑树进行修复处理中,他需要根据 当前节点 以及 当前节点的父节点 和 叔叔节点 的颜色来推断树是否需要修复处理;
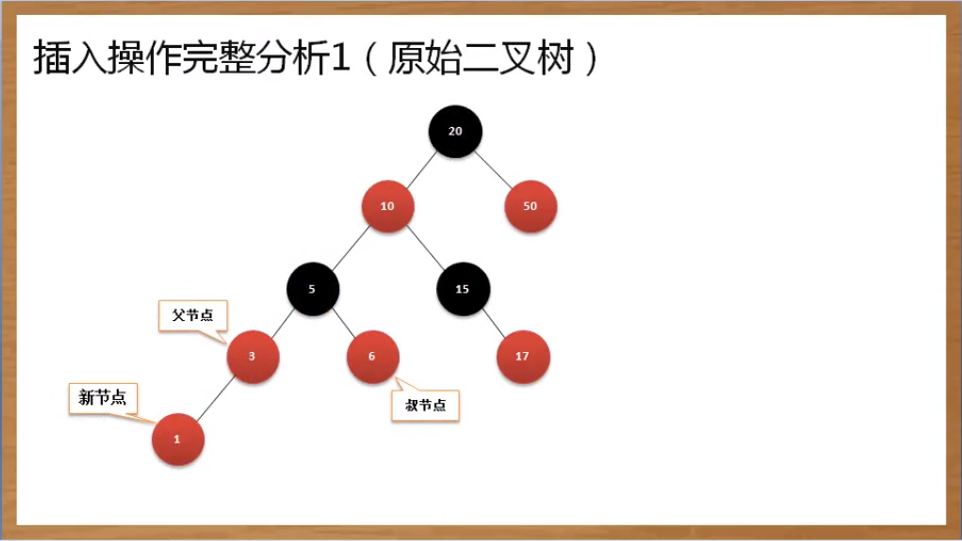
数据删除的平衡修复
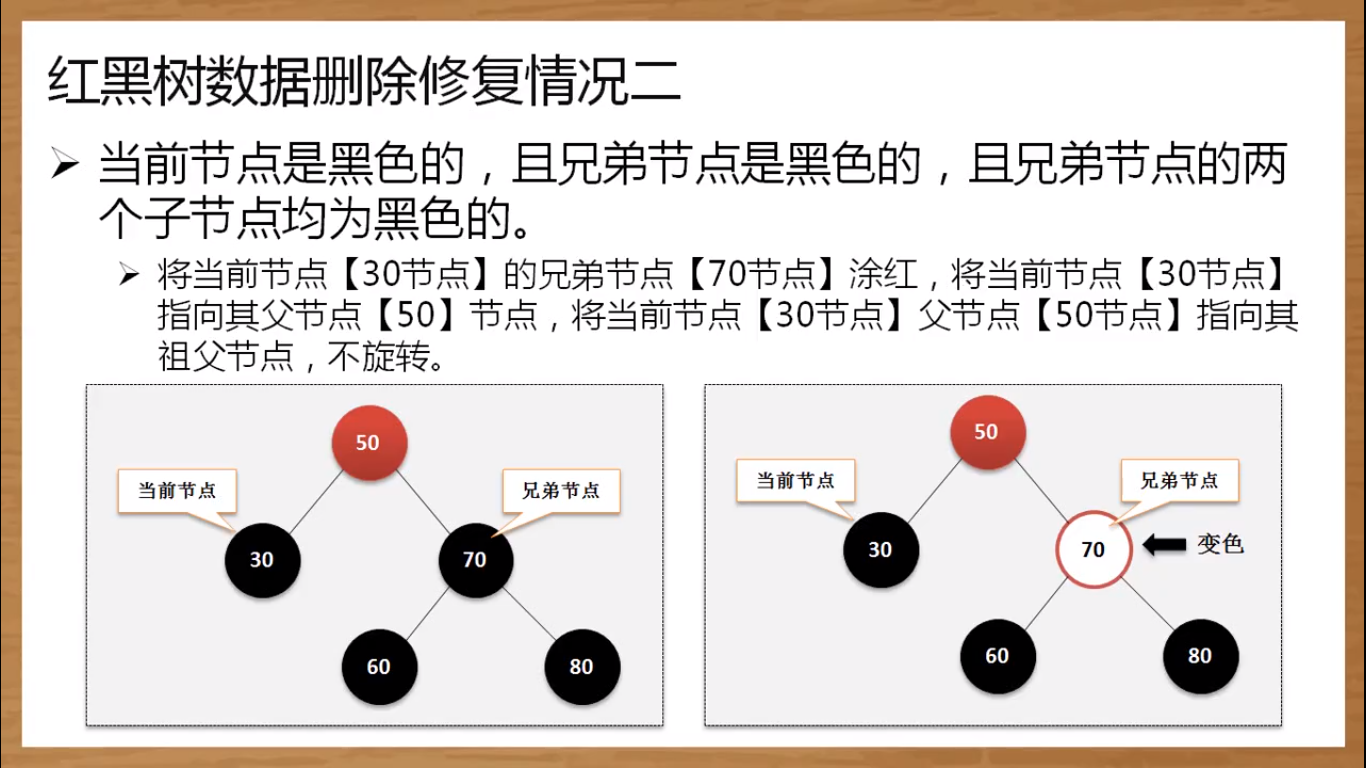
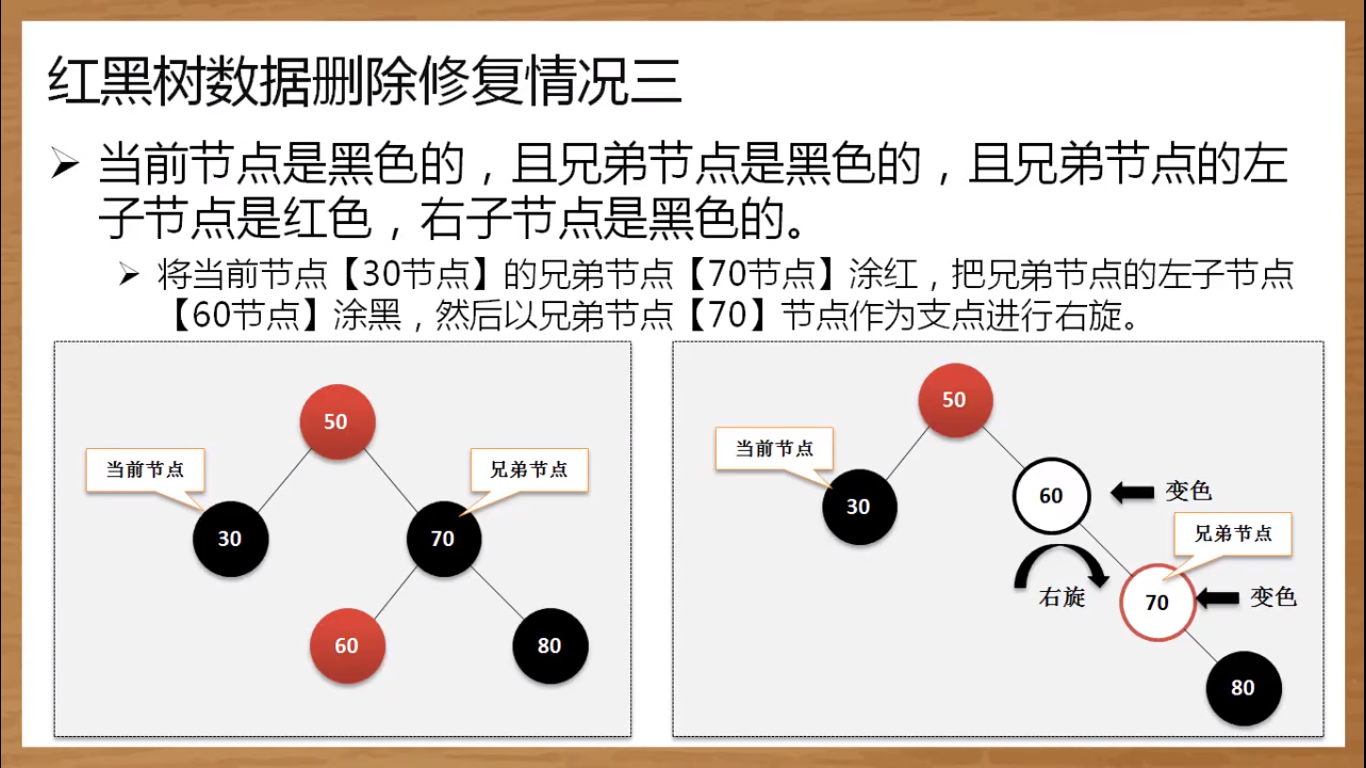
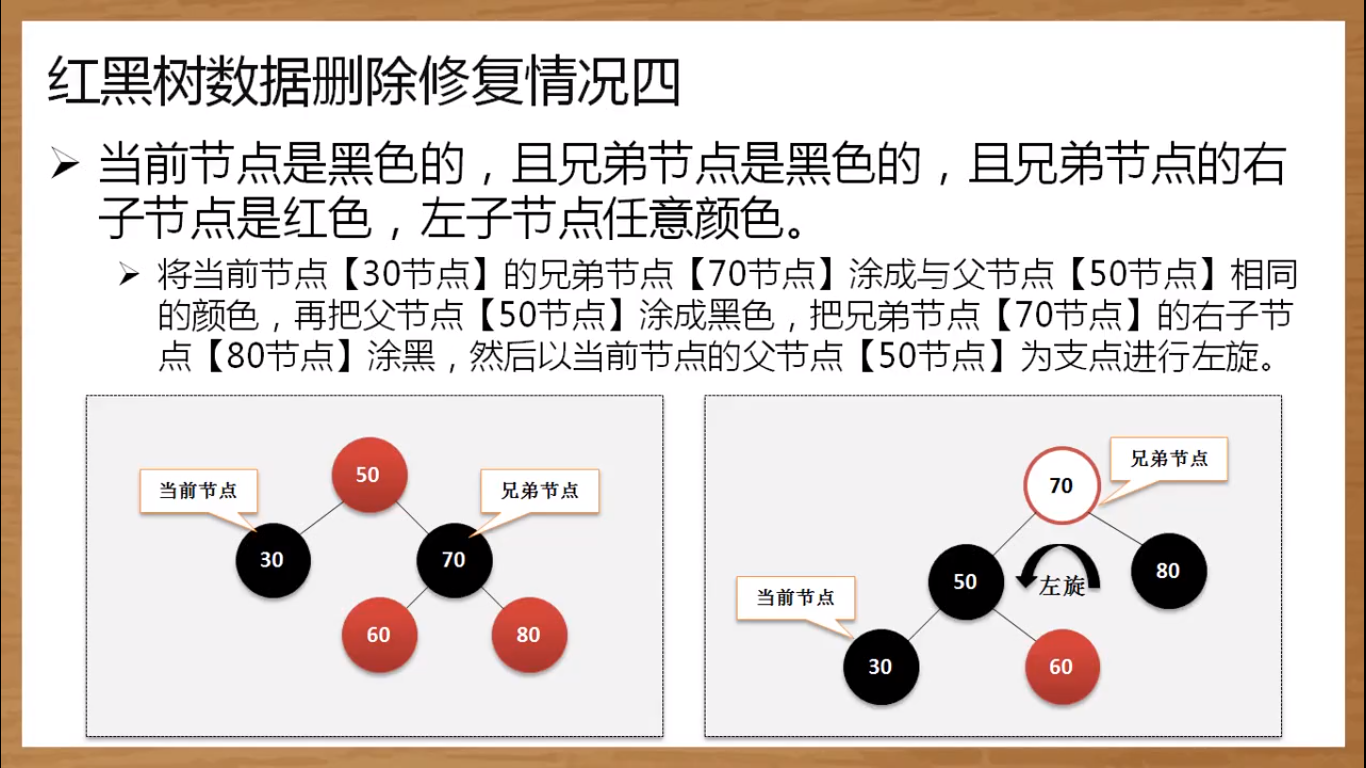
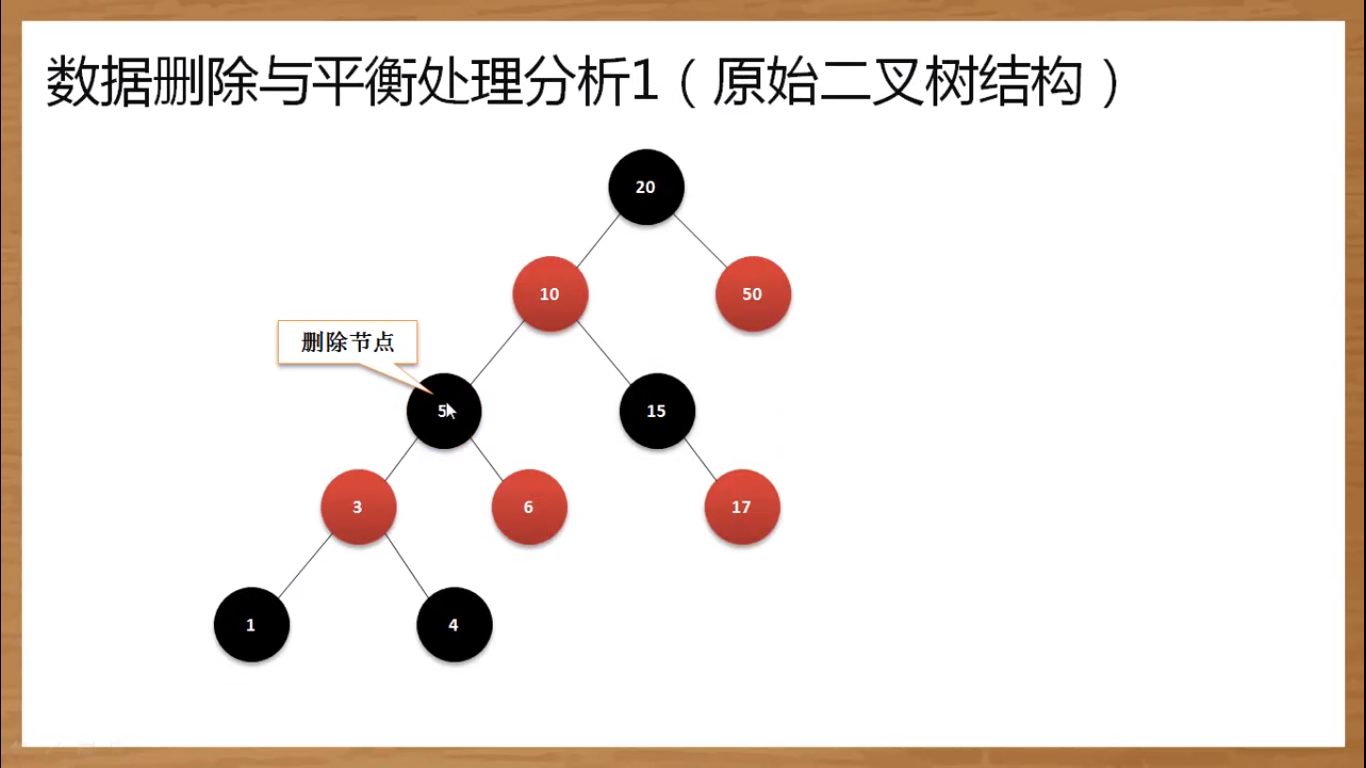
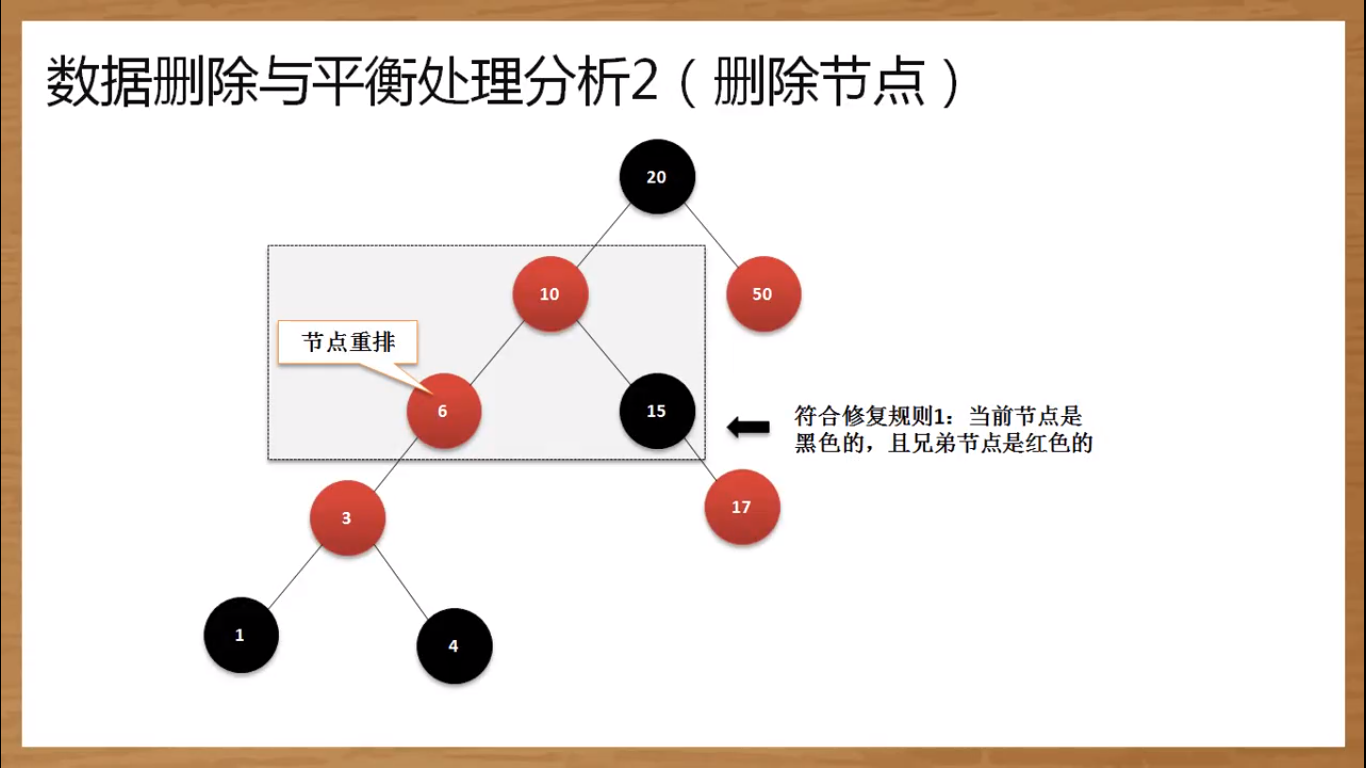
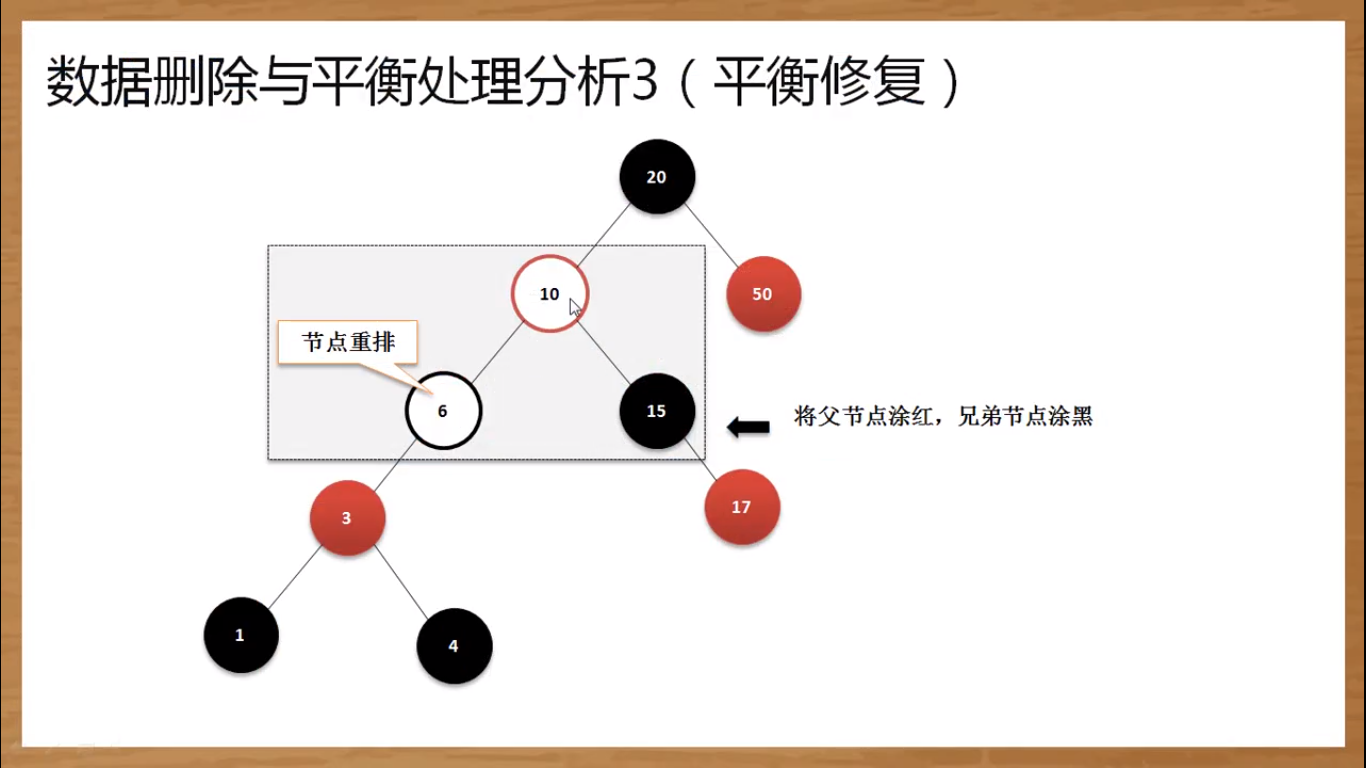
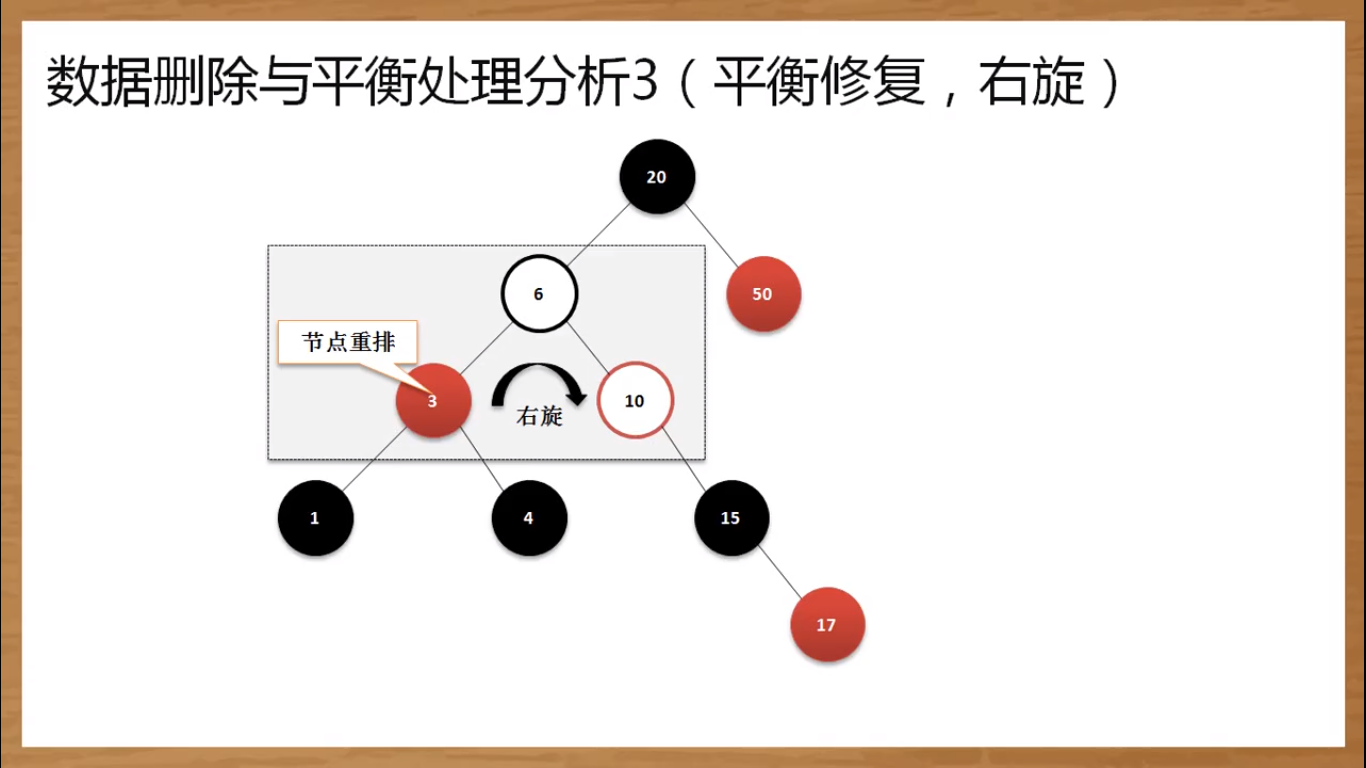
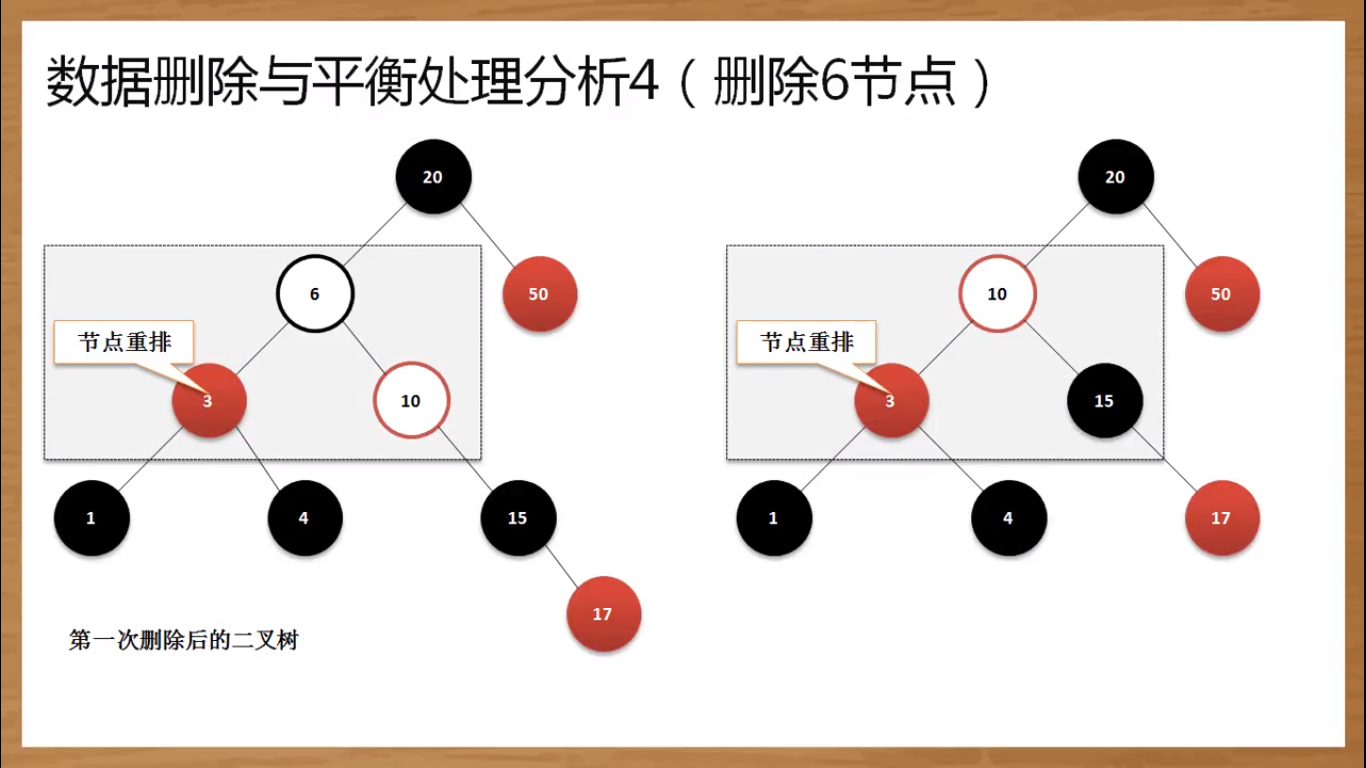
在红黑树之中修复的目的是为了保证树结构中的黑色节点的数量平衡,黑色节点的数量平衡了,那么才可能得到“O(logn)”的执行性能,但是修复的过程一方面是红黑的处理,另一方面就是子节点保存的层次。
类库使用案例分析
1.StringBuffer使用
定义一个StringBuffer类对象,然后通过append()方法向对象中添加26个小写字母,要求每次只添加一次,共添加26次,然后按照逆序的方式输出,并且可以删除前5个字符;
本操作只要是训练StringBuffer类中的处理方法,因为StringBuffer的主要特点是内容允许修改
2
3
4
5
6
7
8
9
10
11
12
13
public static void main(String[] args){
StringBuffer buf = new StringBuffer();
for(int x = 'a';x <= 'z';x++) {
buf.append((char)x);
}
buf.reverse().delete(0, 5);
System.out.println(buf);
}
}
/*
utsrqponmlkjihgfedcba
*/
2. 随机数组
利用Random类产生5个1~30之间(包括1和30)的随机数组
1 | import java.util.Arrays; |
3. Email验证
输入一个Email地址,然后使用正则表达式验证该Email地址是否正确
在这里设置一个单独的验证处理类:
1 | public class JavaApiDemo { |
4. 扔硬币
用0~1之间的随机数来模拟扔硬币试验,统计扔1000次后出现正、反面的次数并输出
1 | import java.util.Random; |
5. IP验证
编写正则表达式,判断给定的是否是一个合法IP地址:第一位内容是无,1,或者2,后面的内容可以0-5,第三位0-9
1 | class Validator{ |
6. HTML拆分
给定下面的HTML代码:
1 | <font face="Arial,Serif" size="+2" color="red"> |
要求对内容进行拆分,拆分之后的结果是:
1 | face Arial,Serif |
对于此时最简单的方法就是进行分组处理
1 | import java.util.regex.Matcher; |
7. 国家代码
编写代码,实现国际化应用,从命令行输入国家的代码,例如:1代表中国,2代表美国,然后根据输入代码的不同调用不同的资源文件显示信息;
这个程序肯定要通过Locale类的对象来指定区域,然后利用ResourceBundle类来加载资源文件,而对于数据的输入可以继续使用初始化的参数形式来完成;
- 定义中文资源文件
- 定义英文资源文件
- 定义程序类进行加载控制
2
3
4
5
6
7
8
9
10
11
12
13
14
15
16
17
18
19
20
21
22
23
24
25
26
27
28
29
30
31
32
33
34
35
36
37
38
39
40
41
42
import java.util.ResourceBundle;
class MessageUtil {
public static final int CHINA = 1;
public static final int USA = 2;
public static final String KEY = "info";
public static final String BASENAME = "cn.jubingyi.message.Message";
public String getMessage(int num) {
Locale loc = this.getLocale(num);
if (loc == null) {
return "Nothing";
}else {
return ResourceBundle.getBundle(BASENAME, loc).getString(KEY);
}
}
private Locale getLocale(int num) {
switch (num) {
case CHINA:
return new Locale("zh", "CN");
case USA:
return new Locale("en", "US");
default:
return null;
}
}
}
public class JavaApiDemo {
public static void main(String[] args) {
if (args.length != 1) {
System.out.println("程序执行错误,没有设置地区编码");
System.exit(1);
}
int choose = Integer.parseInt(args[0]);
System.out.println(new MessageUtil().getMessage(choose));
}
}
/*
1 感谢老铁刷的火箭!
2 Thanks for Mr.Tie's Rocket!
*/
8. 学生信息比较
按照“姓名:年龄:成绩|姓名:年龄:成绩”的格式定义字符串“张三:22:89|王五:20:70”,要求将每组值分别保存在student对象之中,并对这些对象进行排序,排序的原则为:按照成绩由高到低排列,如果成绩相同则按年龄由低向高排序。
是一个直接的做法按照比较器来完成
1 | import java.util.Arrays; |